A collection of walks, discoveries, insights and pictures of exploring Dartmoor National Park
March 13, 2024
Gobbett Tinners Mill
Gobbett Tinners Mill is very unique for Dartmoor, insofar as it has crazing mill stones, mortar stones and mould stones showing that during its operational life it had a triple purpose (ie grinding, knocking and smelting). It is believed that the site was partially robbed in the 19th century when the buildings at Gobbett Mine, 180m away, were constructed. Access to the mill is very straight forward being in a hollow just 7m from the tarmac road which leads up the Swincombe Valley to a small reservoir.
The Dartmoor Tin Research Group (DTRG) in a conference booklet from 2016, state that there is no known documentary evidence for the mill, but state that a sherd dating from 14th / 15th century was found here in 1998, which may assist in its dating. There have been many eminent recorders of this mill and the stone artefacts contained therein over the centuries and these include Amery (1870), Burnard (1888/9), Newcomen Society (1929), Worth (1940), Parsons (1956), Greeves and Robinson (1984), the Historical Metallurgy (1986) and Butler (1991). This humble post is merely a photographic record of the mill recording the key features such as the Crazing Mill Stones, Mould Stones, Mortar Stones, (probable) Site of Furnace and Leat courses which have been so well recorded and published by those who have come before.
Celebrating the Tinworking Landscape of Dartmoor in its European Context: Prehistory to 20th Century – 2016 Conference Booklet & Field Guide (Dartmoor Tin Research Group – DTRG)
Jeremy Butler (1991) – Dartmoor Atlas of Antiquities, South East, Map 62, Figure 62.5 (page 211)
Wikipedia – Dartmoor Tin Mining – https://en.wikipedia.org/wiki/Dartmoor_tin_mining
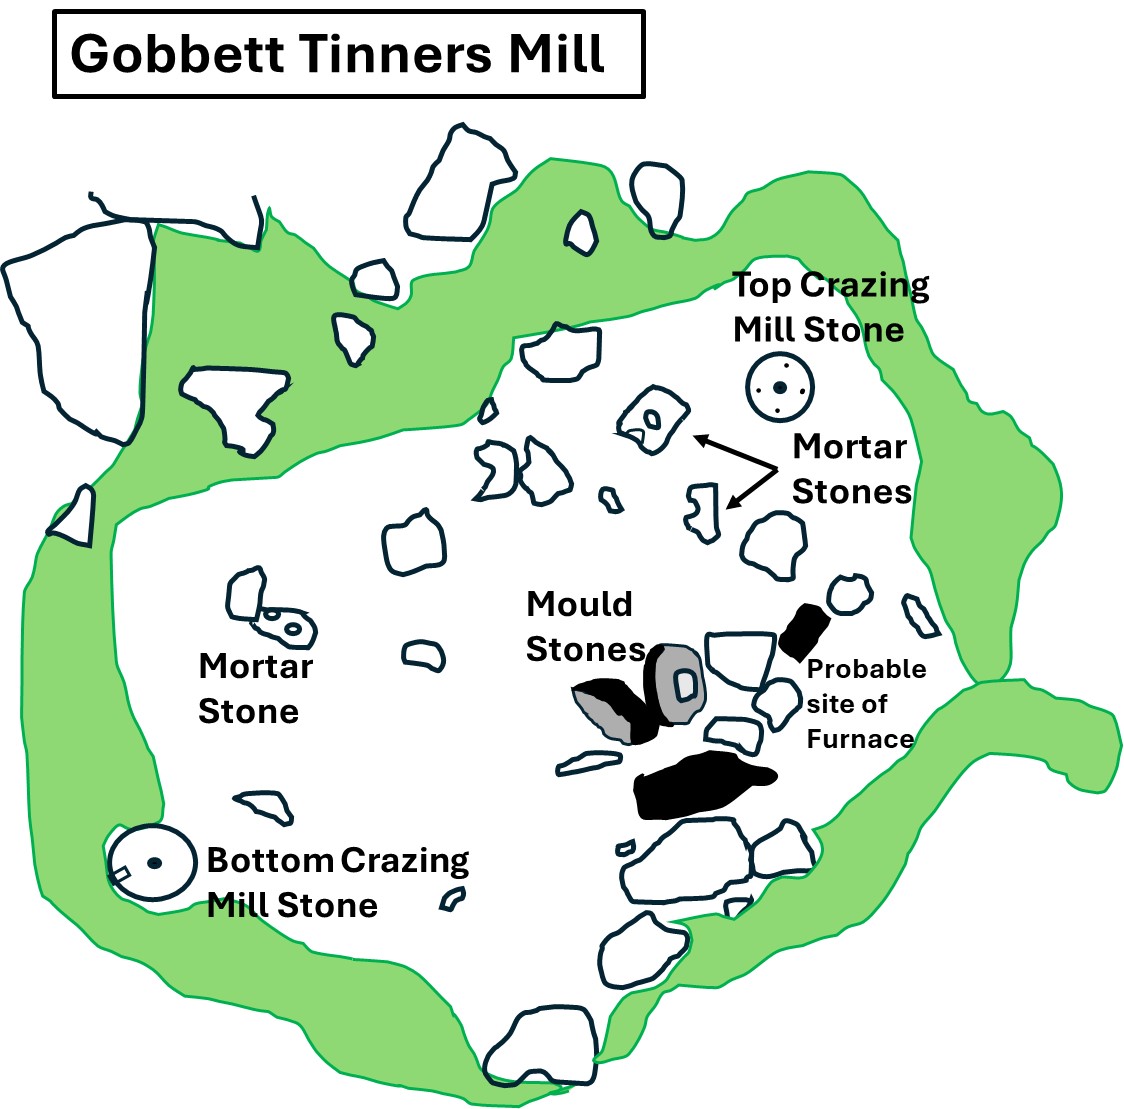
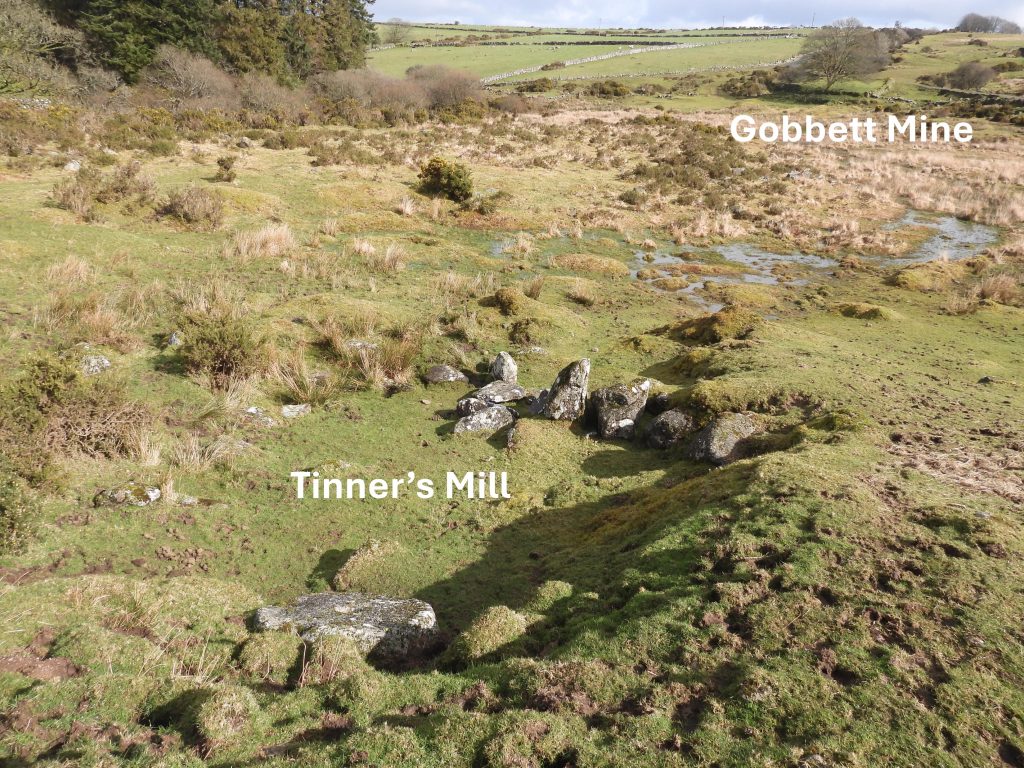
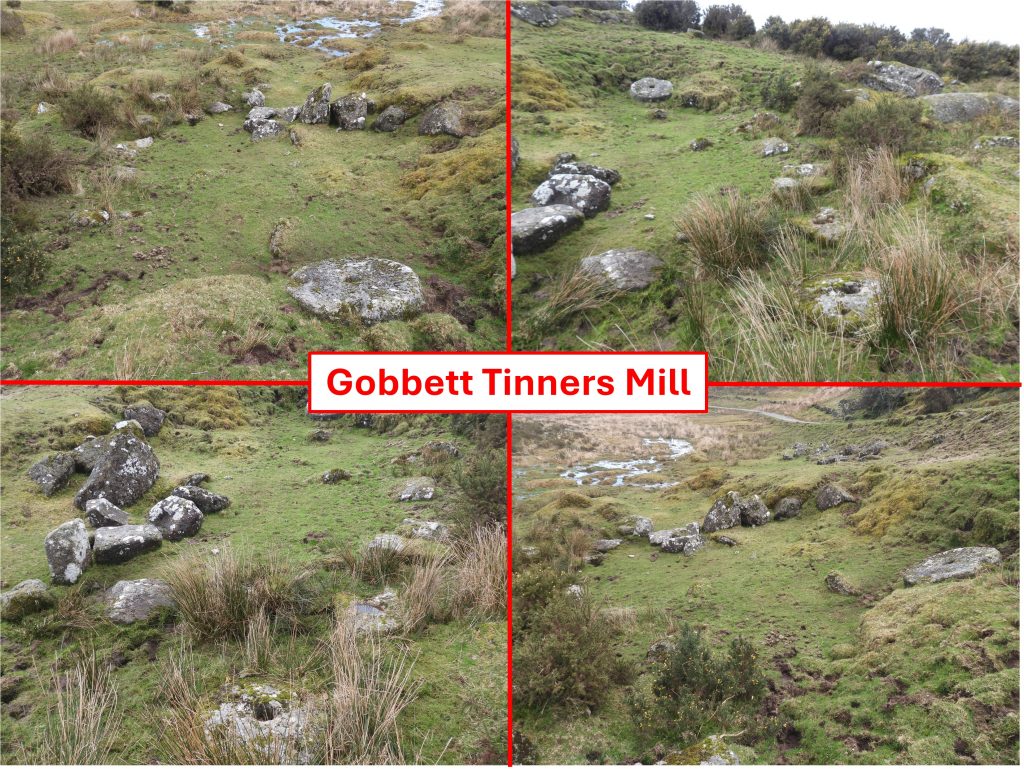
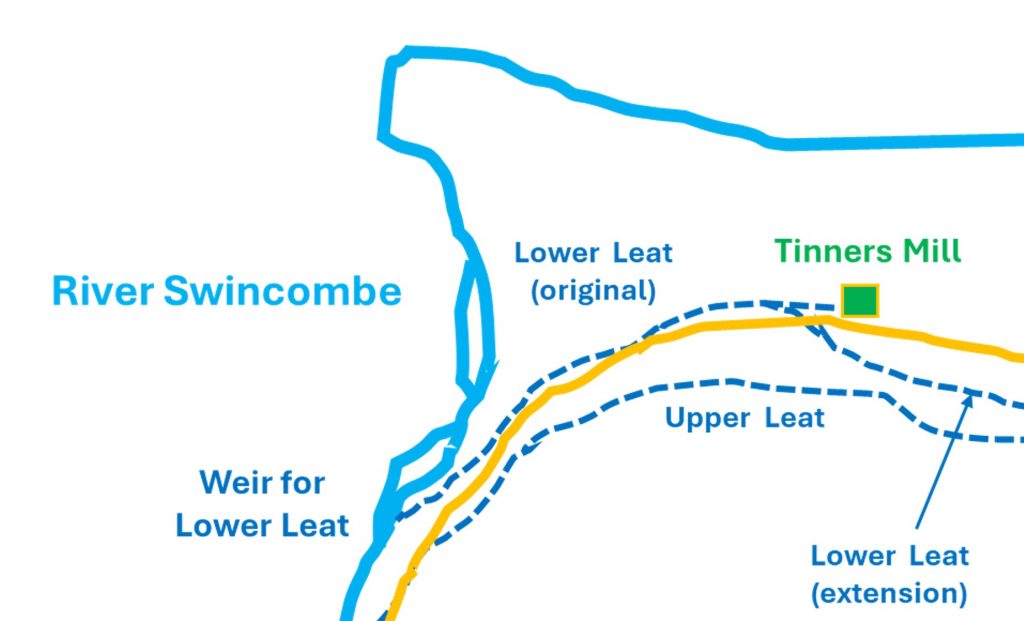
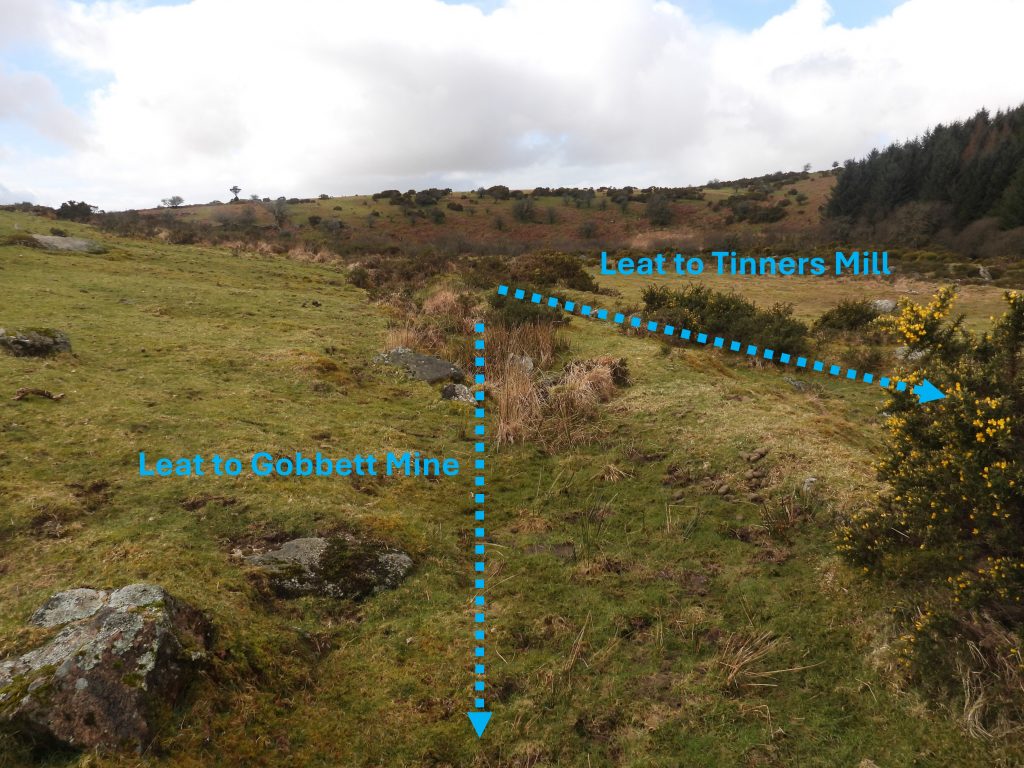
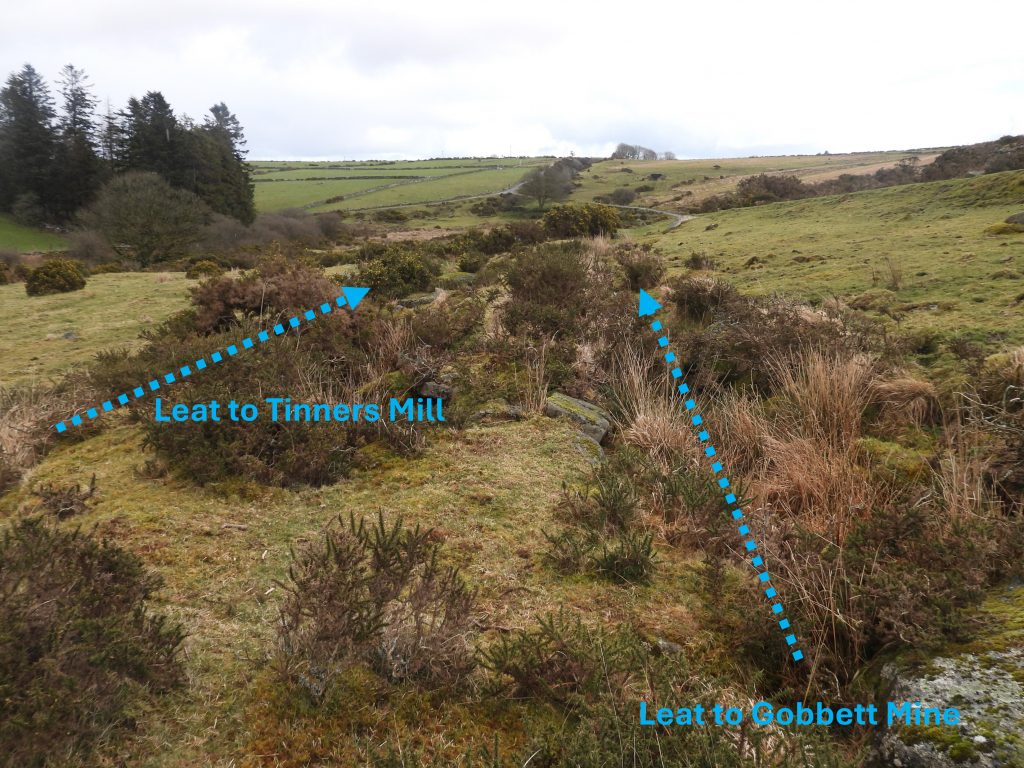
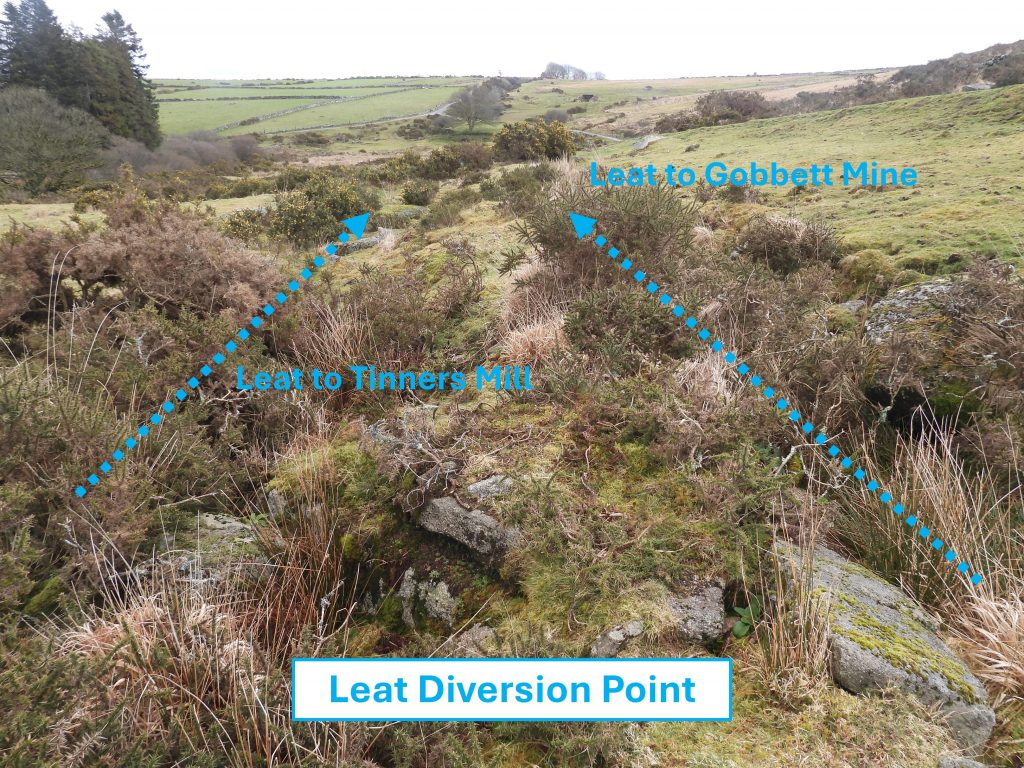
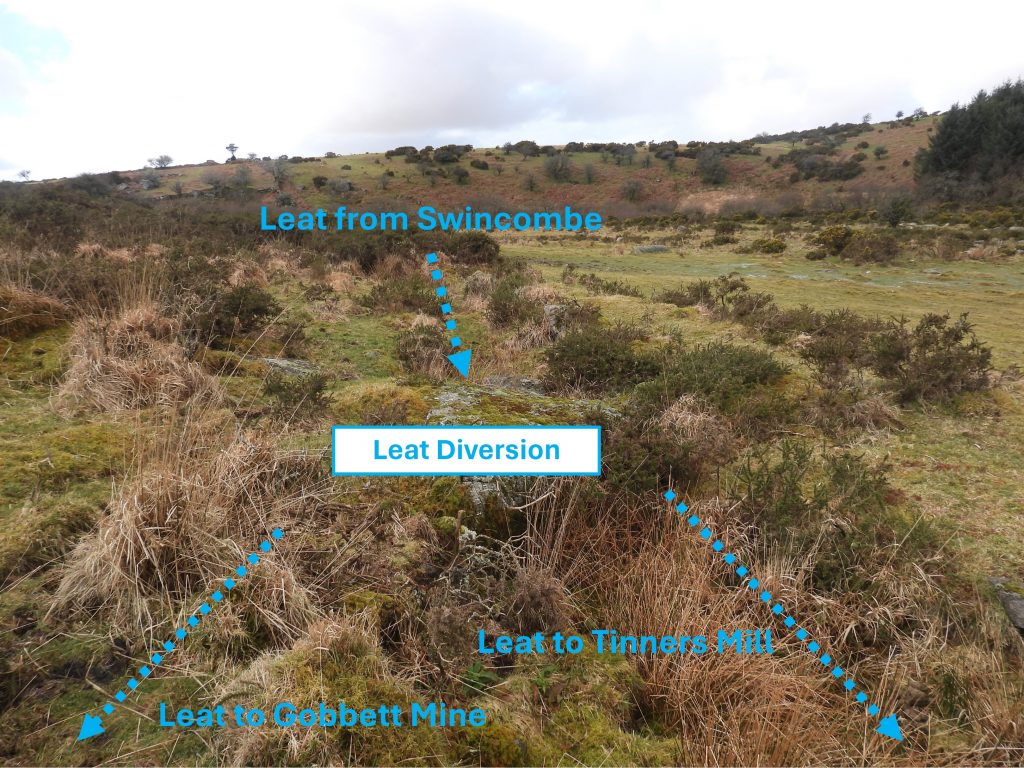
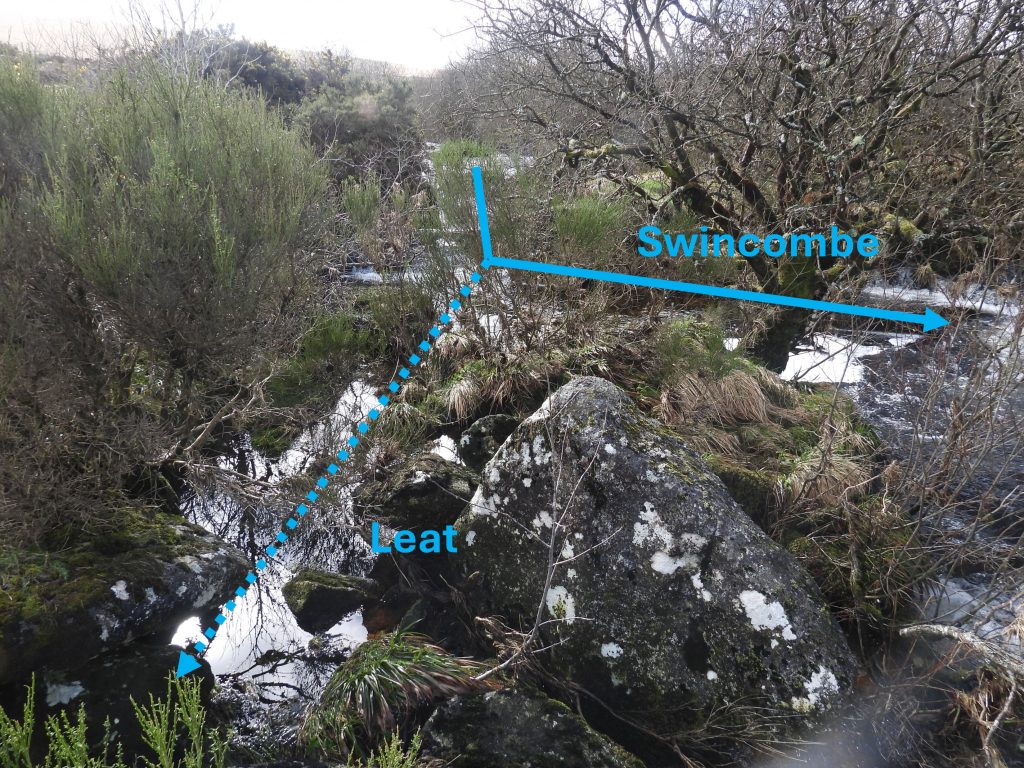
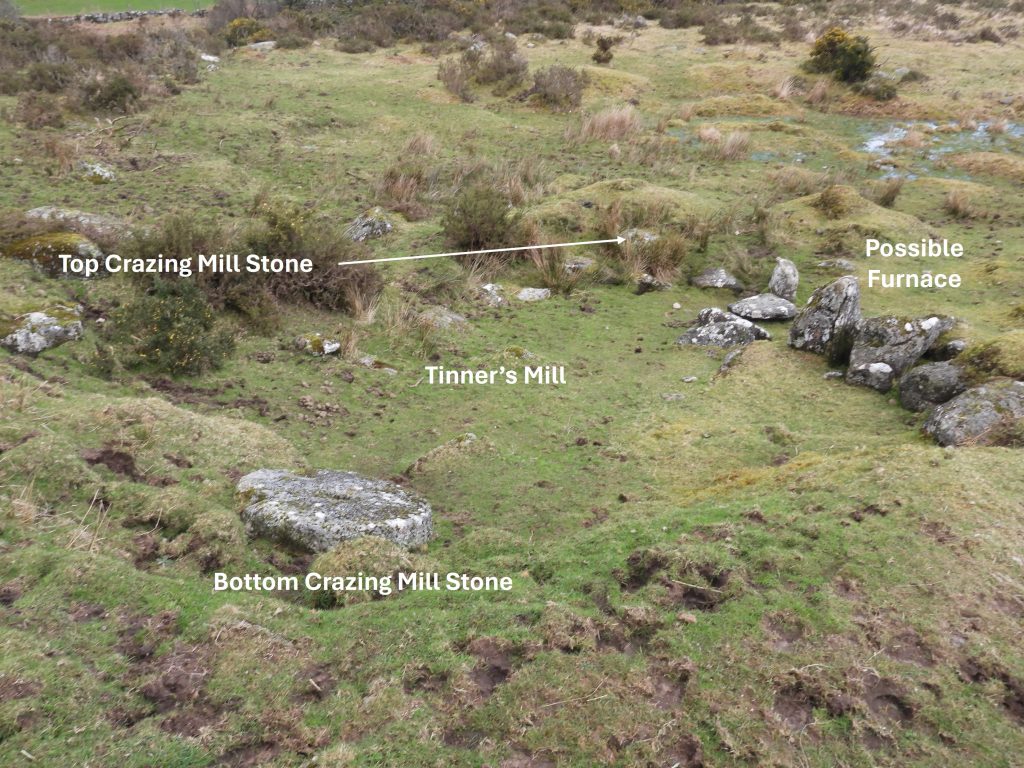
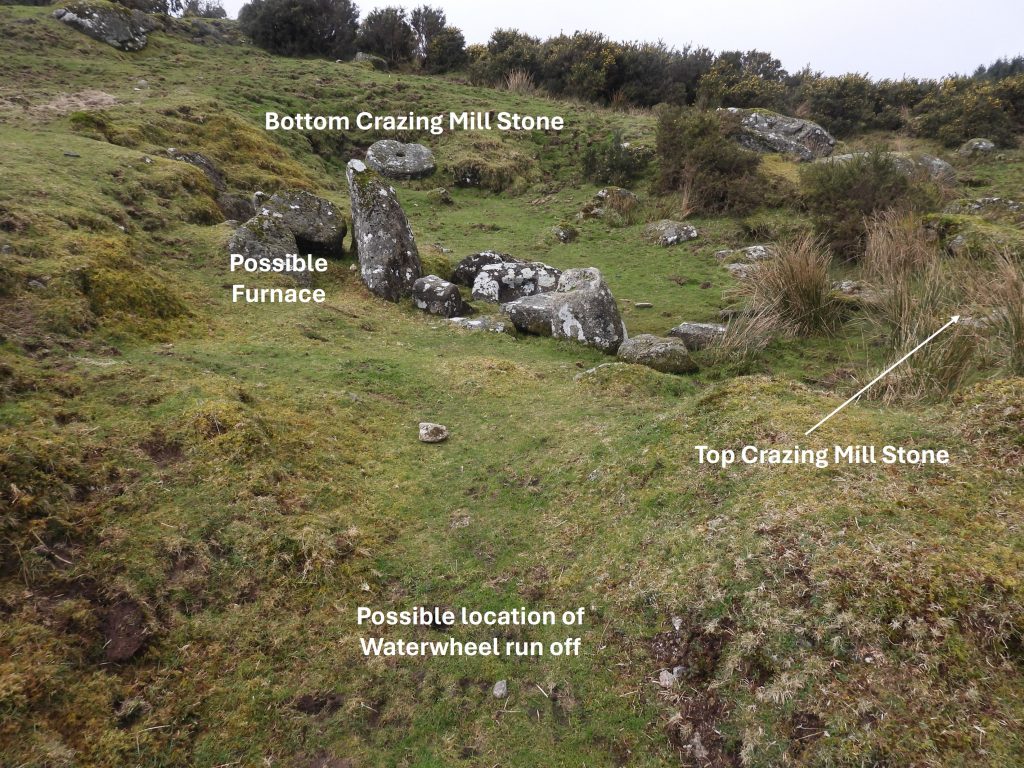
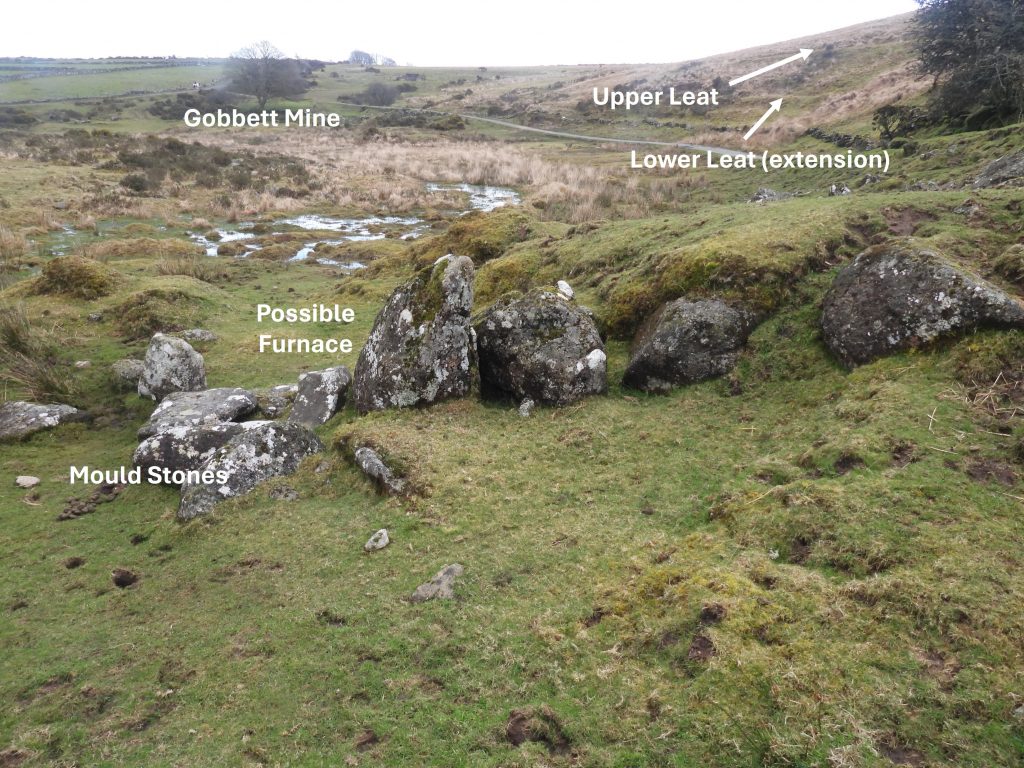
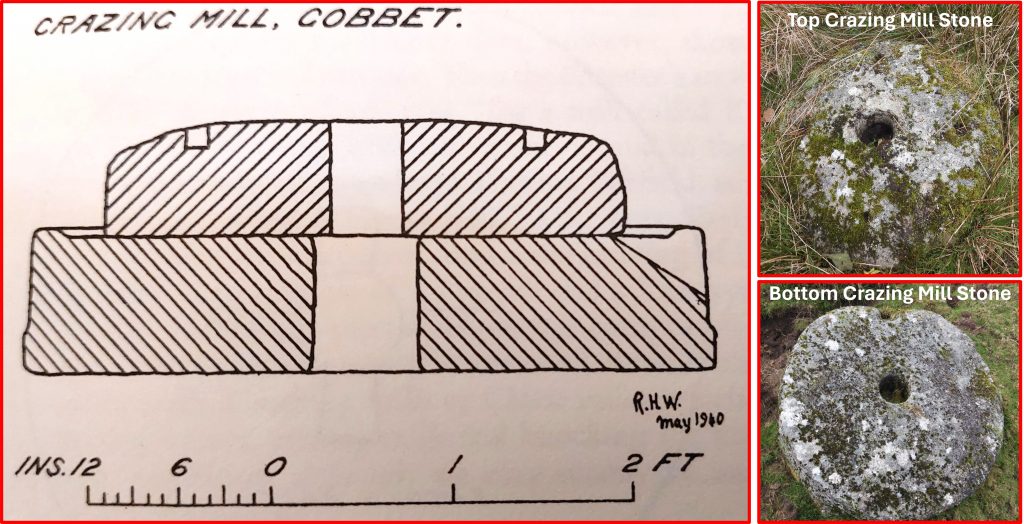
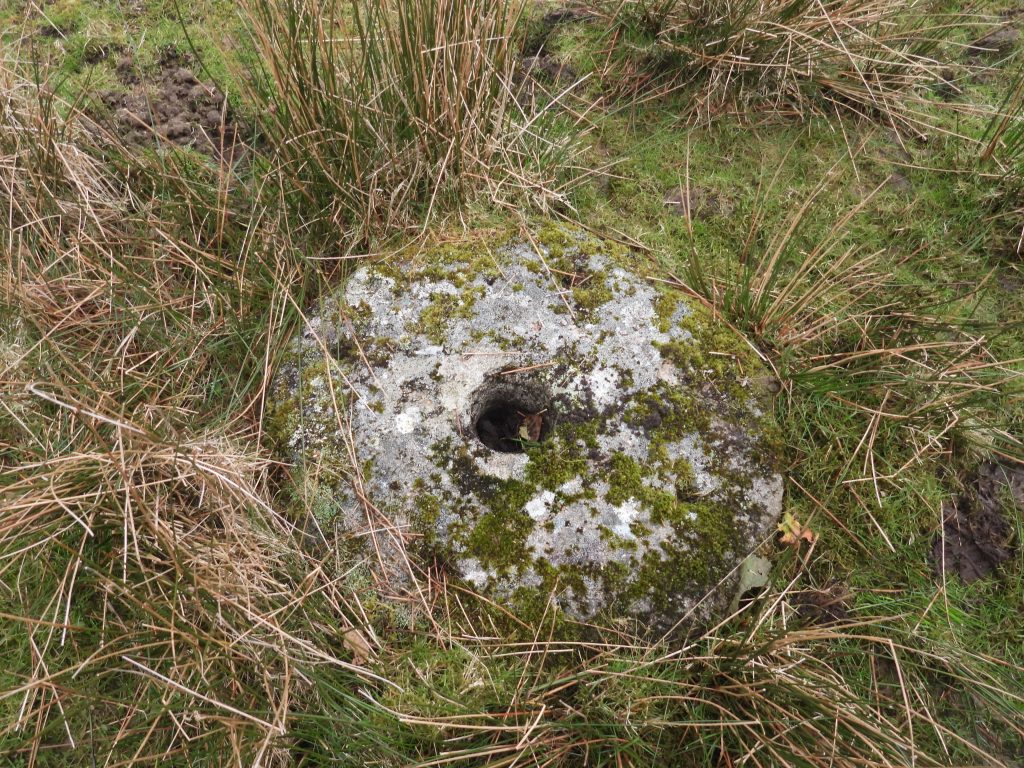
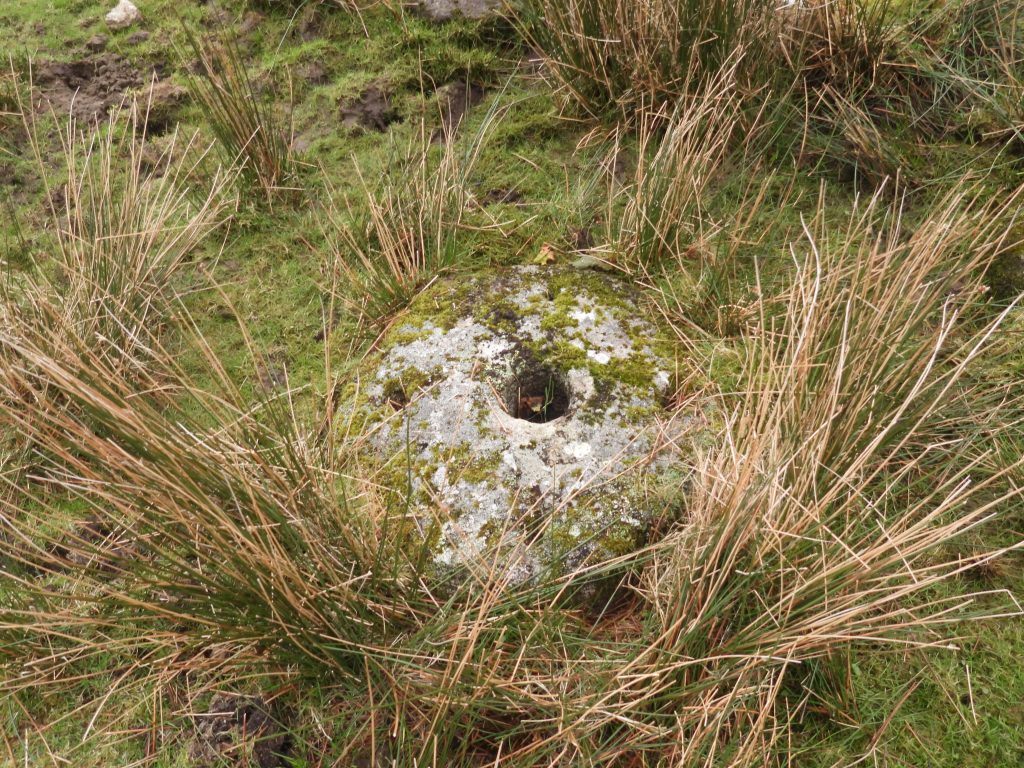
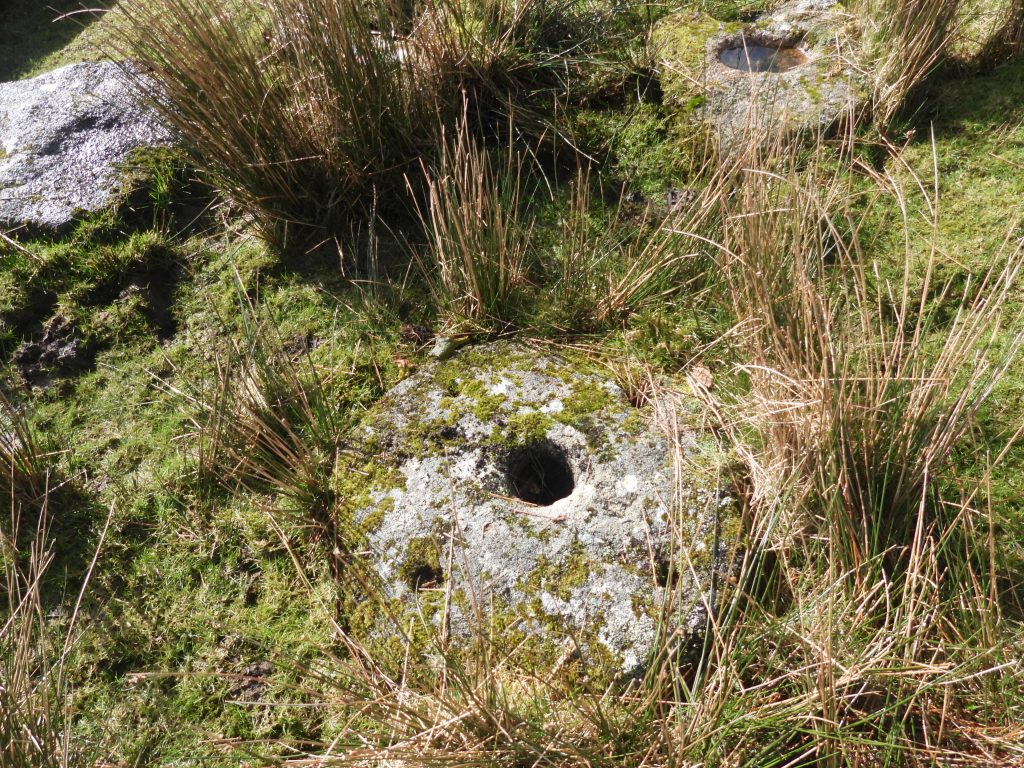
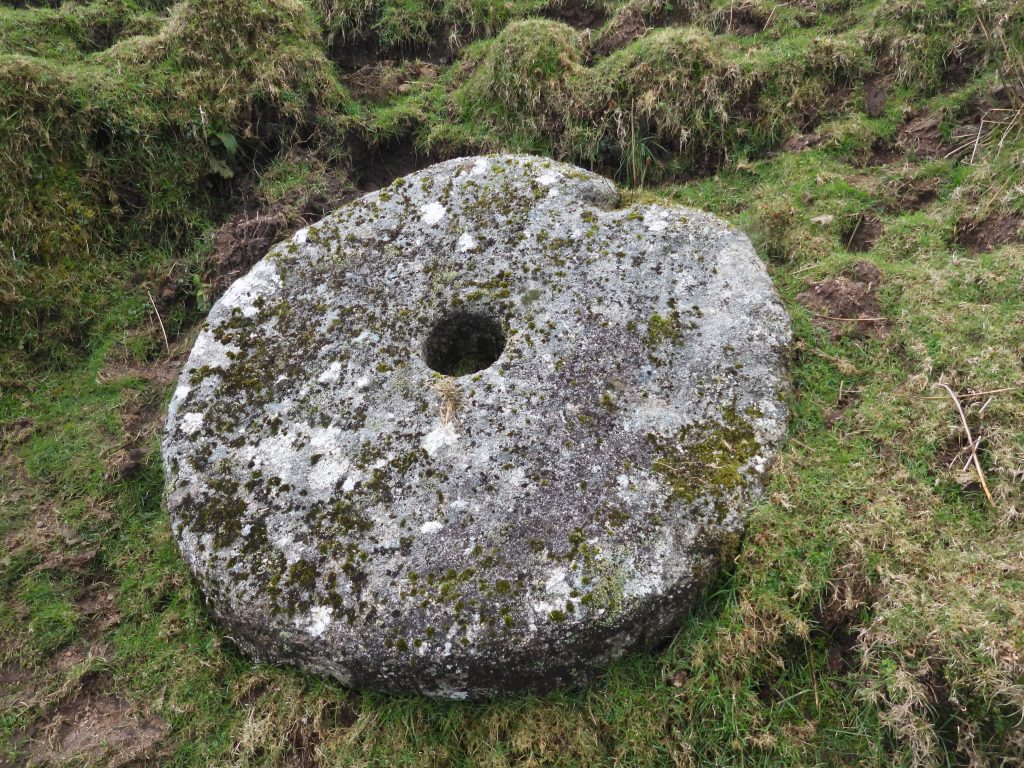
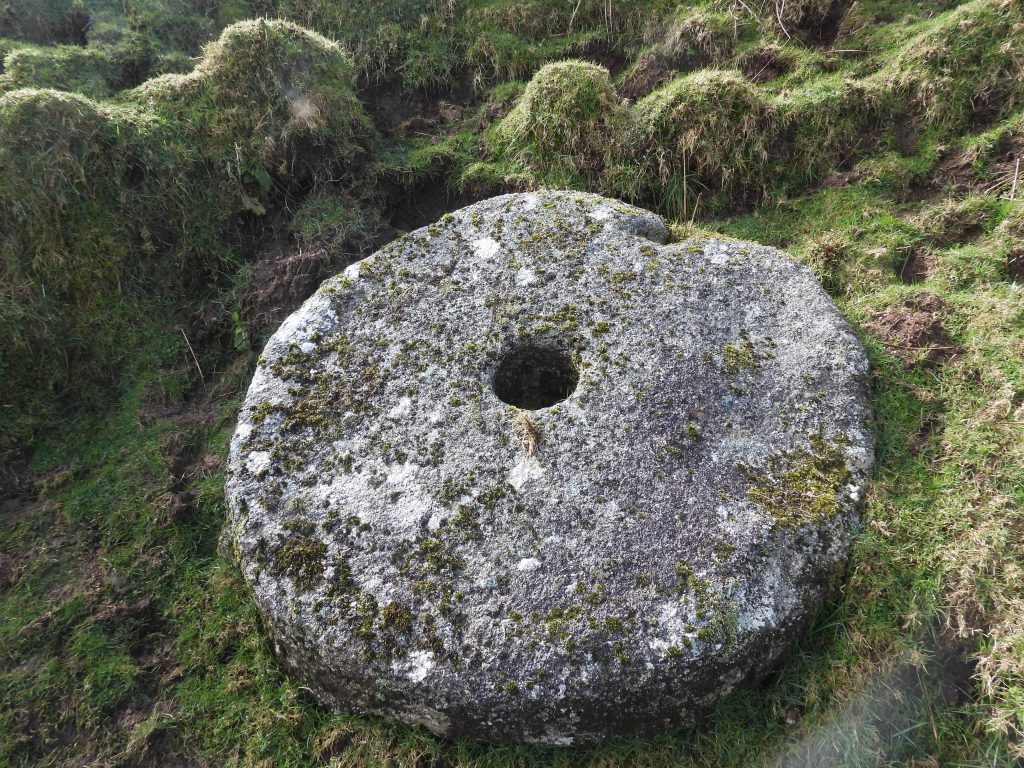
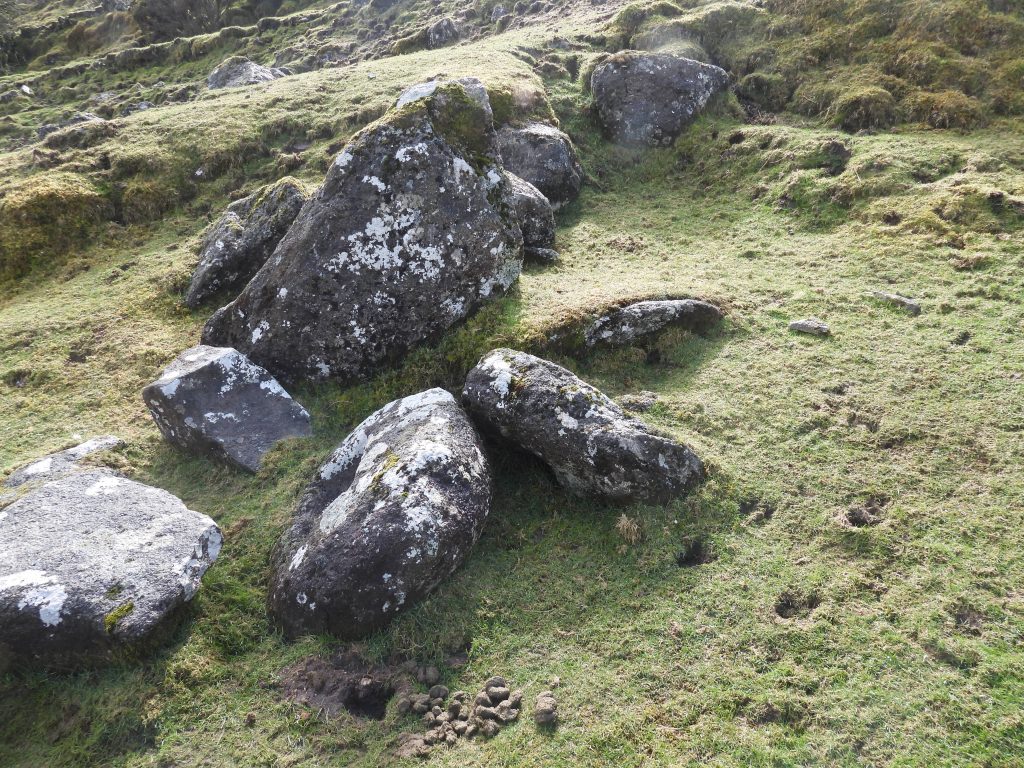
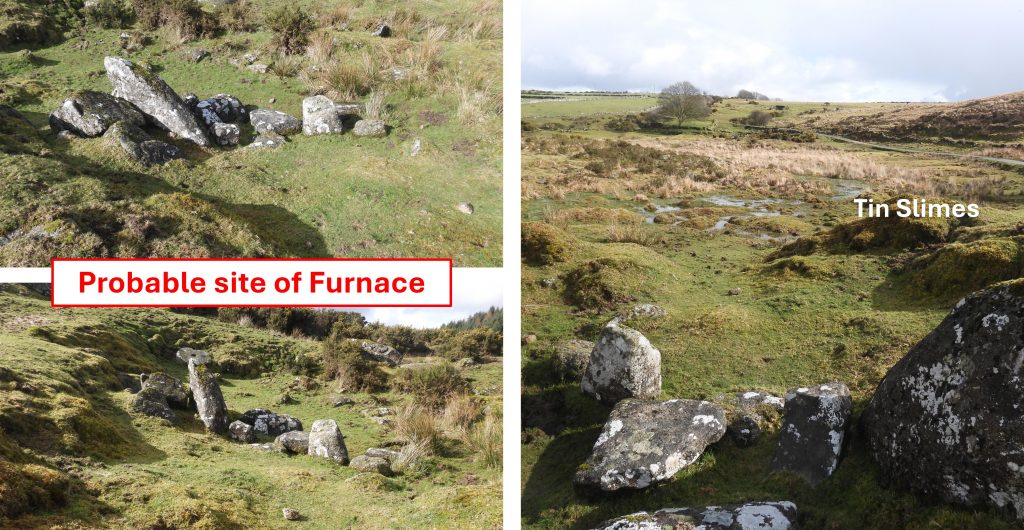
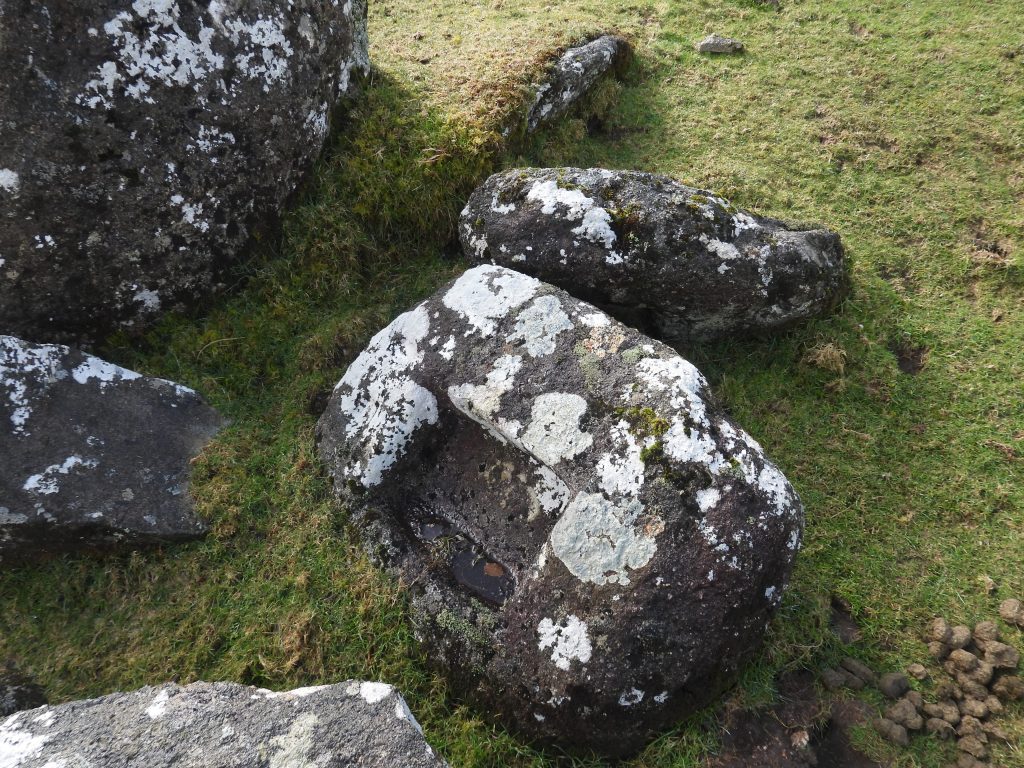
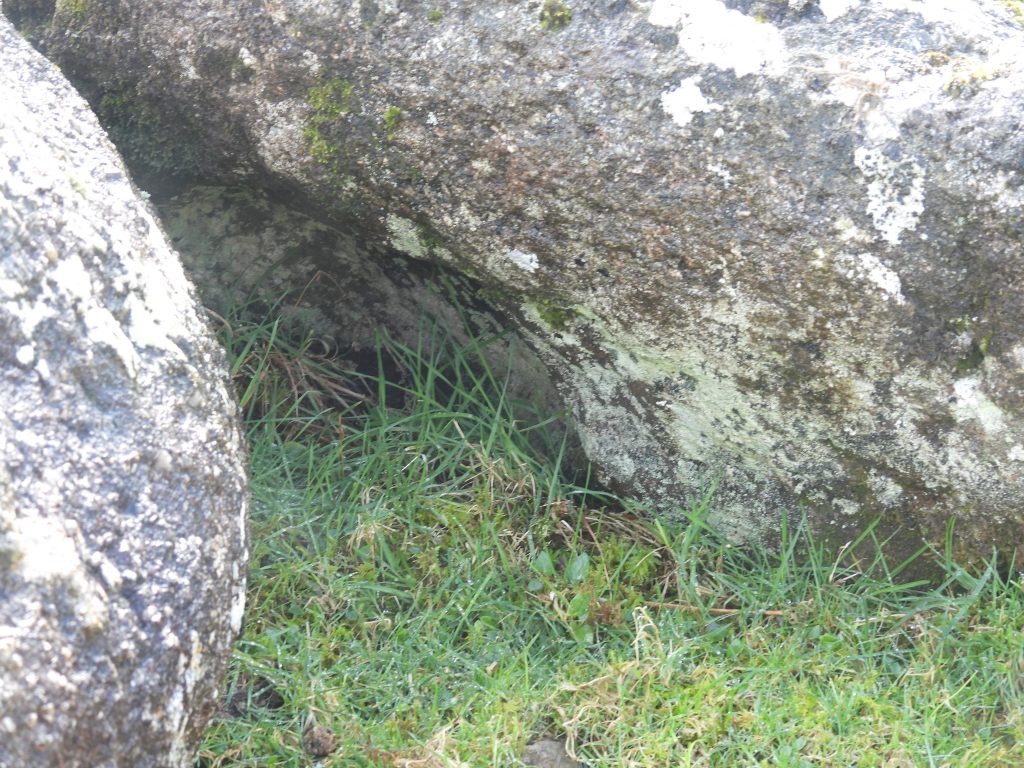
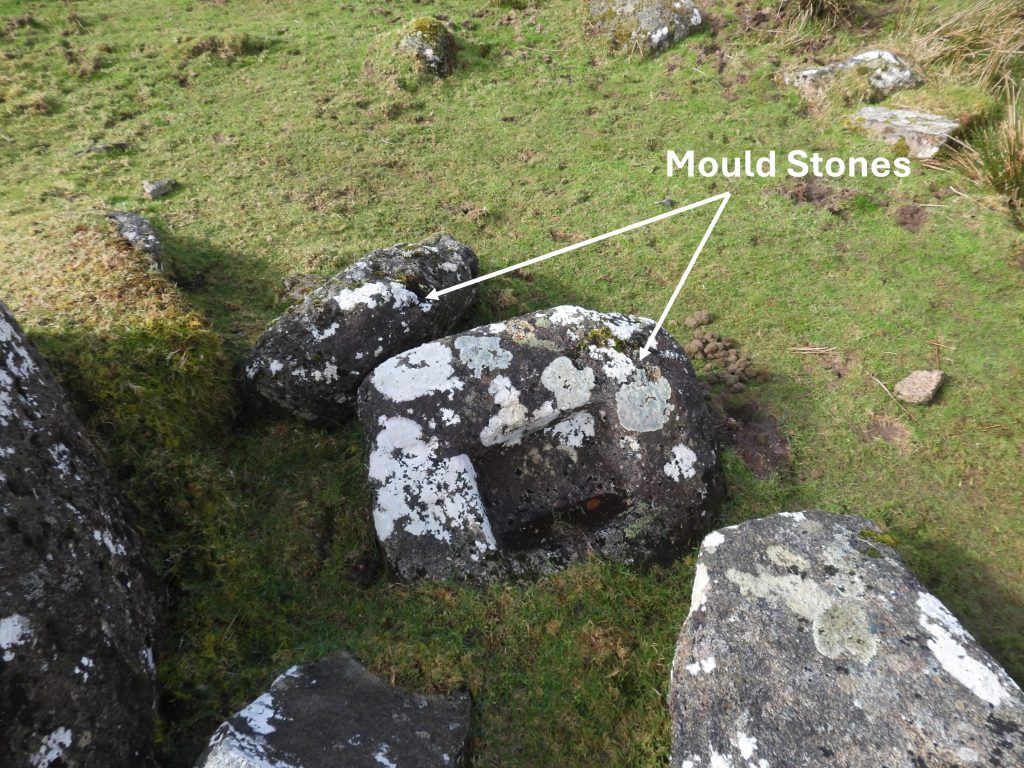
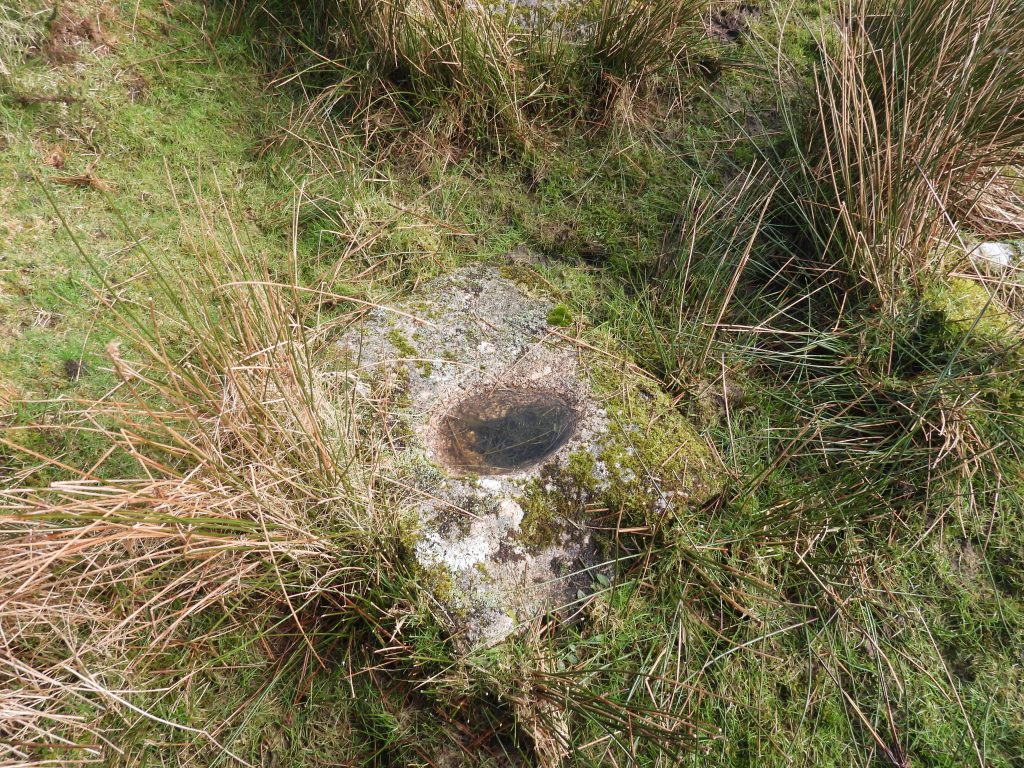
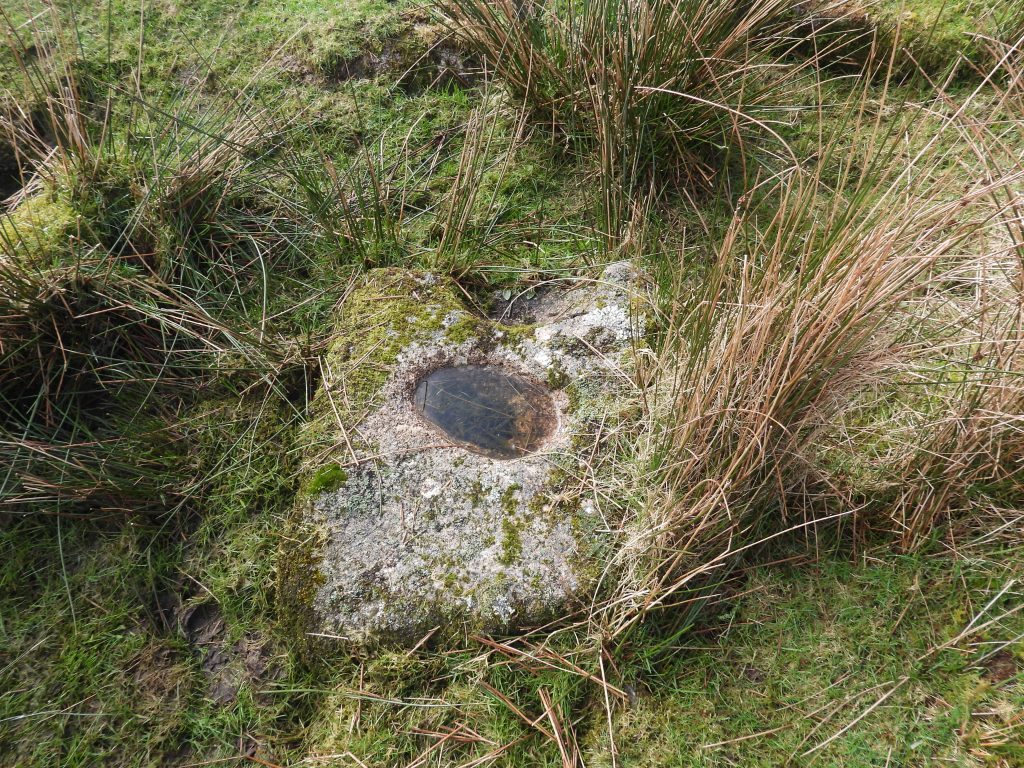
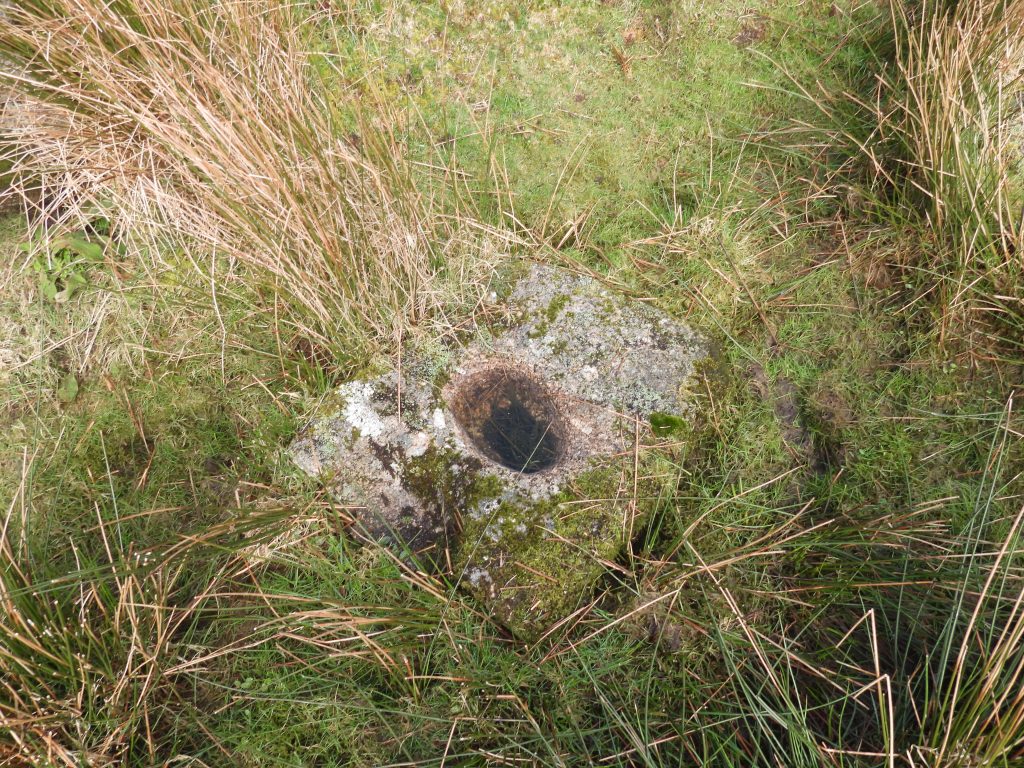
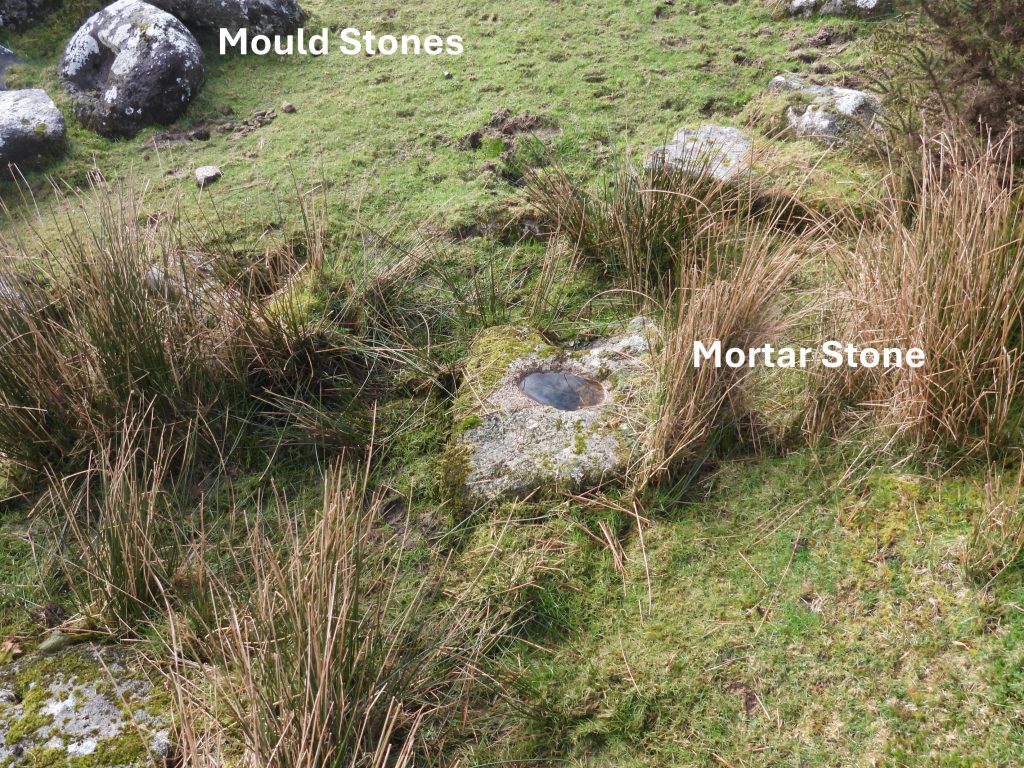
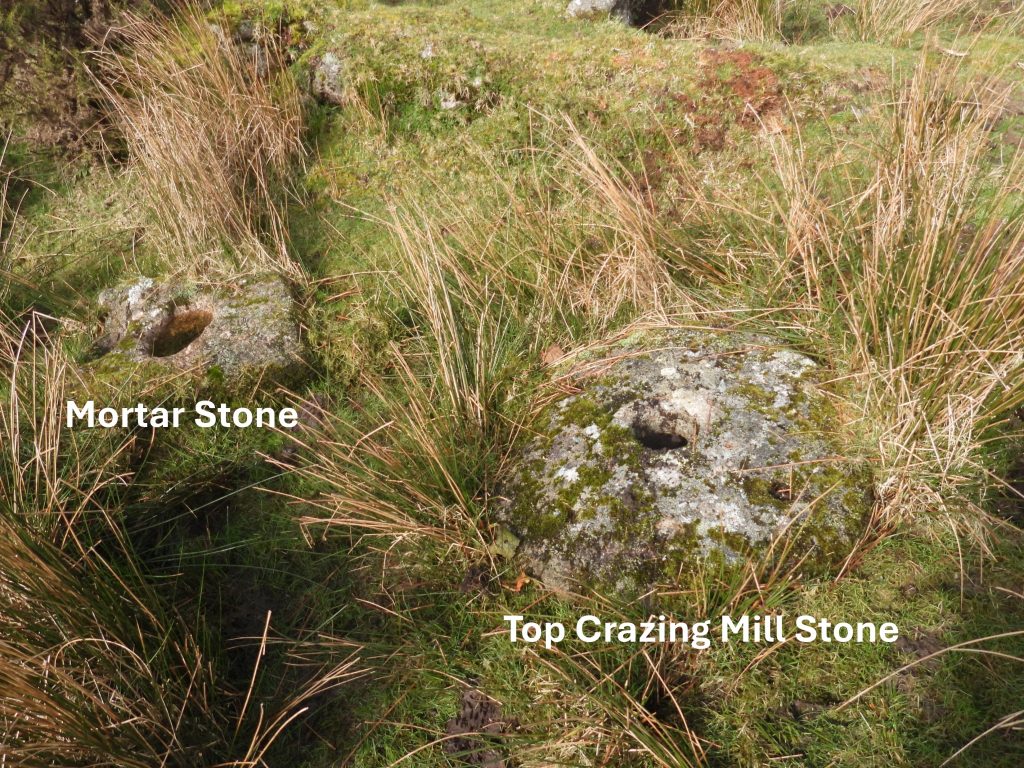
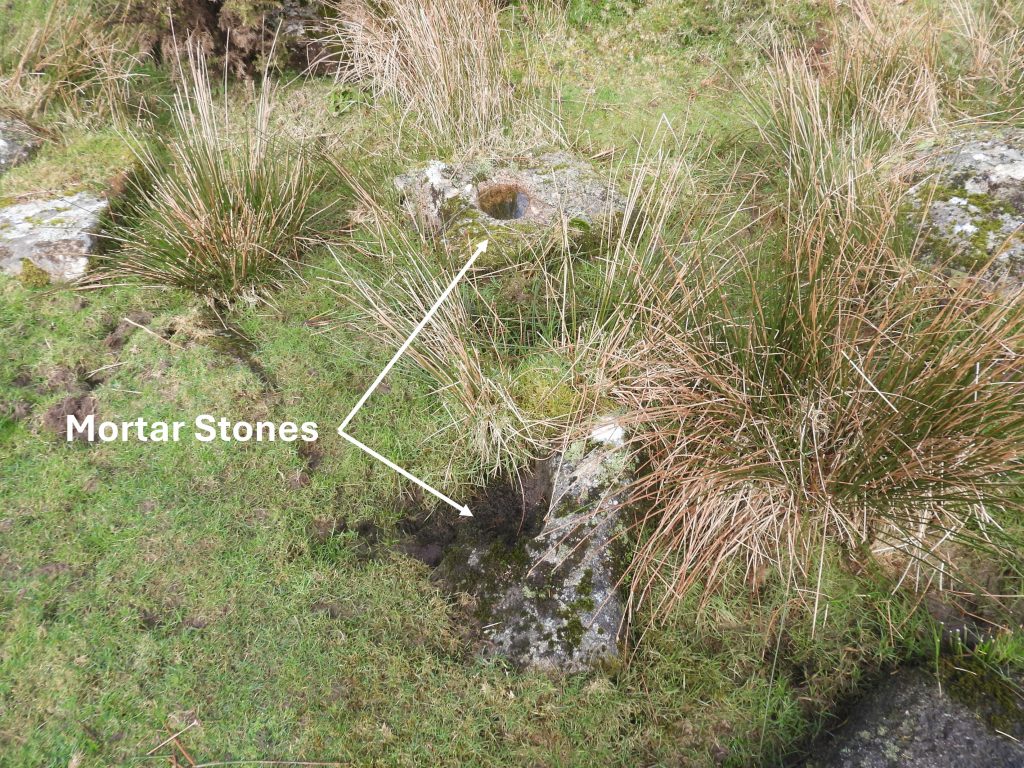
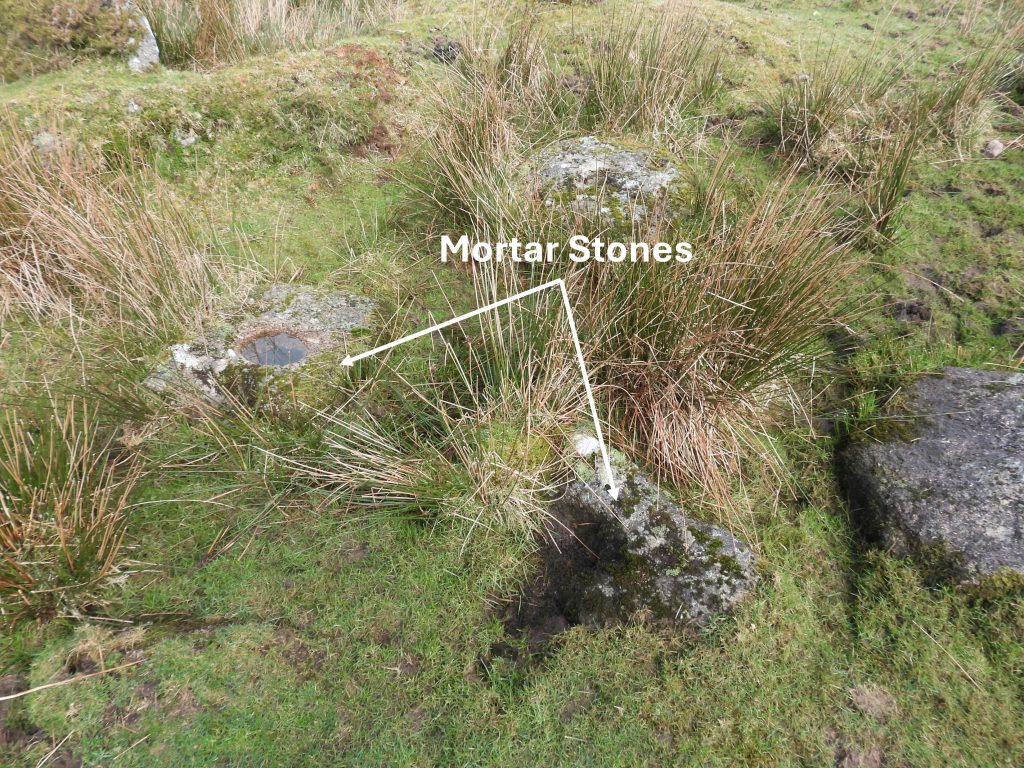
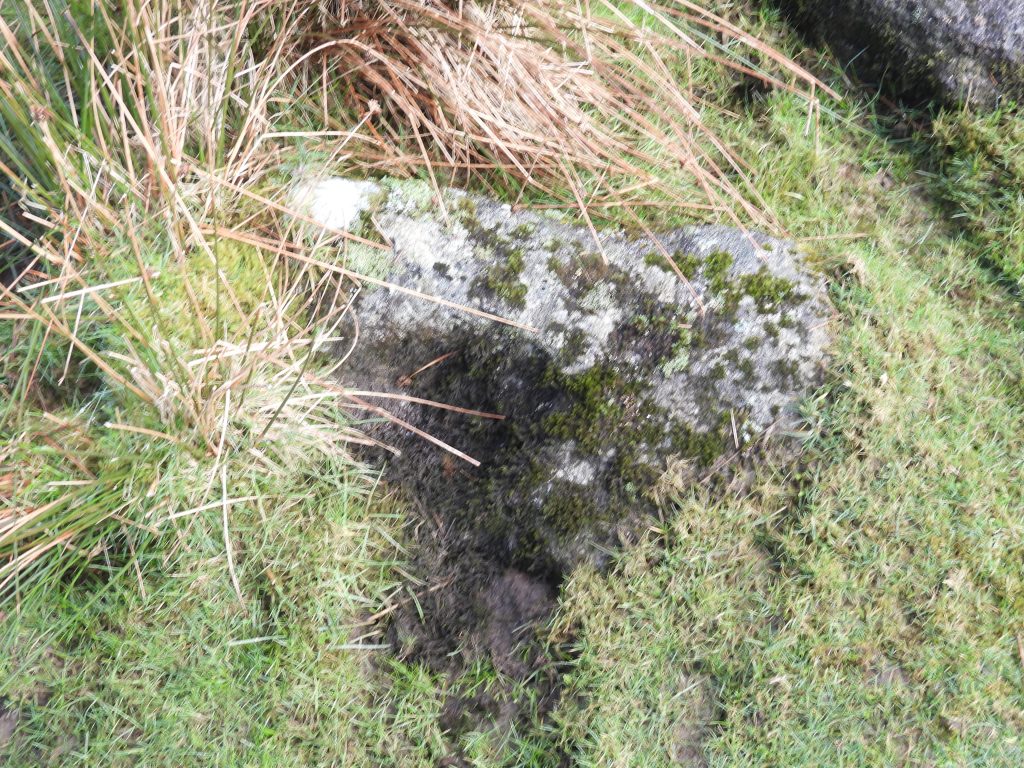
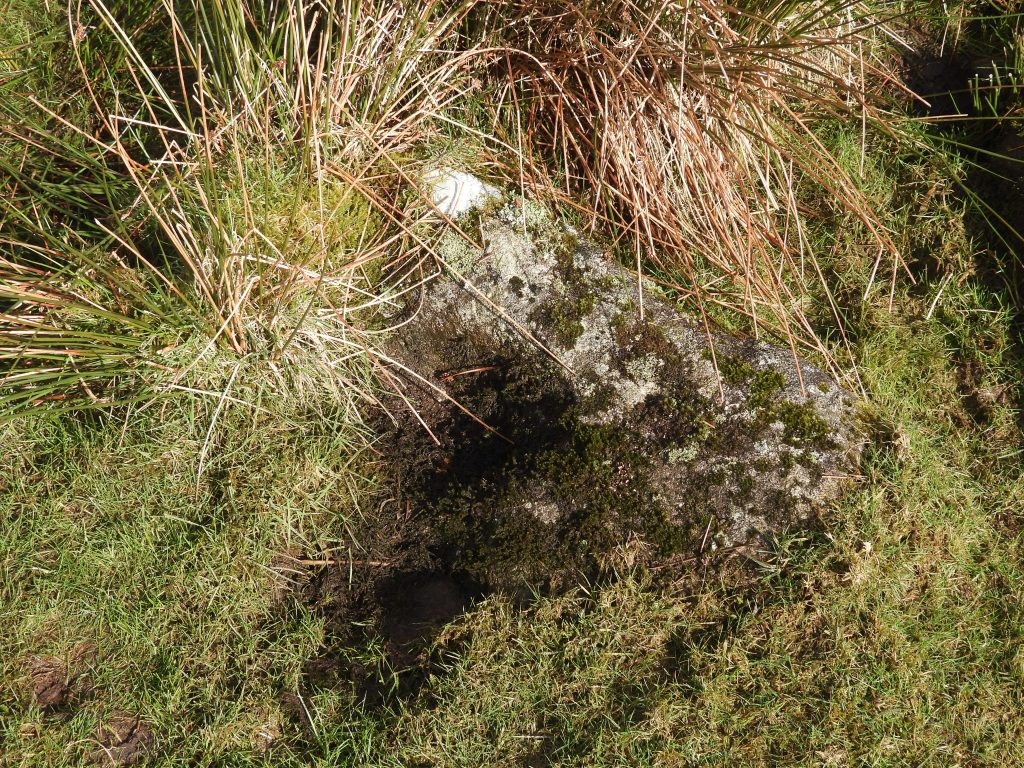
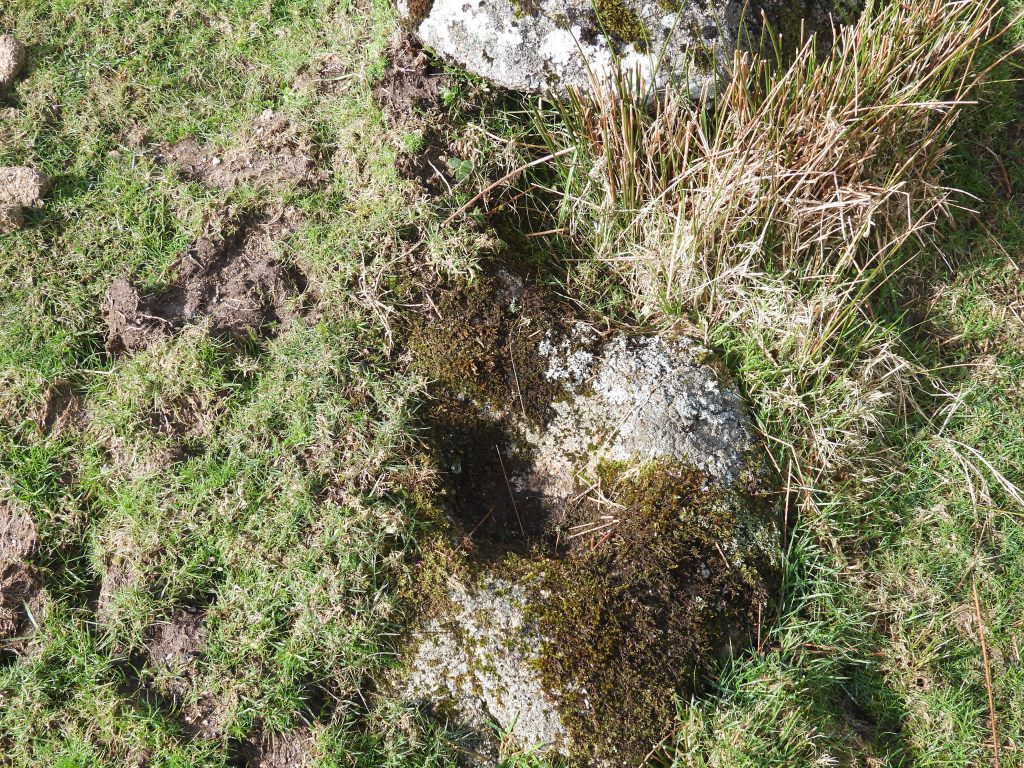
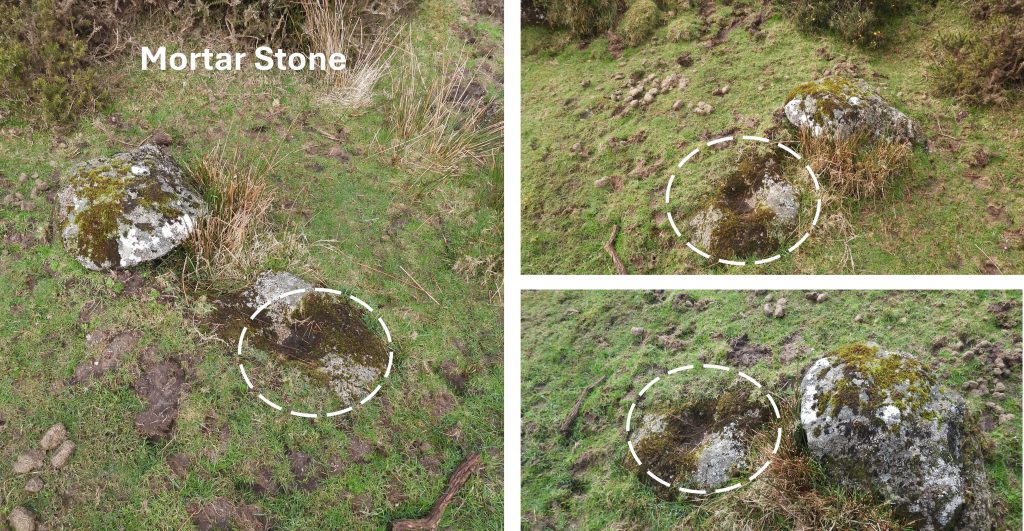
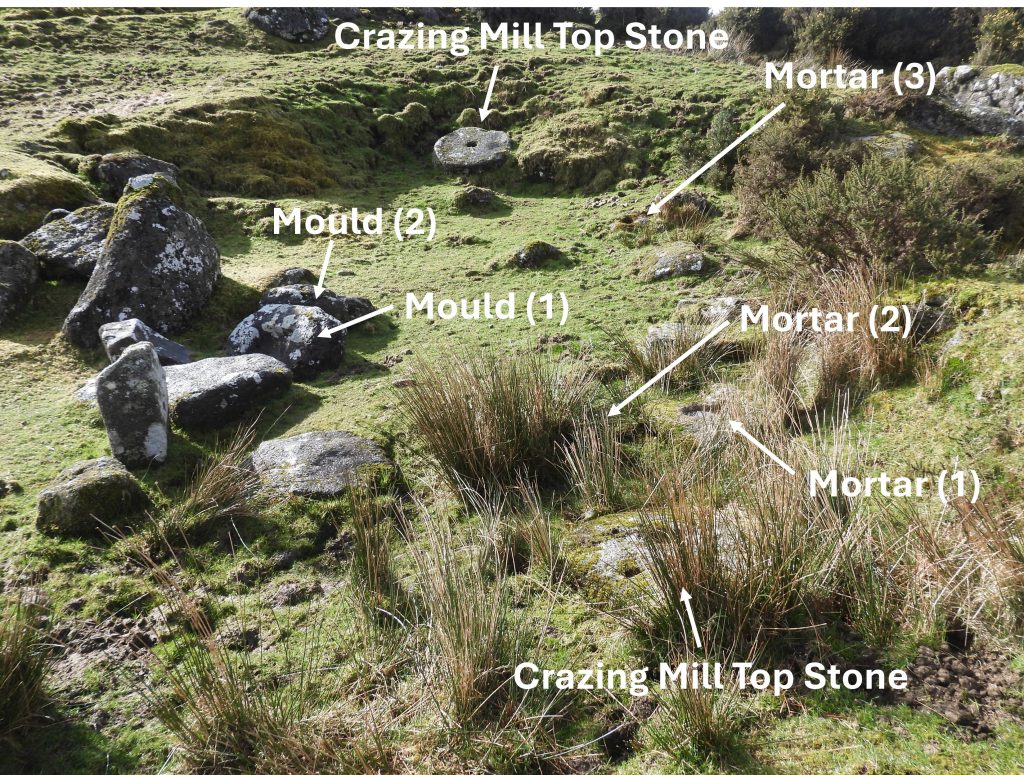
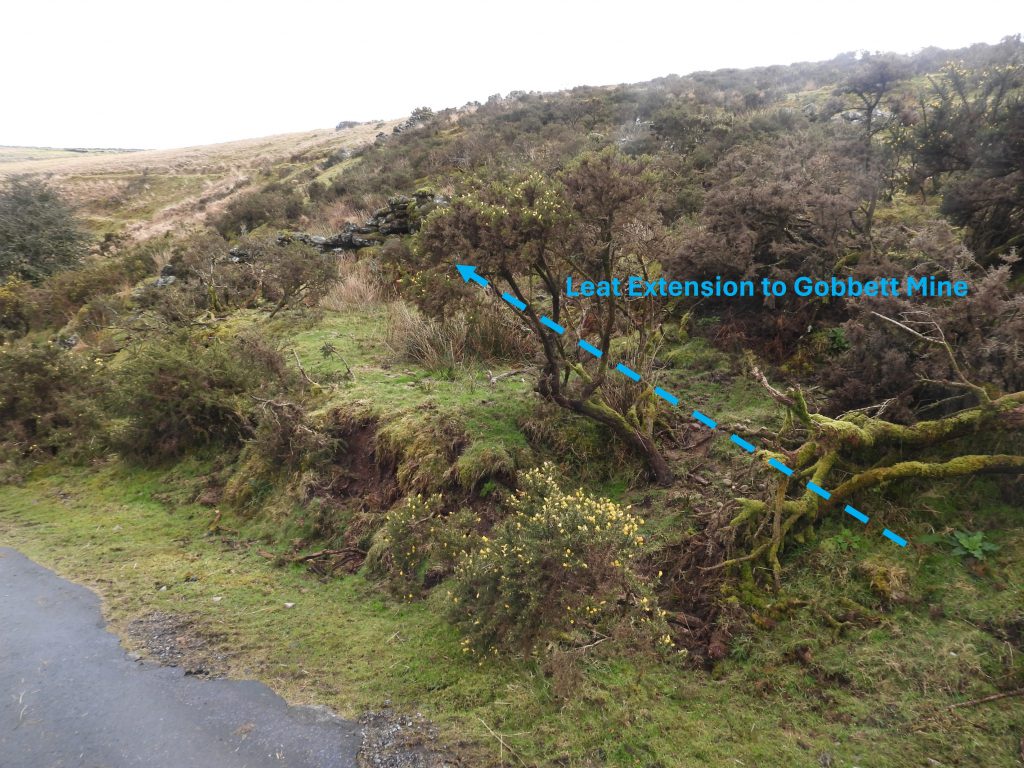
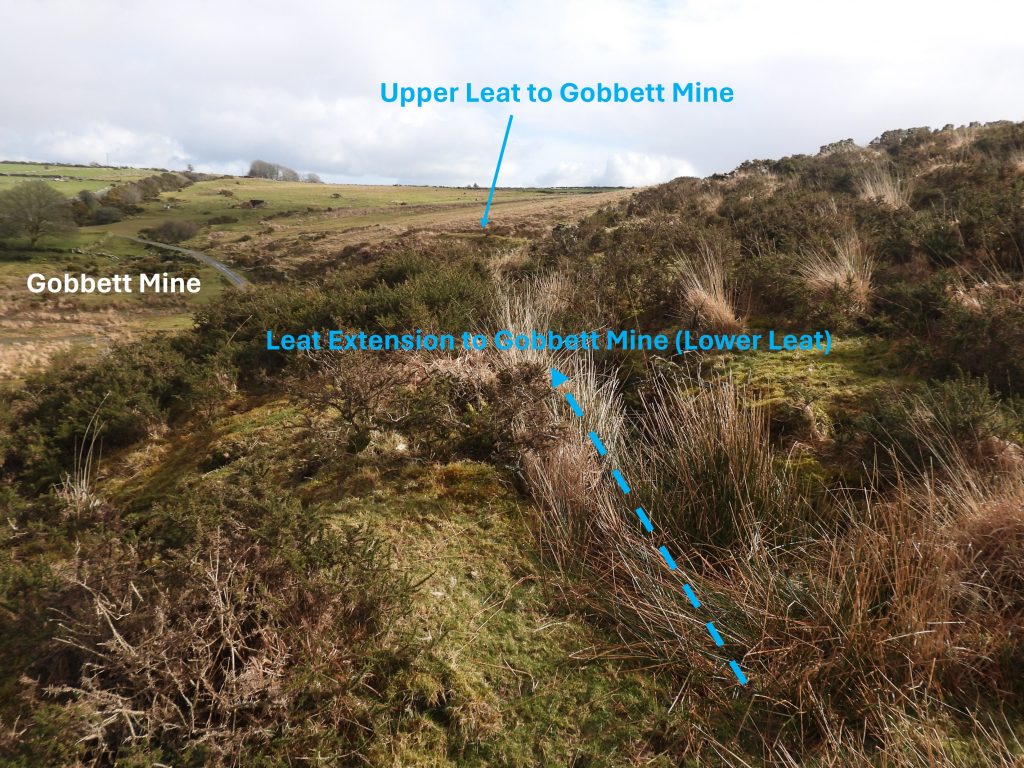
This sketch of the site is based on a similar sketch produced by Jeremy Butler (1991), Dartmoor Atlas of Antiquities, South East, Figure 62.5. Unfortunately, Butler transposed the labels of the Mortar and Mould stones should anyone refer to that publication. That said, the sketch is very accurate in terms of the locations of all the key features within the mill.General view of the Tinner’s Mill from the bank above. Worth on page 295 of ‘Worth’s Dartmoor’ records the Mill as being 30ft (9.14m) by 16ft (4.88m). Others have recorded the dimensions as around 9.5m by 6.5m.Gobbett Tinners Mill is located at SX64510 72800Sketch map of the water courses associated with the Tinners Mill. There are two leats which were dug in the 19th century to feed waterwheels at Gobbett Mine and are labelled Upper Leat and Lower Leat (extension). The miners at Gobbett extended the Lower leat (original) which had fed the Tinners MillTo the west of the mill, there are two leats, split from a single leat being originally fed from the River Swincombe 400 metres away. The original leat to the tinners mill was extended in the 19th century to feed Gobbett Mine.The leat (extension) to Gobbett Mine was one of two which was dug.The author believes the rocks in the foreground of the photograph represent where the original leat to the tinner’s mill was split to extend it to Gobbett Mine. A plan of the mill created by Greeves and Robinson in 1984 show this split.The ‘diversion point’ of the leat from the Swincombe looking west.Tracing the leat westwards is fairly straight forward initiallyAs the leat approaches the Swincombe, the course is more difficult to follow due to the amount of vegetation.The take-off point from the Swincombe can be reached (through some gorse and a boggy area). The picture above was the closest the author could get to the take off point. The grid reference at the point of the photograph is SX64302 72702Returning to the mill, the location of camera for this photograph is approx. where the leat would have terminated. The waterwheel would have, in all probability been located just in front of the large rocks on the right where the mill furnace was believed to have been located.If the author has correctly located where the mill waterwheel was most likely located, the gap at the SE corner of the mill would have been the wheel tailrace runoff. On the left (south) of this runoff are some tin slimesLocation of the Tinners Mill in relation to Gobbett Mine and the tarmac road to Swincombe reservoir. The two leats which serve Gobbett Mine can be seen contouring the hillside in the backgroundEarly tin streamers used a block of hard stone and a ball of stone (or metalbound piece of wood) as a pestle to break up ore as necessary. The ‘Crazing’ technique was an improvement in breaking up ore and employed a pair of circular stones – the top one rotating on a fixed lower one. The Tinners Mill at Gobbett is the only one on Dartmoor at which both upper (top) and lower (bottom) stones of a Crazing Mill have, as yet been found. Worth created a sectioned view of the two stones (Figure 96 on page 319 of Worth’s Dartmoor) as shown above. Worth recorded that the working faces of the stones as being 3ft (0.914m) in diameter.The four holes surrounding the central hole on the upper (top) Crazing Mill Stone are thought to have provided grip by which the stone could be rotated and turned.Worth believed the stone would have been turned or rotated by man power or horse power. Coarse gravel and ore were placed in the central hole. As the top stone was rotated the ore was rendered into fine sand The stone does not appear to have been adapted to allow it to be moved by say, water power (using a waterwheel)The lower (bottom) Crazing MIll Stone has a central hole with a second hole near its edge The use of the outer hole in the lower (bottom) Crazing Mill stone is unknown. The author speculates it was used to possibly ‘peg’ the stone down (this theory is unproven and has no provenance)Probable site of the mill furnace. Tin is smelted from Cassiterite, a mineral found in (hydrothermal) veins in granite. This process was conducted after the initial crushing / grinding of the ore. The furnace would have had a pair of bellows that were powered by an adjacent water wheelAdjacent to the probable site of the Furnace are some Tin Slimes suggesting that there was also some ore dressing here prior to the smelting process. In the early days, tin went through two smeltings, the first near the source of the Cassiterite rich ore, the second at one of the four Stannary Towns (Tavistock, Ashburton, Chagford and Plympton). Taxation was attached to both smeltings ! That said, with more efficient blowing houses and smelting processes, this allowed the use of just one smelting.Mould Stone 1 is recorded by Worth (page 295 of Worth’s Dartmoor) as being 15.75in (40cm) x 11.5 in (29.2cm) at top and 12in (30.5cm) x 9in (22.9cm) at the bottom, being 5in (12.7cm) deep. If the dimensions (top to bottom) are averaged, this equates to around 11,654 cubic cm. With the density of tin being around 7.3g per cubic cm then the ingot would have been approx 85kg (or 13.4st in old money). Worth estimated 86.6kg (191lb). Whichever weight is taken, the ingot would have been very heavy !Mould Stone 2 is recorded by Worth (page 295 of Worth’s Dartmoor) as being 17in (43.2cm) x 15 in (38.1cm) to 10in (25.4) at top and 9in (22.9cm) x 8in (20.3cm) at the bottom, being 5in (12.7cm) deep. As the mould stone is much eroded, it would seem Worth suggested a range of dimensions at the top (ie 15in to 10in). The author has used the dimensions (top to bottom) and averaged them, calculating a volume around 10,917 cubic cm. With the density of tin being around 7.3g per cubic cm then the ingot would have been approx 79.7kg (or 12.55st in old money). Worth estimated the ingot would have been 83kg (183lb).With the ingots from these mould stones being around 80-86kg, one wonders how they were extracted from the mould stonesThere are three locations of Mortar Stones at the Tinners Mill, suggesting that this was once a knocking (knacking) or stamping mill as well as a Blowing (smelting) House and a once Crazing Mill. There was a need by the tinners to process (crush) larger pieces of ore prior to smelting*, which couldn’t be achieved using the ‘Crazing’ method. The solution was the invention of ‘stamping’ which was the use of vertical hammers powered by a waterwheel. The hammers would crush the ore on a mortar stone, which after a period of time created a ‘tell-tale’ hollow. *If the crushed ore wasn’t of sufficient high purity it was necessary to remove unwanted ‘gangue’ prior to smelting. This was called dressing the ore. The evidence of tin slimes at the site does indicate some ore dressing took place hereMortar Stone 1 is actually a whole and a part (half) ‘hollow’. The whole ‘hollow’ is elliptical. With there being two hollows in this stone, there would have been two headed stamps here Close up of Mortar Stone 1. There are at least 60 stamp mills across Dartmoor, with the first documentary evidence of such a mill dating from 1504. Stamping mills probably date from well before this as there was a Cornish one documented from 1400.The relative locations of Mould Stone 1 to Mortar Stone 1. Relative locations of the Top Crazing Mill Stone and Mortar Stone 1Mortar Stone 2 lies partially buried a short distance from Mortar Stone 1Worth records (page 295 of Worth’s Dartmoor) the largest mortar as being 12in (30.4cm) by 7.5in (19.1cm) with depth 5in (25.4cm). By eye (not measuring), the author thinks this may well be Mortar Stone 1 (furthest from the camera)Mortar Stone 2, as depicted by Butler is in a damaged condition. Stamping Mills were also known as ‘knacking’ or ‘knocking’ mills. On the upper reaches of the River Erme, there is a location known as Knacking Mill Gulf, which is a testament to this name. Close up of Mortar Stone 2. The vertical hammers which made these hollows comprised of wooden uprights (held in a wooden frame) which had iron-shod at the bottom.Mortar Stone 3 located up the slope of the mill towards the location of the Bottom Crazing Mill Stone. Mortar Stone 3 might be easily overlooked as it has quite a small ‘hollow’ and is moss covered. This Mortar Stone (like Mortar Stone 1) has one whole and one part ‘hollow’, further suggesting the use of a twin or pair of stamps here. The stamps mechanism would have included a fine grill to sift out the ore which was being subjected to a washing process at the same time. The sifting / washing process was a 16th century innovation.This annotated picture shows all the relative locations of Crazing Mill Stones (Top and Bottom), the two Mould Stones and three Mortar Stones.The leat extension where it crosses the tarmac road en-route to Gobbett MineThe two leats above the tarmac road opposite the tinners mill leading to Gobbett Mine
have this record dated 1471 –
DRO Title Deeds: Meavy & elsewhere
Repository Devon Heritage Centre Ref Z13/1 Access status Open Title Deeds Charter: Meavy, 19th January 1474-
…1) John Bonvyll of Comb Ralegh, Esq 2) Thomas Pomeroy and Agnes his wife and Richard Pomeroy and John Pomeroy their sons
Premises: Premises: messuages lands and tenements in West Grobbeton and Wasond and tithing of Mewy to hold
details – 1) John Bonvyll of Comb Ralegh, Esq 2) Thomas Pomeroy and Agnes his wife and Richard Pomeroy and John Pomeroy their sons
Premises: all the messuages lands and tenements in west Grobbeton and Wasond and tithing of Mewy to hold for their lives successively at a rent of 33s. 4d and suit at court of Mewy and the best best as a heriot:
Witnesses: Adam Byrde, Robert Seller and John Mede
Dated at Meavy: Monday next before Christmas.
14 Edward IV. 1471 Two seals. Latin.
I think Grobberton is Gobbet Tin (mine) but Wasond eludes me
Any ideas as to where /what ‘ Wasond’ might be ?
I am unaware of where West Grobbeton or Wasond might be. I have checked the 19th century tithe for Meavy Parish and they do not appear there. I have never heard Gobbet been mentioned as West Grobberton and of course is not in Meavy Parish.
Gobert MAY have been worked as far back as the C15th , burt almost certainly there was some kind of settlement there
DROTitle Deeds: Meavy & elsewhere
Repository Devon Heritage Centre Ref Z13/1 – Open Access
Title Deeds Charter: Meavy, 19th January 1474-
…1) John Bonvyll of Comb Ralegh, Esq 2) Thomas Pomeroy and Agnes his wife and Richard Pomeroy and John Pomeroy their sons
Premises: Premises: messuages lands and tenements in West Grobbeton and Wasond and tithing of Mewy to hold……
Premises: all the messuages lands and tenements in west Grobbeton and Wasond and tithing of Mewy to hold for their lives successively at a rent of 33s. 4d and suit at court of Mewy and the best best as a heriot: tenants to have firebote, housbote, folbote and haybote and to keep the tenement in repair.
Witnesses: Adam Byrde, Robert Seller and John Mede. Dated at Meavy: Monday next before Christmas. 14 Edward IV. 1471 Two seals. Latin.


Annie Pomeroy May 10, 2025
have this record dated 1471 –
DRO Title Deeds: Meavy & elsewhere
Repository Devon Heritage Centre Ref Z13/1 Access status Open Title Deeds Charter: Meavy, 19th January 1474-
…1) John Bonvyll of Comb Ralegh, Esq 2) Thomas Pomeroy and Agnes his wife and Richard Pomeroy and John Pomeroy their sons
Premises: Premises: messuages lands and tenements in West Grobbeton and Wasond and tithing of Mewy to hold
details – 1) John Bonvyll of Comb Ralegh, Esq 2) Thomas Pomeroy and Agnes his wife and Richard Pomeroy and John Pomeroy their sons
Premises: all the messuages lands and tenements in west Grobbeton and Wasond and tithing of Mewy to hold for their lives successively at a rent of 33s. 4d and suit at court of Mewy and the best best as a heriot:
Witnesses: Adam Byrde, Robert Seller and John Mede
Dated at Meavy: Monday next before Christmas.
14 Edward IV. 1471 Two seals. Latin.
I think Grobberton is Gobbet Tin (mine) but Wasond eludes me
Any ideas as to where /what ‘ Wasond’ might be ?
SteveGriggDartmoor May 12, 2025 — Post author
Hi Annie,
I am unaware of where West Grobbeton or Wasond might be. I have checked the 19th century tithe for Meavy Parish and they do not appear there. I have never heard Gobbet been mentioned as West Grobberton and of course is not in Meavy Parish.
Sorry I can’t help at this time.
Kind Regards,
Steve (Dartmoor Explorations)
Annie Pomeroy May 11, 2025
Gobert MAY have been worked as far back as the C15th , burt almost certainly there was some kind of settlement there
DROTitle Deeds: Meavy & elsewhere
Repository Devon Heritage Centre Ref Z13/1 – Open Access
Title Deeds Charter: Meavy, 19th January 1474-
…1) John Bonvyll of Comb Ralegh, Esq 2) Thomas Pomeroy and Agnes his wife and Richard Pomeroy and John Pomeroy their sons
Premises: Premises: messuages lands and tenements in West Grobbeton and Wasond and tithing of Mewy to hold……
Premises: all the messuages lands and tenements in west Grobbeton and Wasond and tithing of Mewy to hold for their lives successively at a rent of 33s. 4d and suit at court of Mewy and the best best as a heriot: tenants to have firebote, housbote, folbote and haybote and to keep the tenement in repair.
Witnesses: Adam Byrde, Robert Seller and John Mede. Dated at Meavy: Monday next before Christmas. 14 Edward IV. 1471 Two seals. Latin.