A collection of walks, discoveries, insights and pictures of exploring Dartmoor National Park
September 4, 2022
Water management across the centuries in the Upper Meavy and Hart Tor Brook Valleys
This post is split into three sections and considers water management in the Upper Meavy and Hart Tor Valleys for use by tinners and for the source of drinking water for the expanding population of Plymouth.
Firstly, the post covers the four leats in the area which were dug to provide water : a) for the tin works below Hart Tor (Tinners’ Reservoir and Leats 1 & 2); b) for Drinking Water for Plymouth Dock (Devonport Leat) and c) for Keaglesborough Tin mine located further down the Meavy Valley (Keaglesborough Leat).
Secondly, the intriguing dozen capped bore holes in the area, allude to a proposed 19th century reservoir that would have been constructed in the area. The post considers the impact of such a scheme and the antiquities that would have been lost.
Finally, the post looks at the water augmentation of Devonport Leat water from the Meavy and Hart Tor Brook by way of an iron pipe dating from 1915.
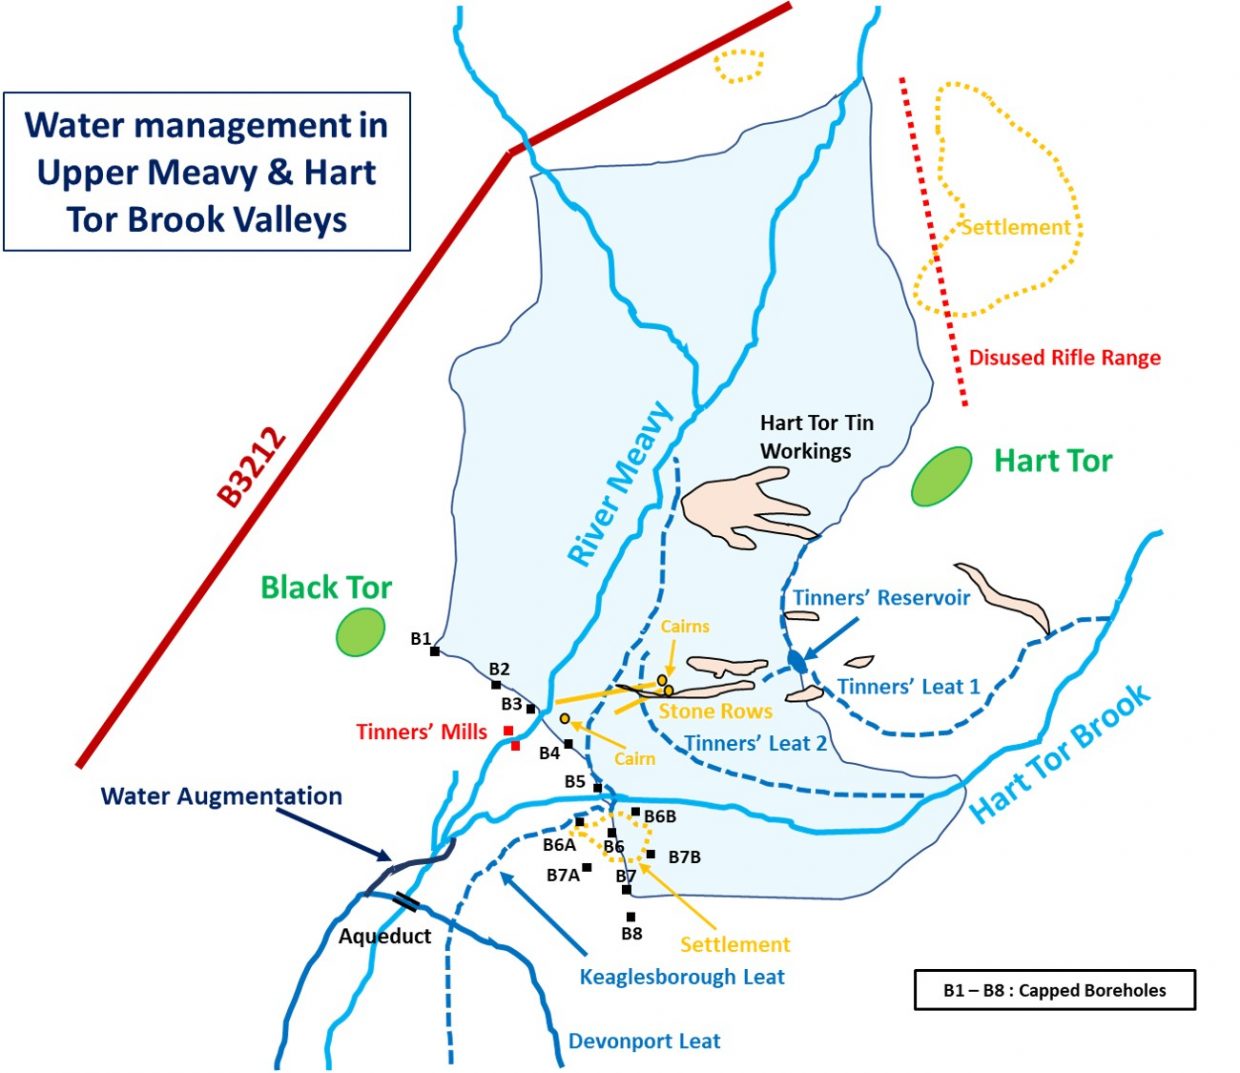
This sketch map shows the area covered in this post with the water courses, antiquities, capped bore holes, tors and the estimated intrusion the proposed 19th century reservoir would have had. The labelling of the 12 capped bore holes is consistent with that found on a survey map at: http://scans.bgs.ac.uk/sobi_scans/boreholes/611166/images/12818626.html
Part 1: Four leatsand Tinners’ Reservoir
The first part of this post is further subdivided into three parts, covering the water management associated with the Hart Tor Tinworks, Devonport Leat and Keaglesborough Mine.
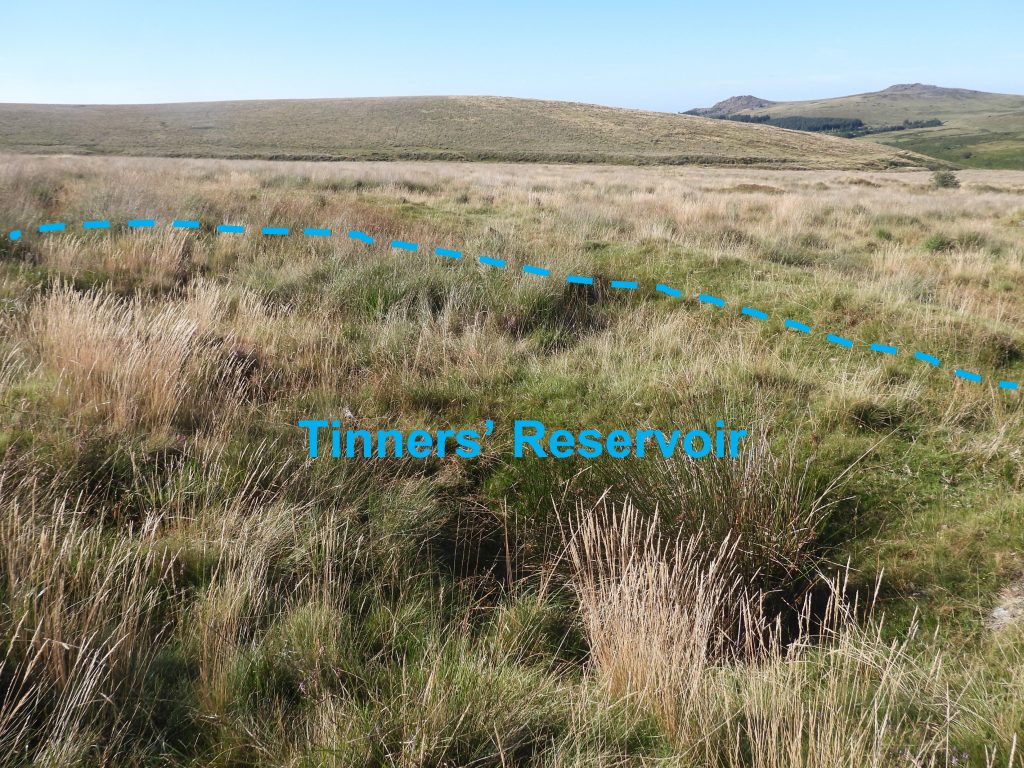
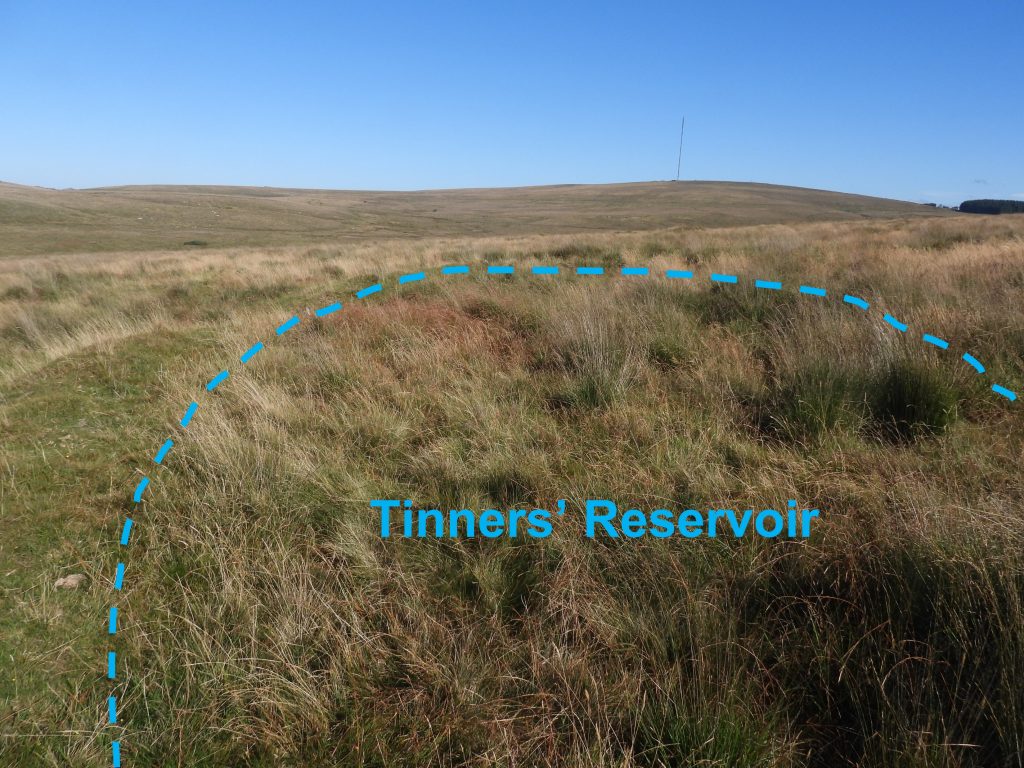
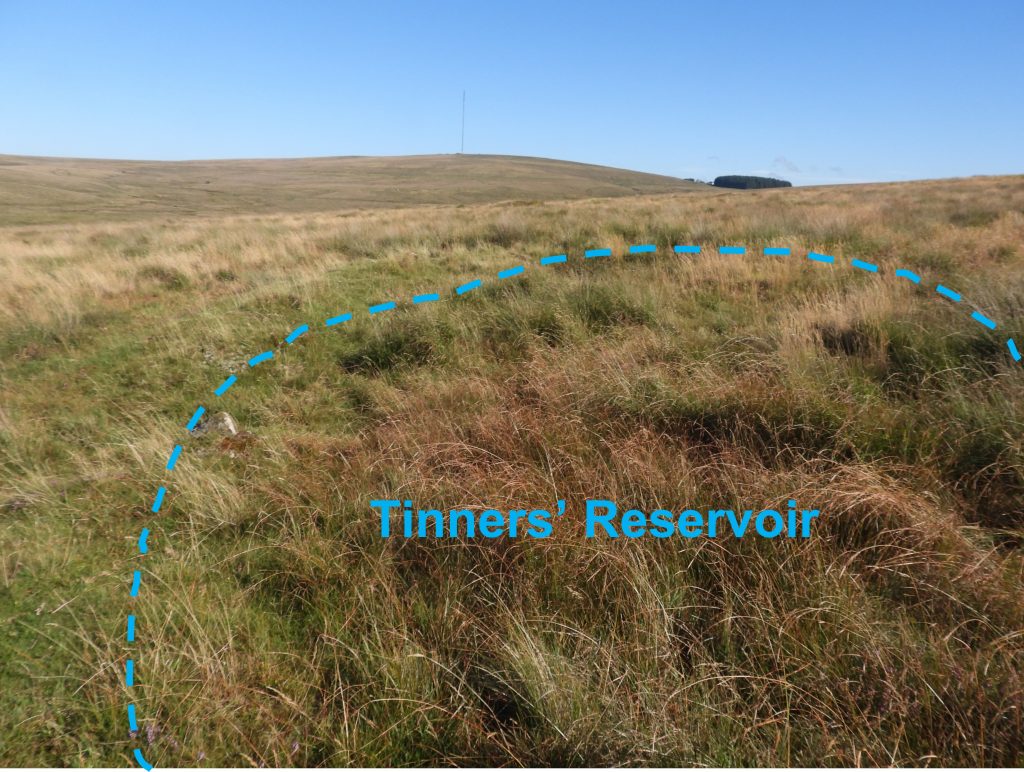
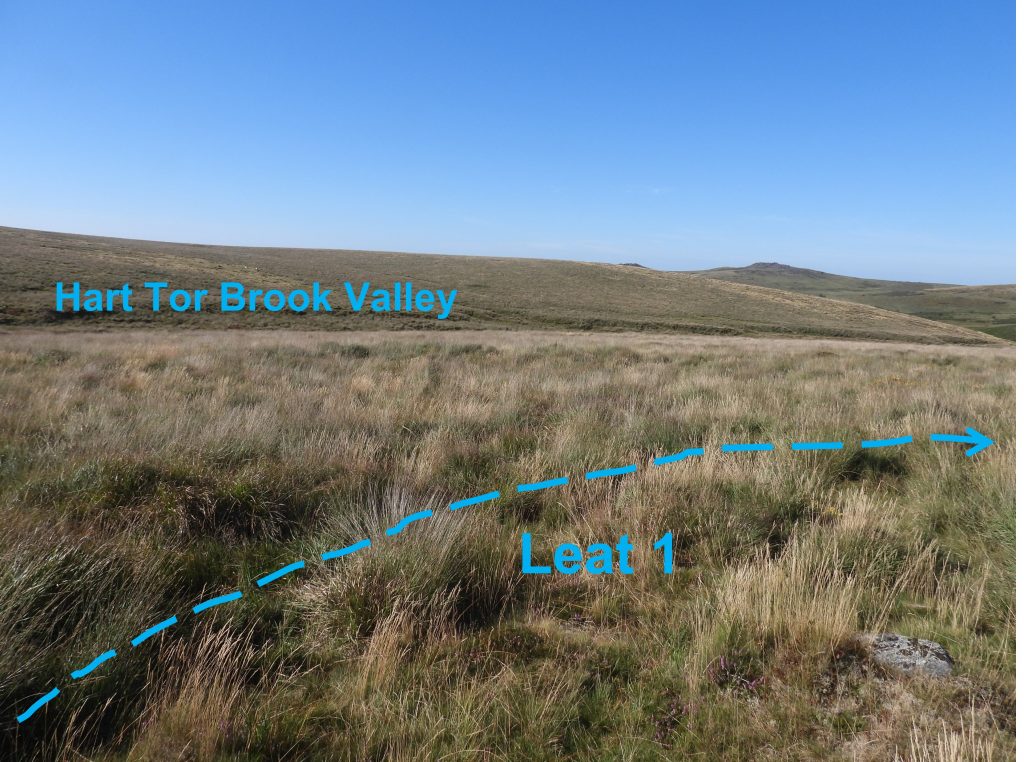
a) Hart Tor Tinworks: In this area there are six different types of tinwork, namely: alluvial and eluvial streamworks, openworks, lode-back pits, shafts and shoad collection pits as described in Sandy Gerrard’s paper (Meavy Valley Archaeology, Site Report No. 10, HART TOR TINWORKS – 1998). It is theorised that the tinners would have required water during the “openworks” period of their prospecting and that the water they carried was used for sluicing away debris, although this is open to debate. It is possible that the two leats and a small reservoir which can still just about be discerned belonged exclusively to an earlier phase of streaming or prospecting than the “openworks” period.
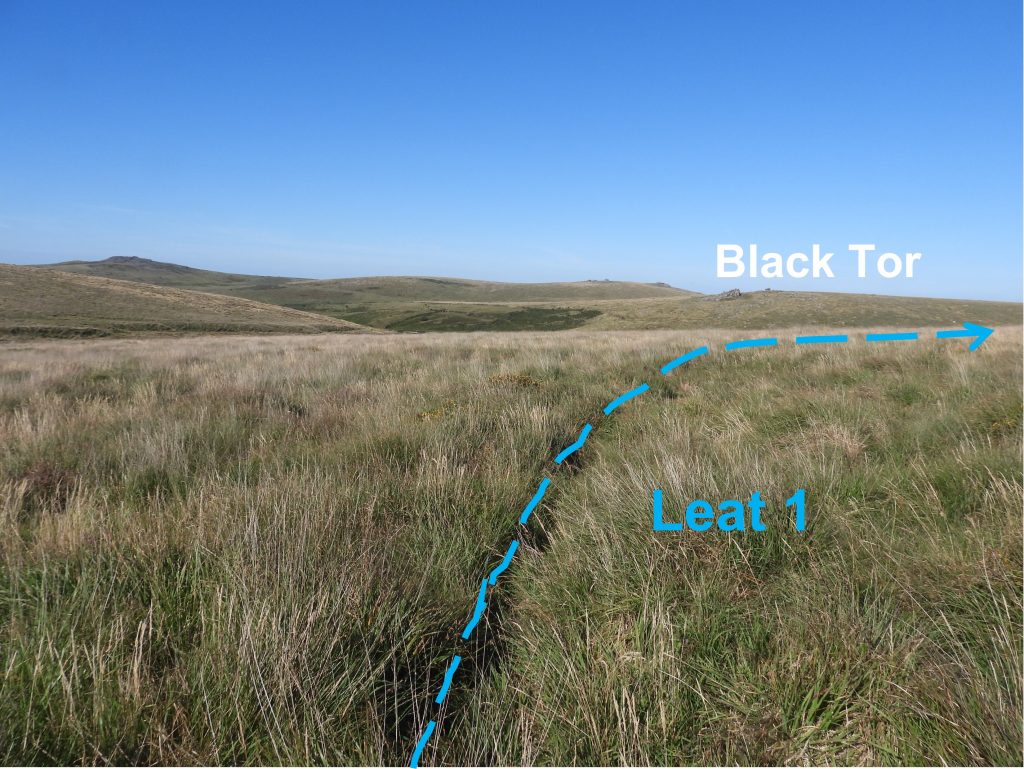
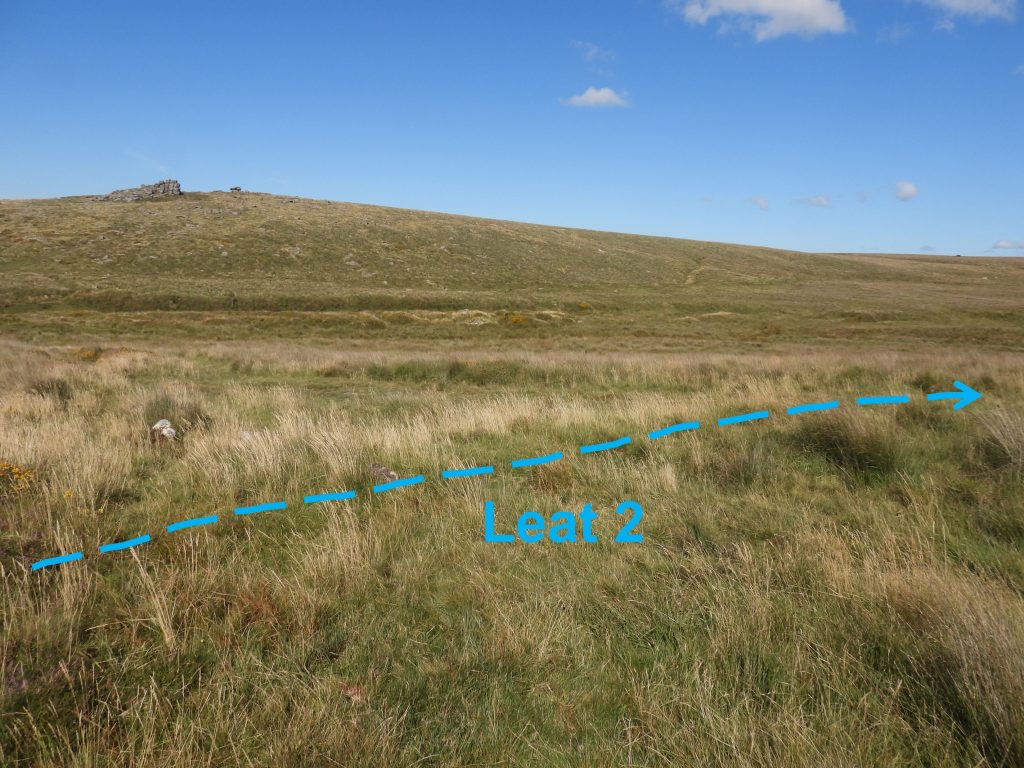
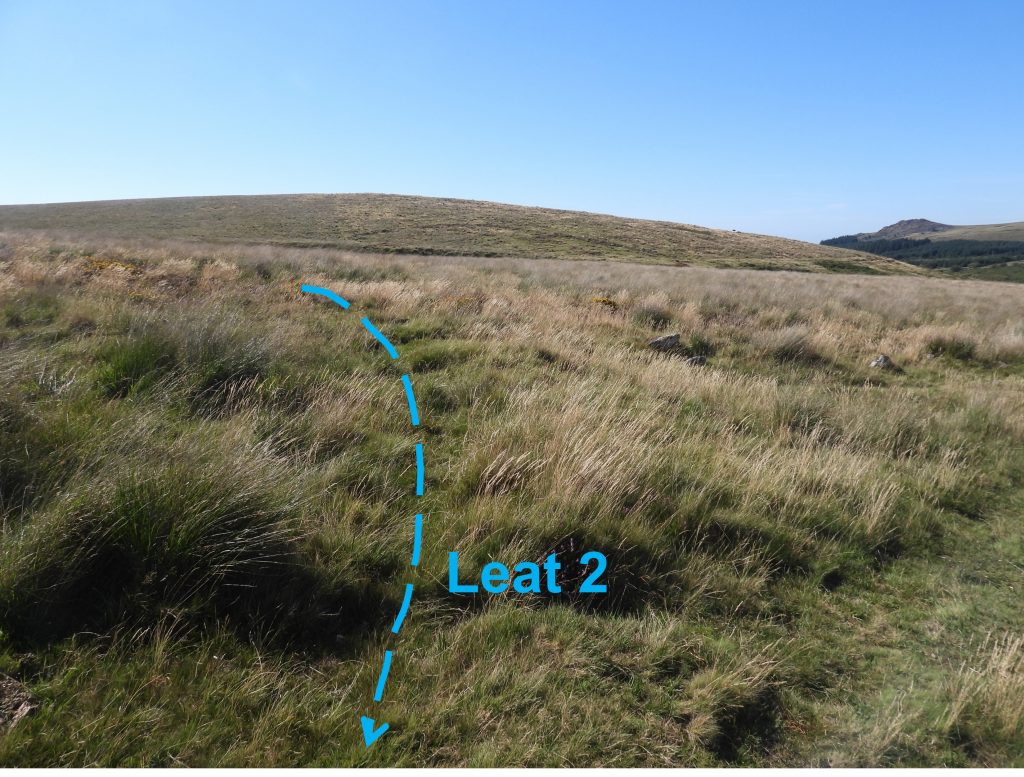
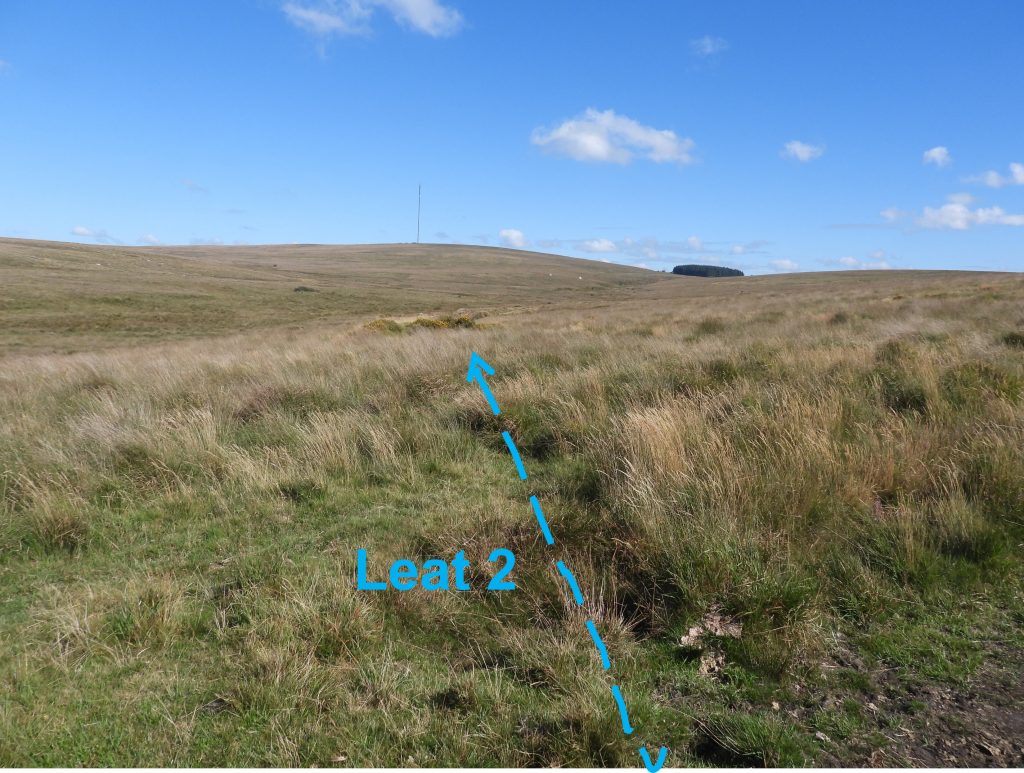
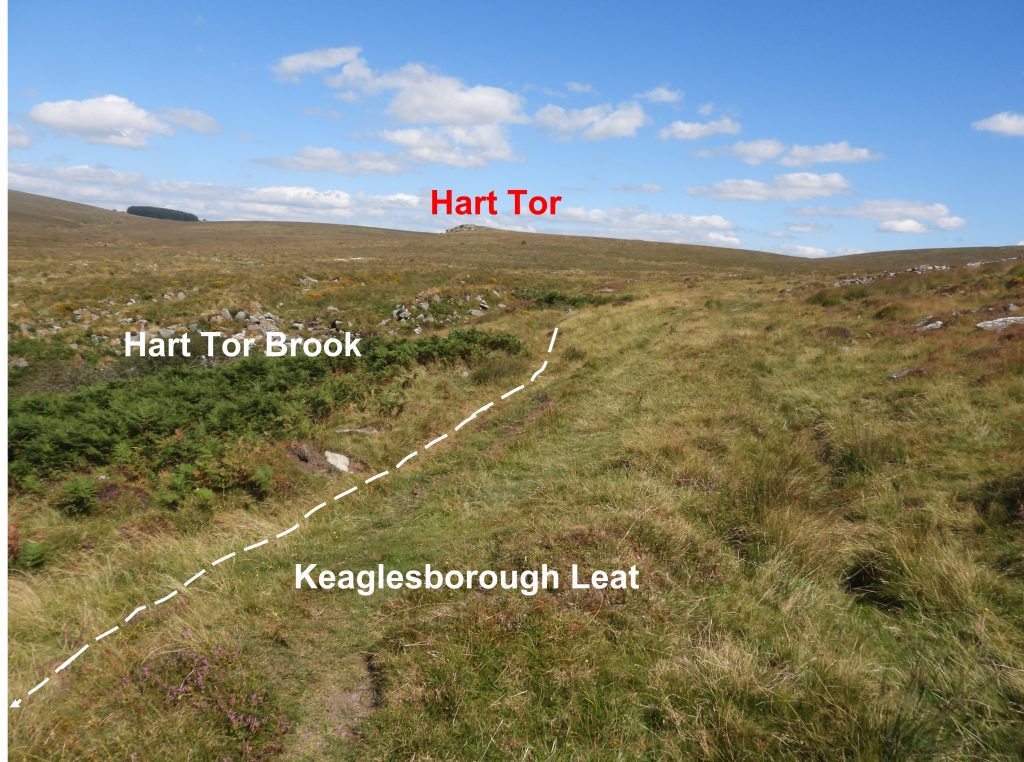
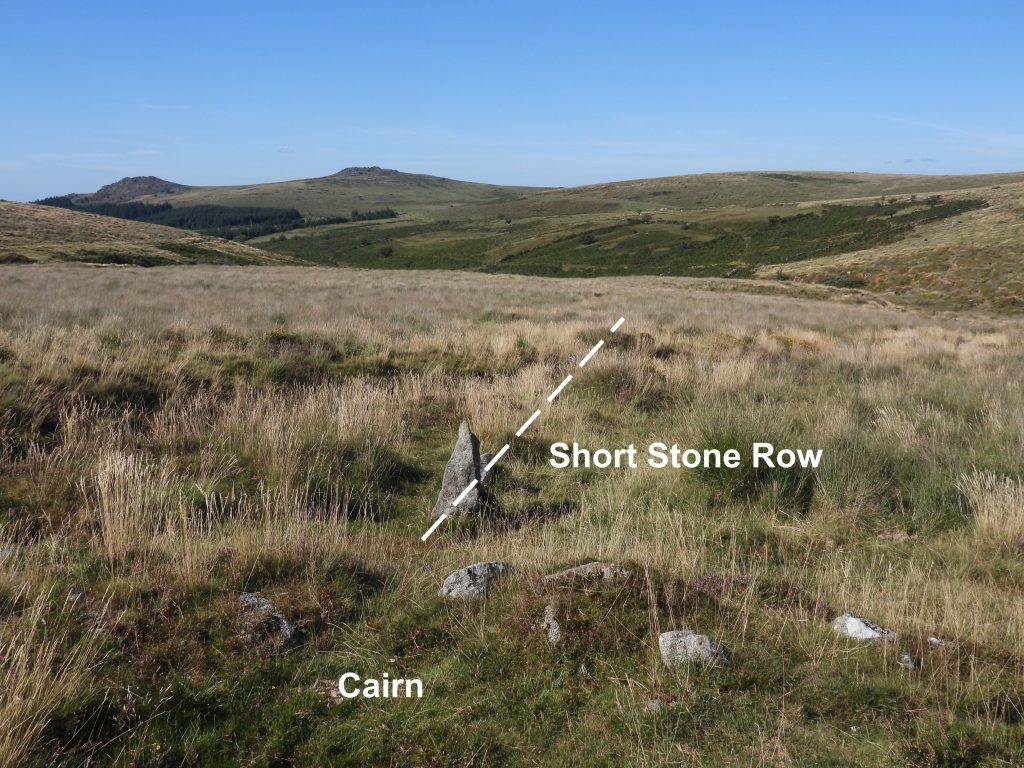
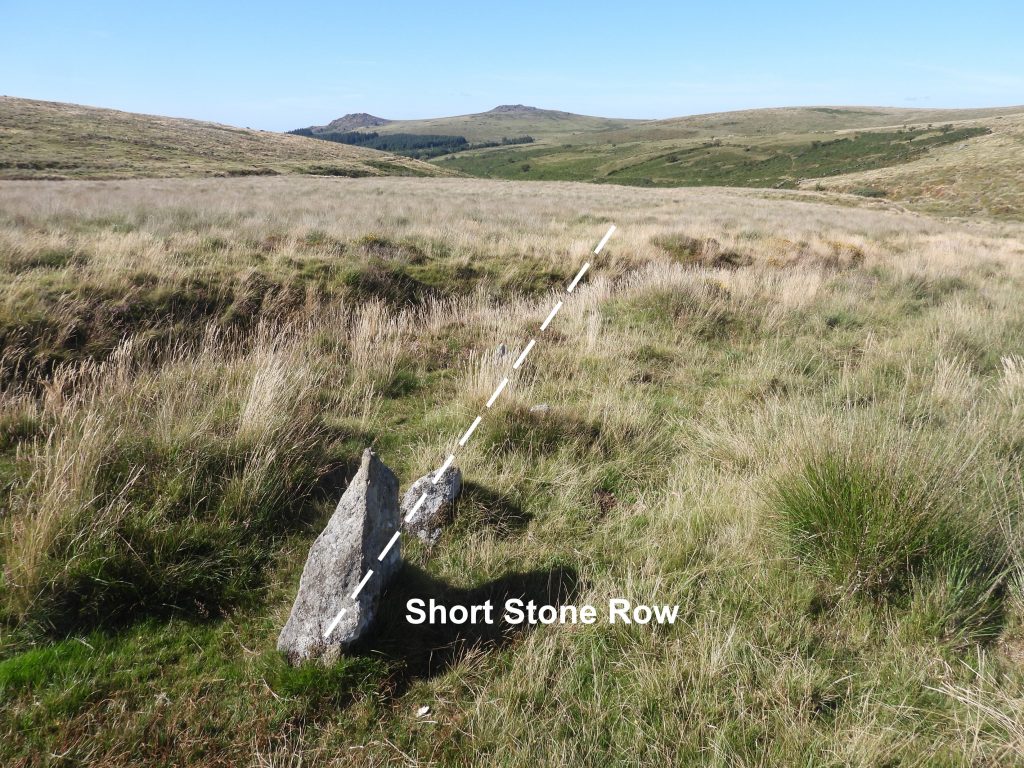
One example of the tinners’ water management in the area can be found in the from of a small crescentic tinners’ reservoir measuring 23m long can be found just to the east of a large openwork. There is a small tinners’ pit within the reservoir which suggests that tin extraction continued after the reservoir and the leat that fed it were abandoned. (Ref: Gerrard – Hart Tor Tinworks – page 15).The reservoir comprises an 0.6m high curvilinear earthen bank that has a gap near the centre and there is a shallow depressed area for water storage on the (east) uphill side. Near the “gap” on the west side of the reservoir was recorded by the author at location SX57893 71743The small crescentic tinners’ reservoir was fed by a leat (marked as “leat 1” on the sketch map), which can be traced with some difficulty to its source, Hart Tor Brook. With reference to M.J Fletcher (2007-2008, Walkhampton Premier Archaeological Landscape; Field Investigation Project) it is considered whether the leat is of one period of construction that included the reservoir or whether it was constructed in two distinct stages for two separate functions perhaps firstly to feed the openwork adjacent to the reservoir is not clear, although the earthwork evidence suggests the latter. The leat feeding the reservoir appears to have continued along the same contour line to further openworks (near the Meavy). In addition, there appears to have been a leat / outflow leading from the reservoir down to some more openworks to the west as is shown in the photograph.A second leat (labelled leat 2) is even more difficult to trace. It cuts across a both a single and a double stone row, where it is now best to discern its locationThe “track” in the bottom right of the picture is the location of the double stone row. This leat may have fed more openworks to the north, albeit its course can no longer be discerned.The phootgraph shows the course of leat 2 heading towards the openworks near to the Meavy.
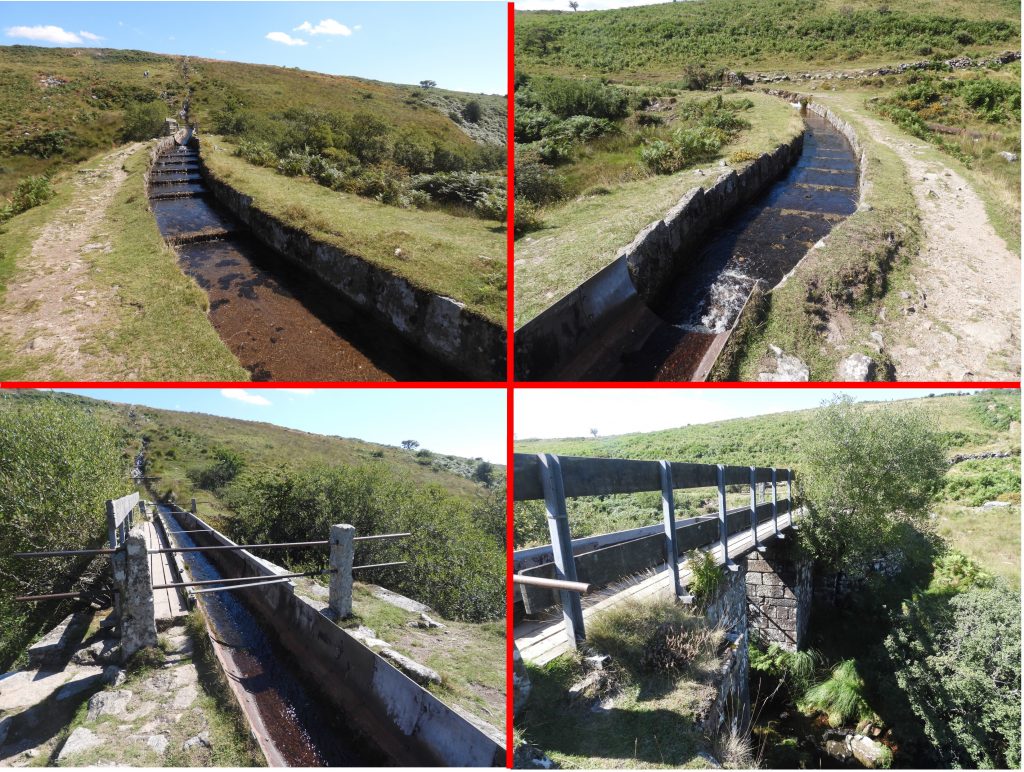
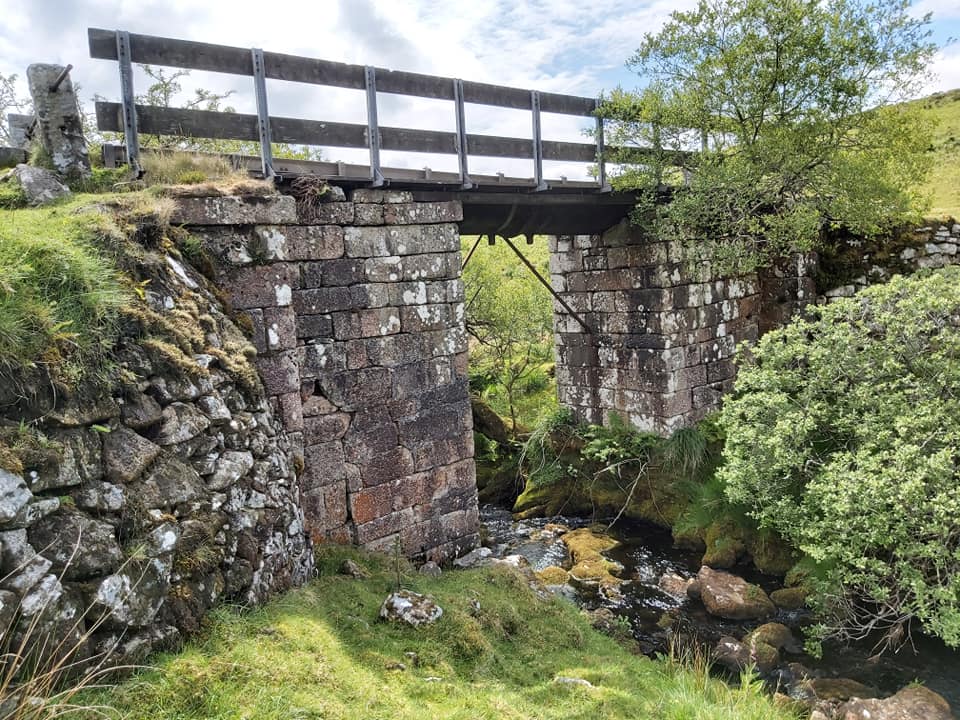
b) Devonport Leat: A post about water management in this area wouldn’t be complete without mentioning Devonport Leat. Any visitor to the area could not fail to dramatic cascade of the leat over Raddick Hill and across the “Iron Bridge” (aqueduct). Devonport Leat was completed around 1802 to supply water to Plymouth Dock (known as Devonport after 1824).
The aqueduct which carries Devonport Leat is also known as the ‘Iron Bridge’.View of Iron Bridge from Raddick Hill. The aqueduct granite piers are original but the iron trough would have previously been a wooden one. The flood control scheme and spillway at eastern end can just about be seen in the photograph.
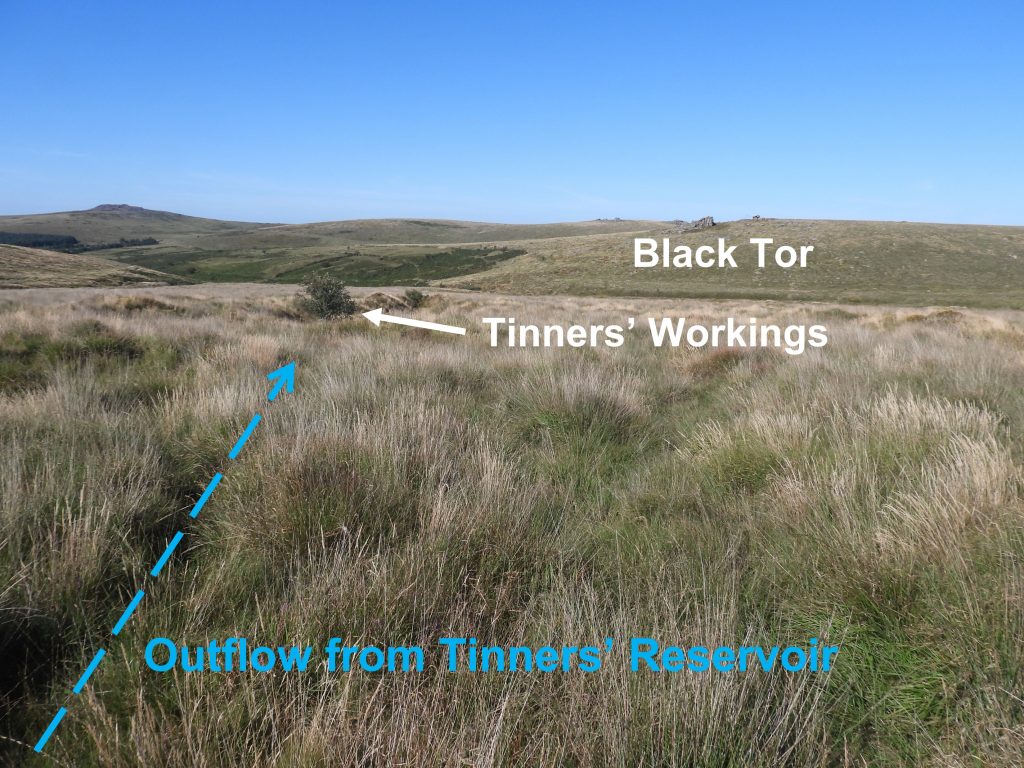
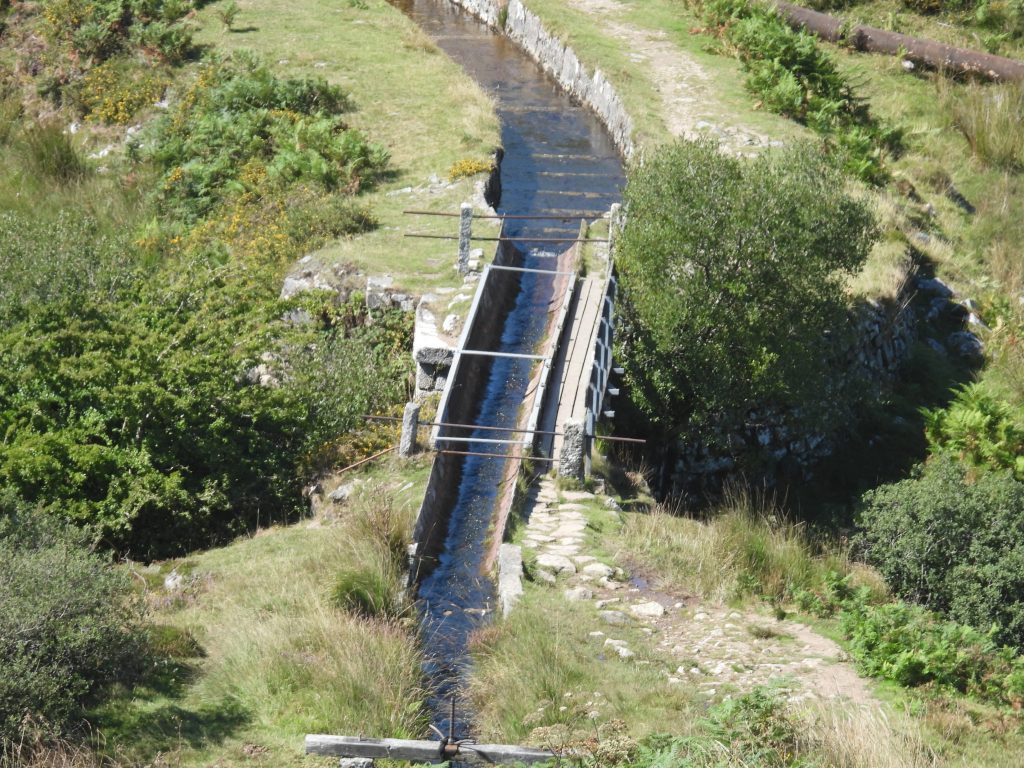
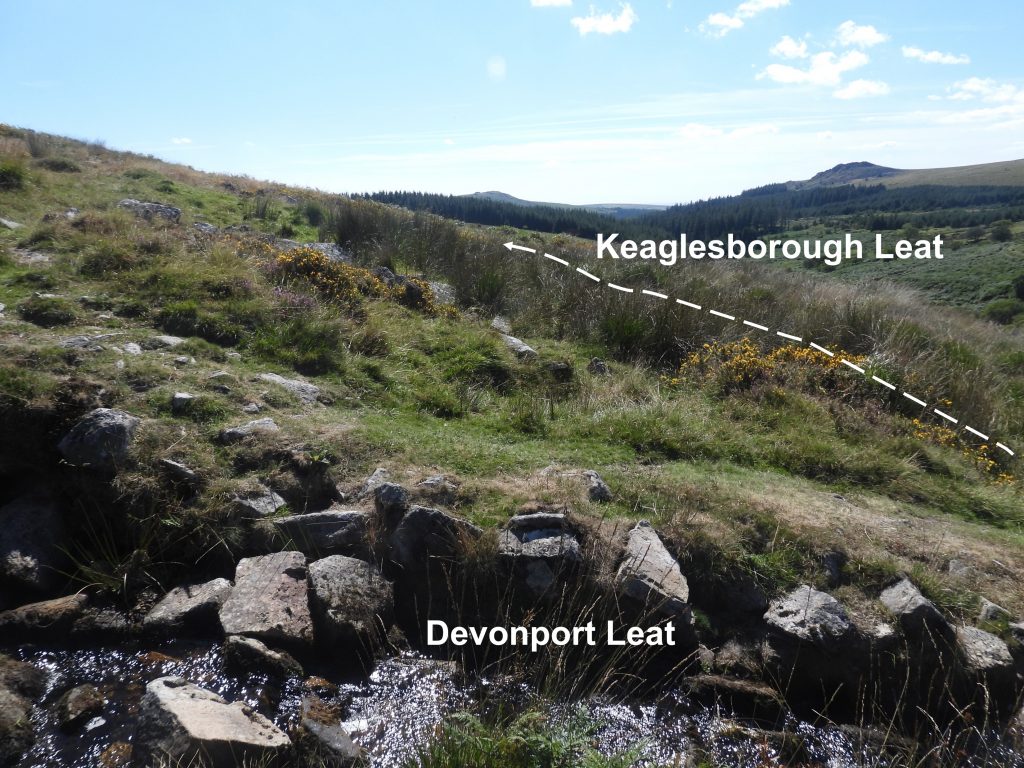
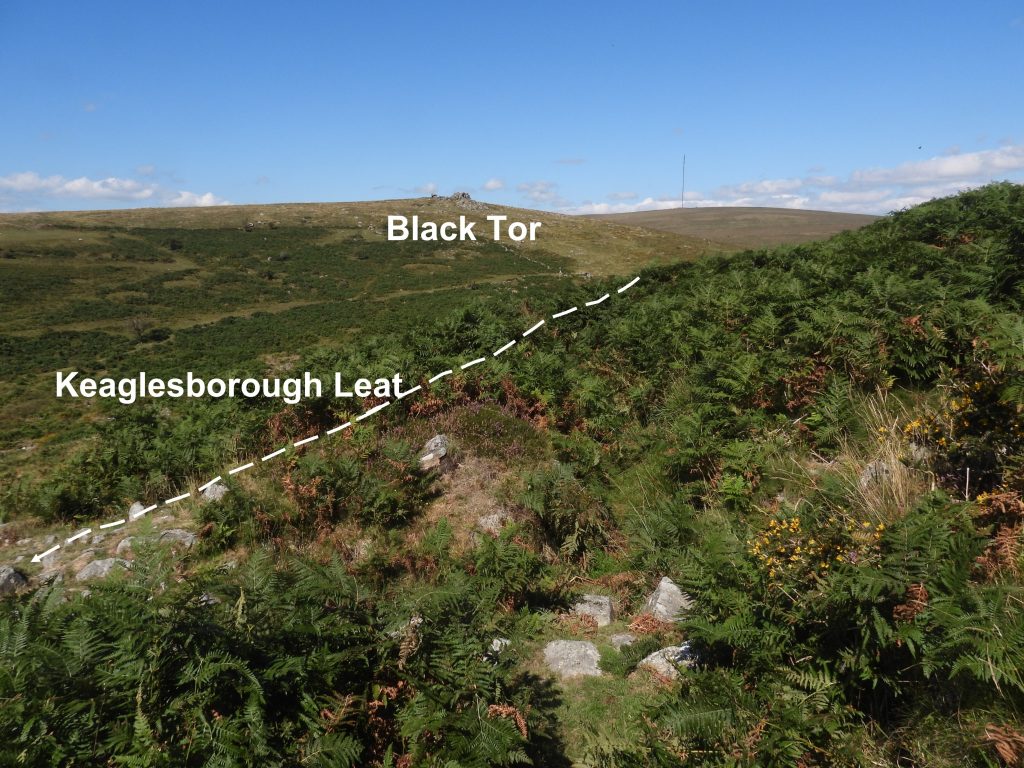
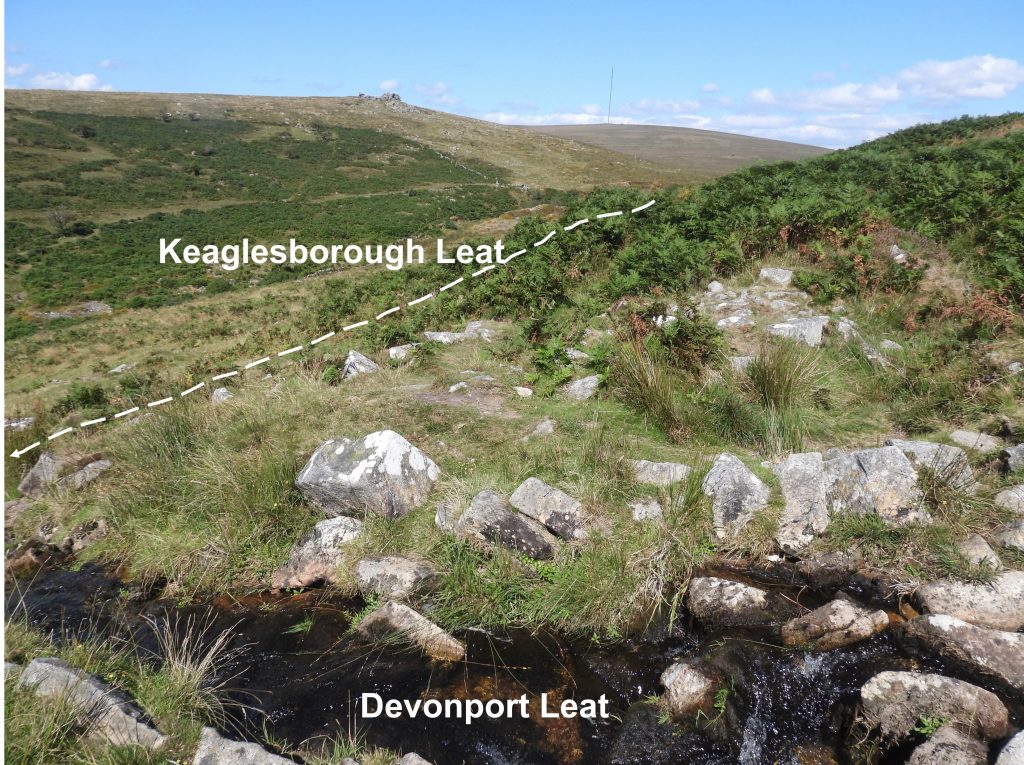
c) Keaglesborough Mine: This complex comprises a large openwork, an adit, two dressing floors with sundry features, shafts, spoil heaps and two wheelpits. The mine is located near Raddick Plantation, Leather Tor Bridge and Raddick Lane about a mile to the south of the area covered in this post. The mining at Keaglesborough has references back to the 14th century with the latter day operations being in the 19th century. A tinners’ leat was dug in the early 19th century to convey water from the Meavy River to supply the mine at Keaglesborough (two waterwheels) and took water from the Meavy across to Hart Tor Brook where there was a feeder from which ran down the Meavy valley above a steep tinners’ cliff. The (dry) leat crosses Devonport Leat just above the aqueduct.
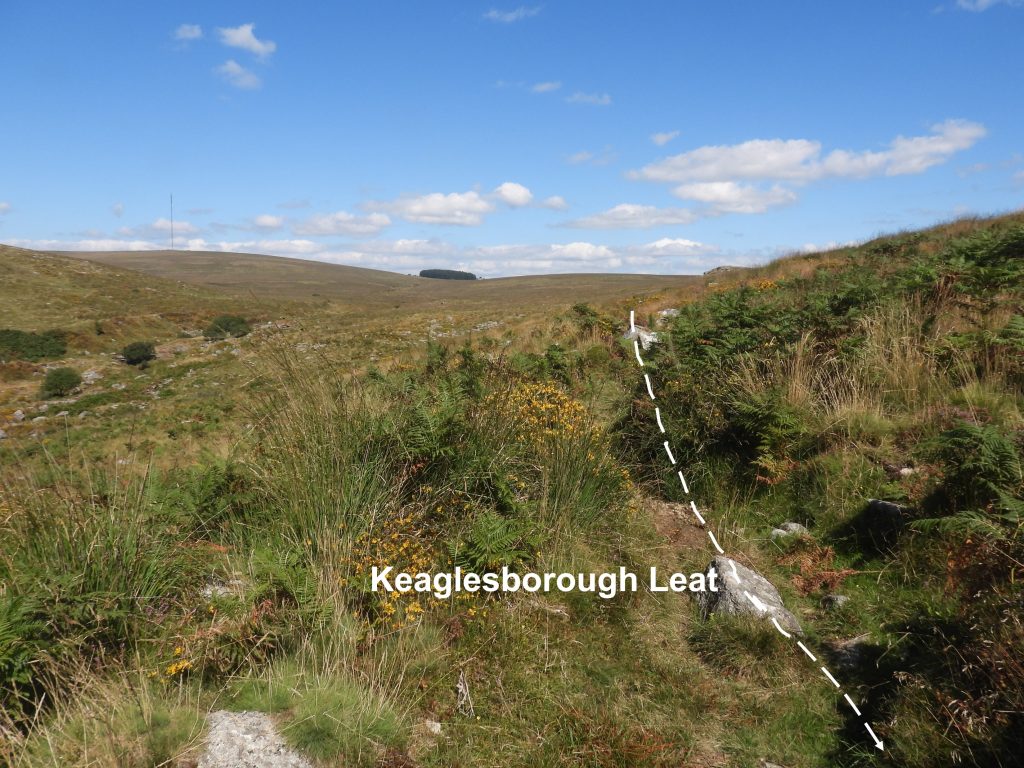
Keaglesbrough Leat crosses Devonport Leat. The two leats would have been constructed around the same period (Devonport Leat at the turn of the 19th century and Keaglesborough Leat shortly afterwards). Would there have been a small wooden launder carrying the Keaglesborough Leat across its “bigger brother” ?Keaglesborugh Leat is relatively easy to locate from Raddick Hill (upstream) towards Hart Tor BrookAnother view where the two leats would have met.On the southern side of Devonport Leat, Keaglesborough Leat disappears into the long grass and reeds.The dry Keaglesborough Leat moving north with the Meavy and Hart Tor Brook Valleys seen on the left of the photograph.Approaching Hart Tor Brook where the leat feeder would have been. There is also a fed into this point taken from the Meavy but was not identified by the author during his exploration. It is possible that this leat may have fed one of the tinners’ mills at Black Tor falls.
Part 2:Proposed reservoir from 19th Century.
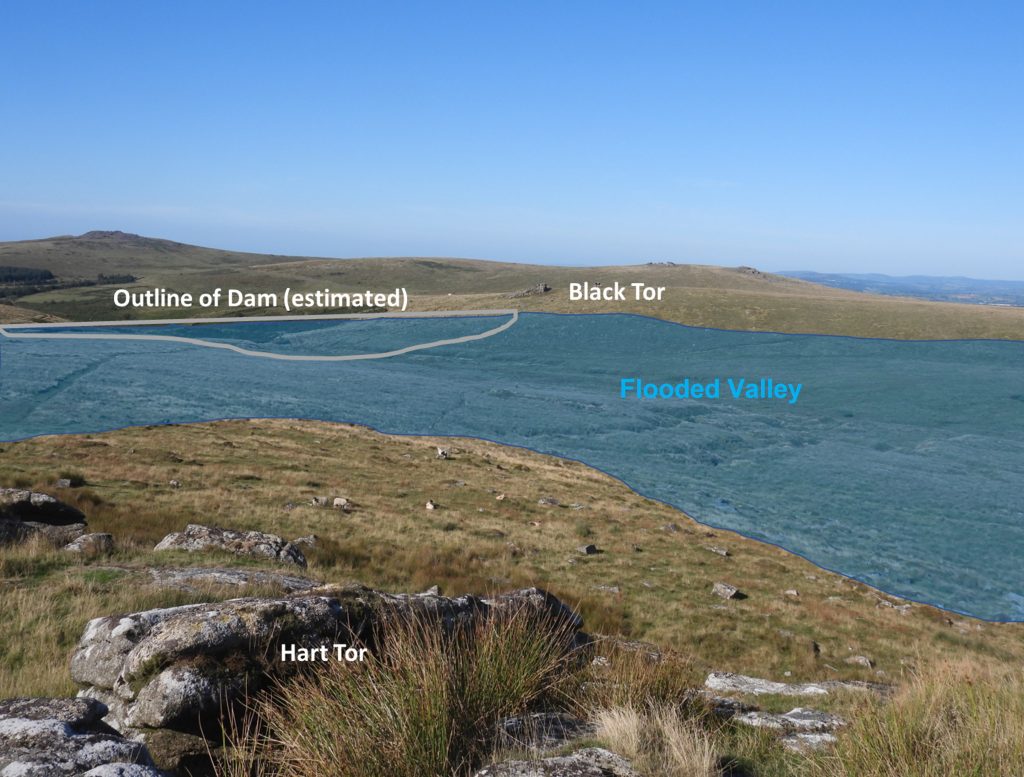
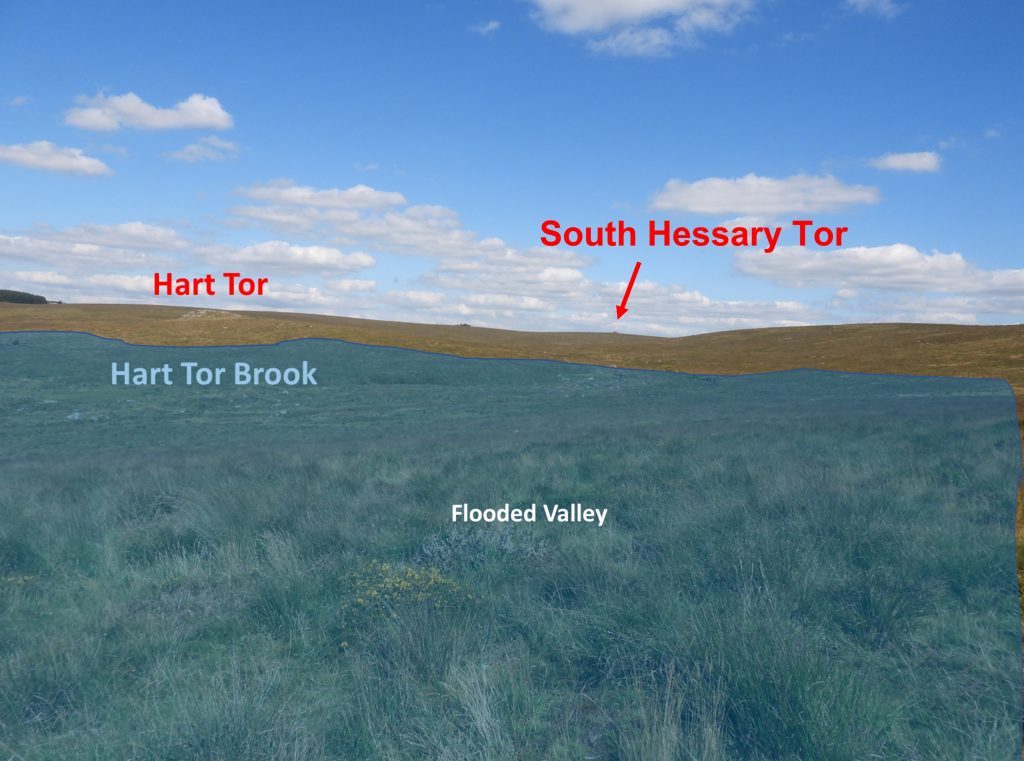
The survey map (see previous hyper-link in sketch map caption) showing the capped boreholes can also be found on Dartefacts. Robert Naylor describes that: “These twelve items (capped bore holes) are relics of a C.19th project to create a reservoir in this valley”. He further shows the potential impact such a reservoir would have had by way of a annotated map showing the water level at the 360m contour line. It was this entry that partly inspired the author to write this post.
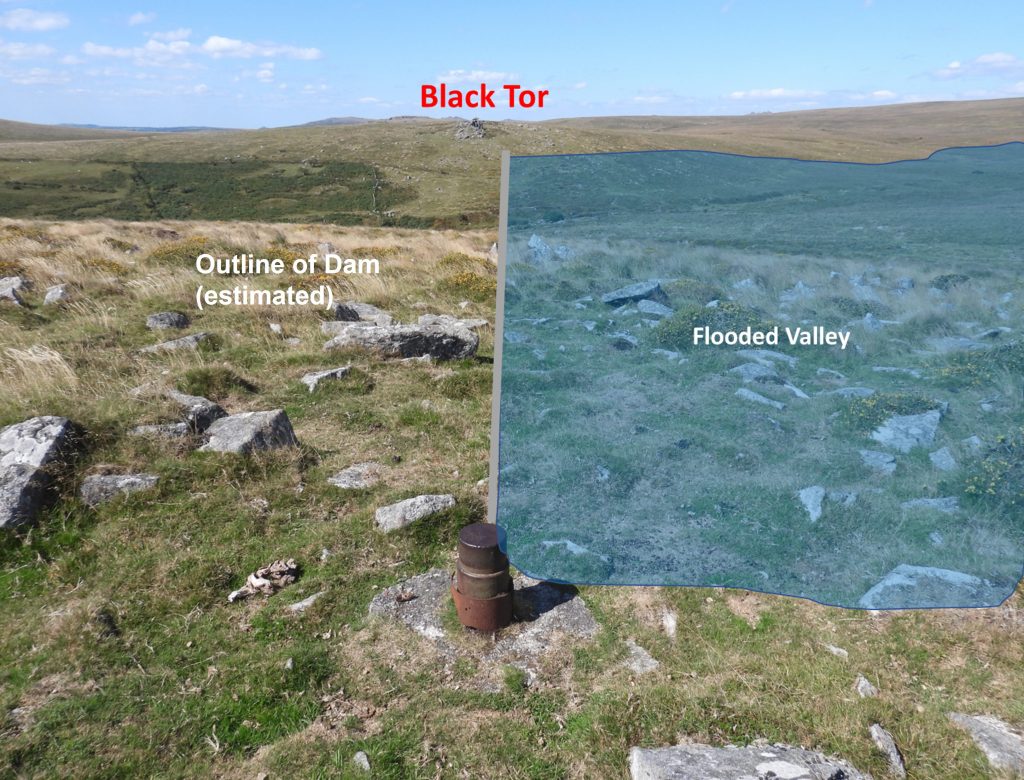
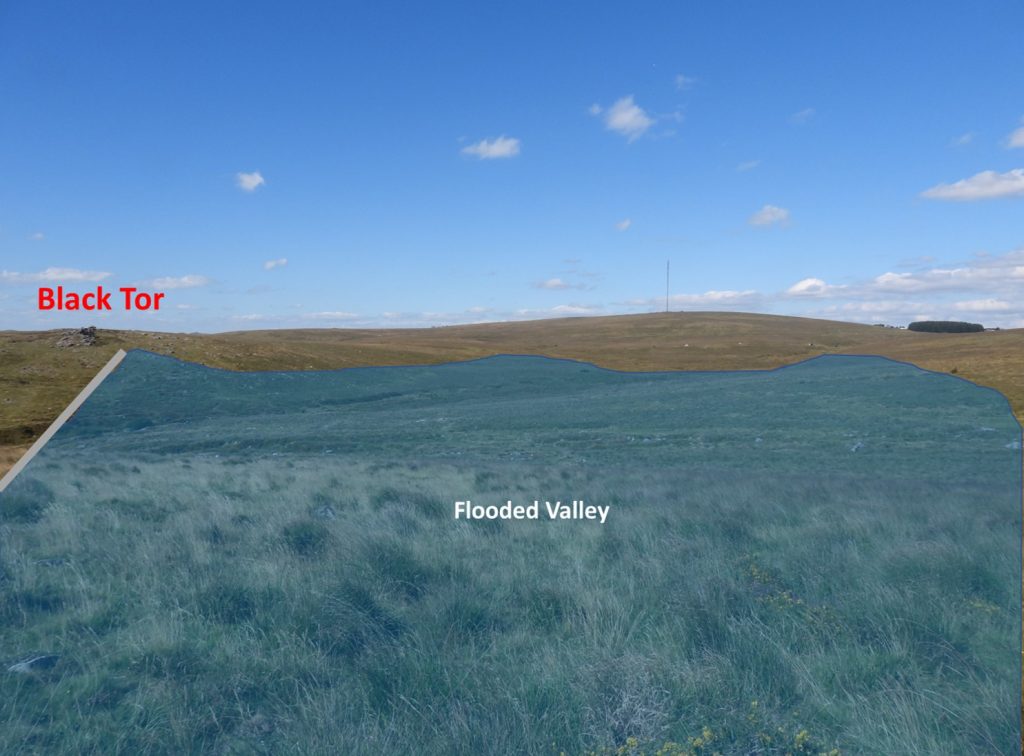
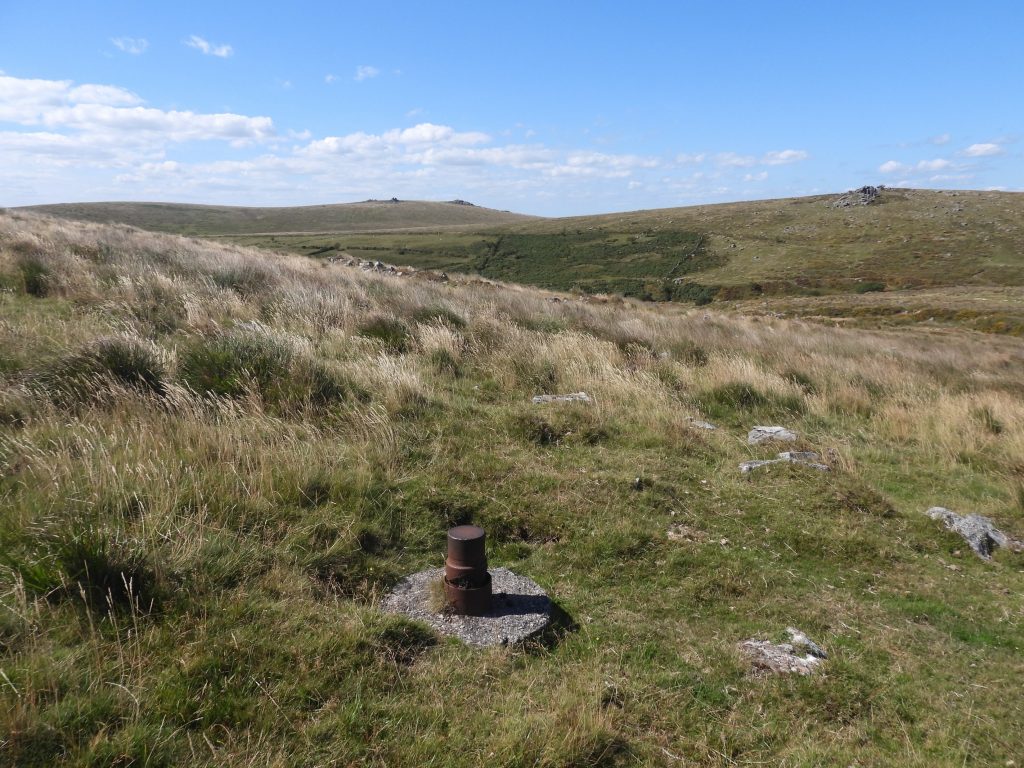
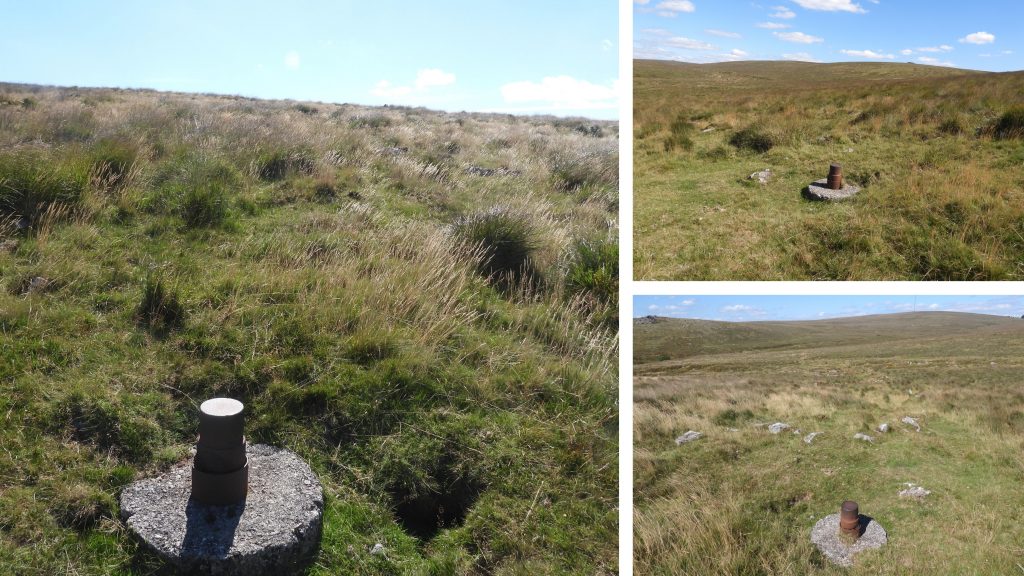
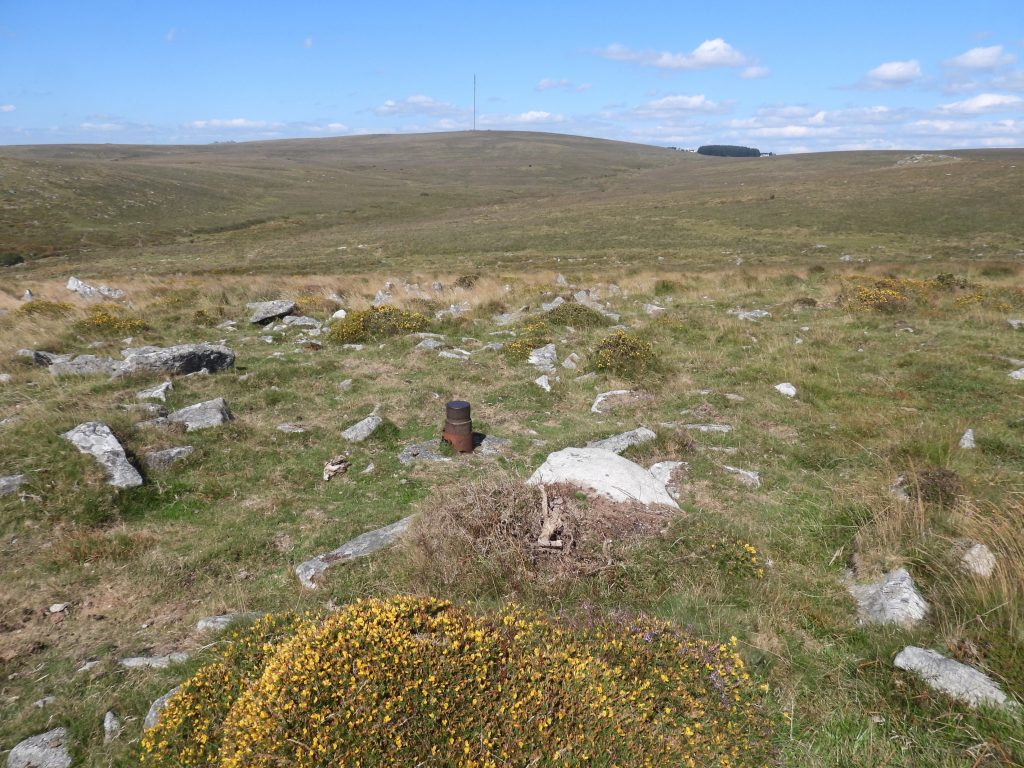
The twelve capped boreholes bare testament to an unsuccessful bid to consider the construction of a dam and reservoir in the Upper Meavy and Hart Tor Brook valleys. Ultimately, the geology of the proposed dam area proved to be the failure as the the granite wasn’t sound enough. The scheme was abandoned in favour of Burrator further down the Meavy Valley. This is mentioned in F.H Starkey publication, Exploring Dartmoor, on page 195 (and even shows a sketch of one of the capped boreholes!).
The land on which Burrator Reservoir is located was once (mainly) owned by two major landowners. One of the landowners was a Mr Bayly of Torr, Hartley, Plymouth (timber importer, his company became Bayly Bartlett). He wished to help the people of Plymouth and gave a large tract of land for the reservoir to be built However, the other landowner declined to sell at that time. The Hart Tor / Black Tor area was, at first, the preferred choice for a reservoir, but after the survey, Burrator seemed as a far better choice, with its adjacent stone quarries. The Burrator area was looked at again and the reluctant landowner eventually sold his tract of land to enable the reservoir to be built, which started in 1893 and was completed by 1898.
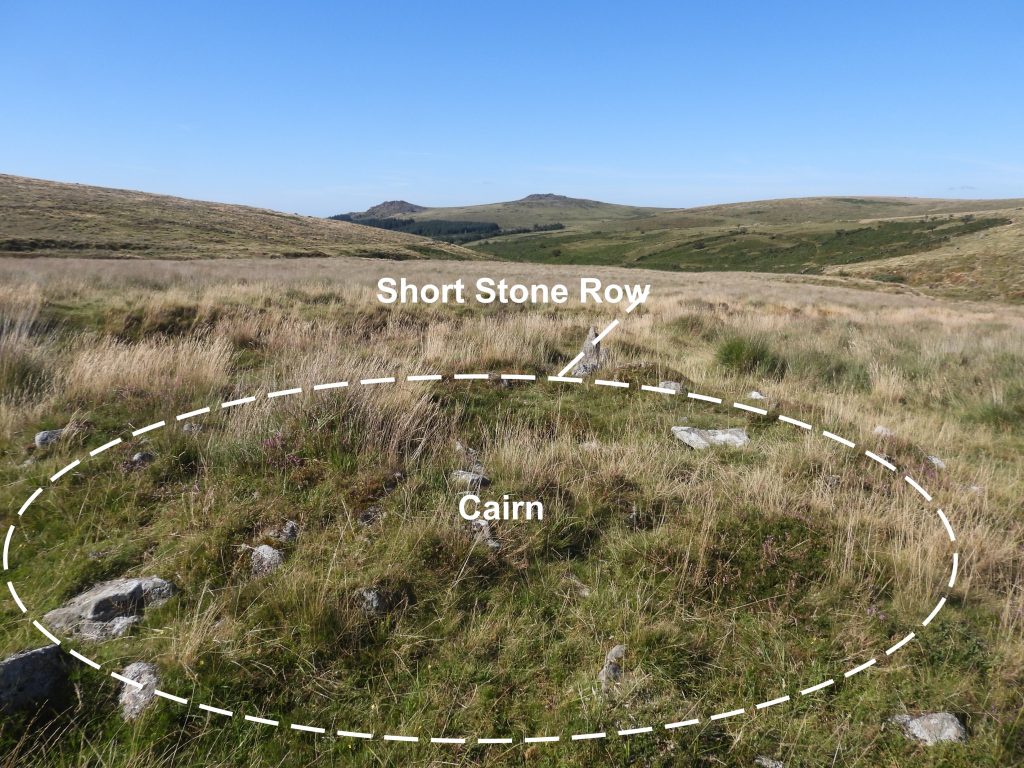
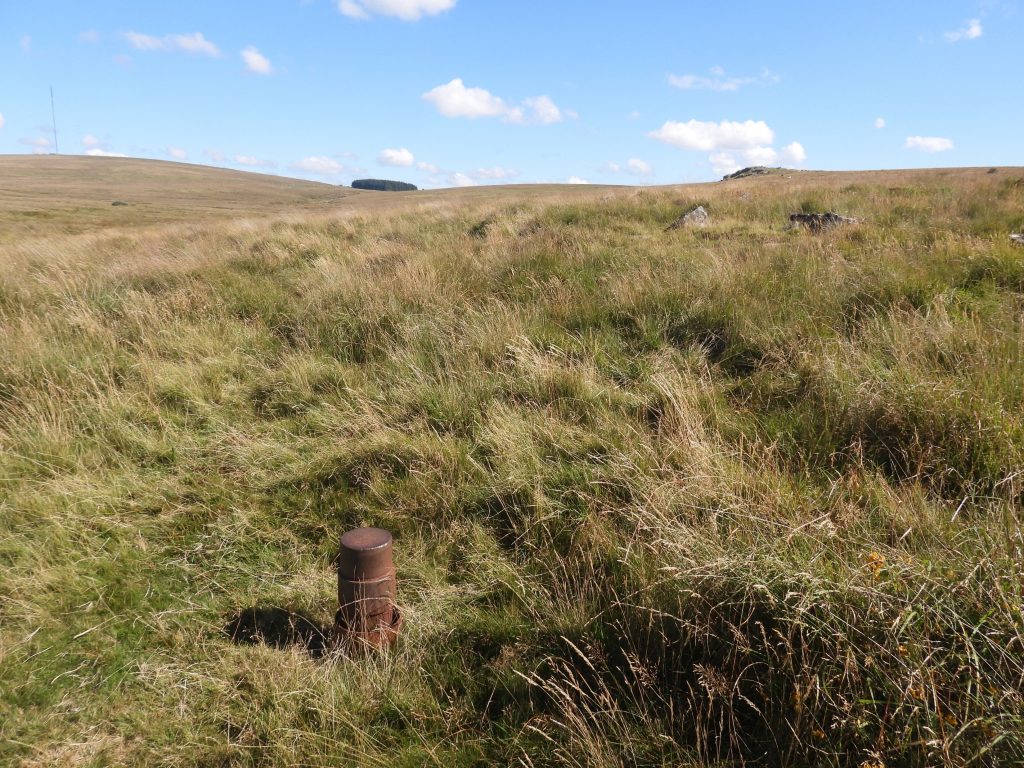
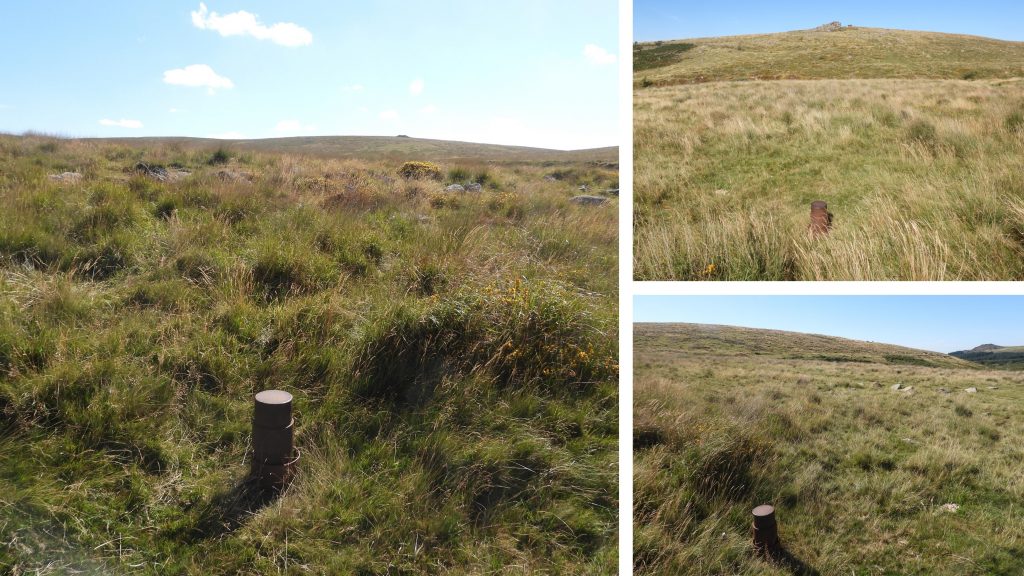
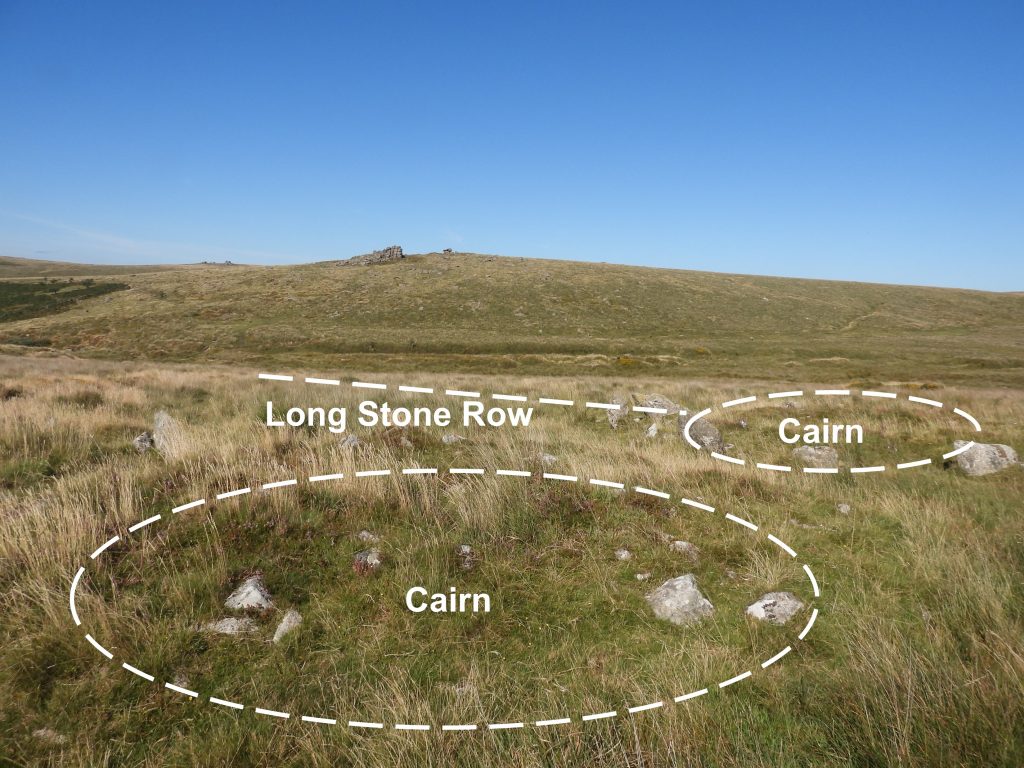
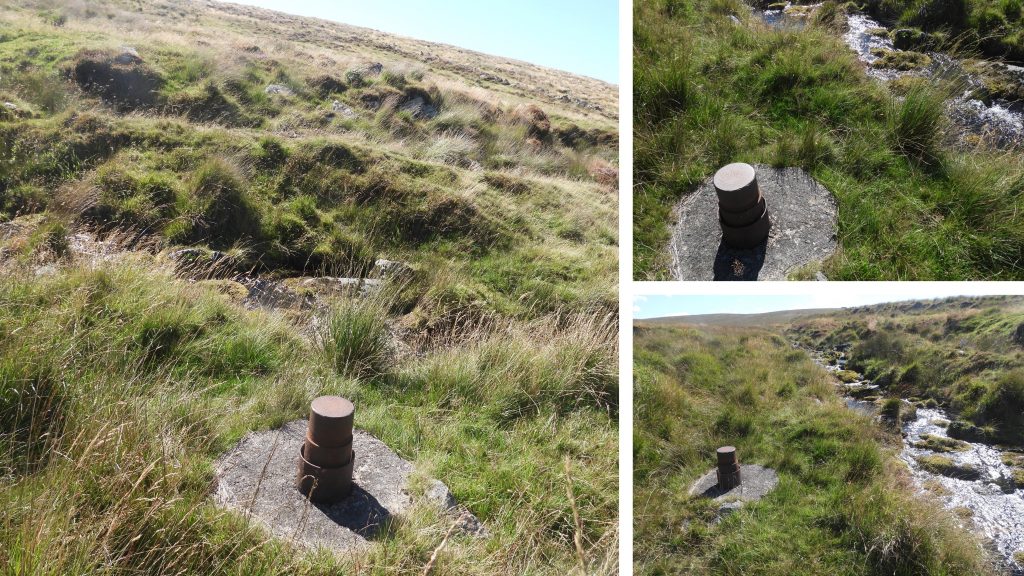
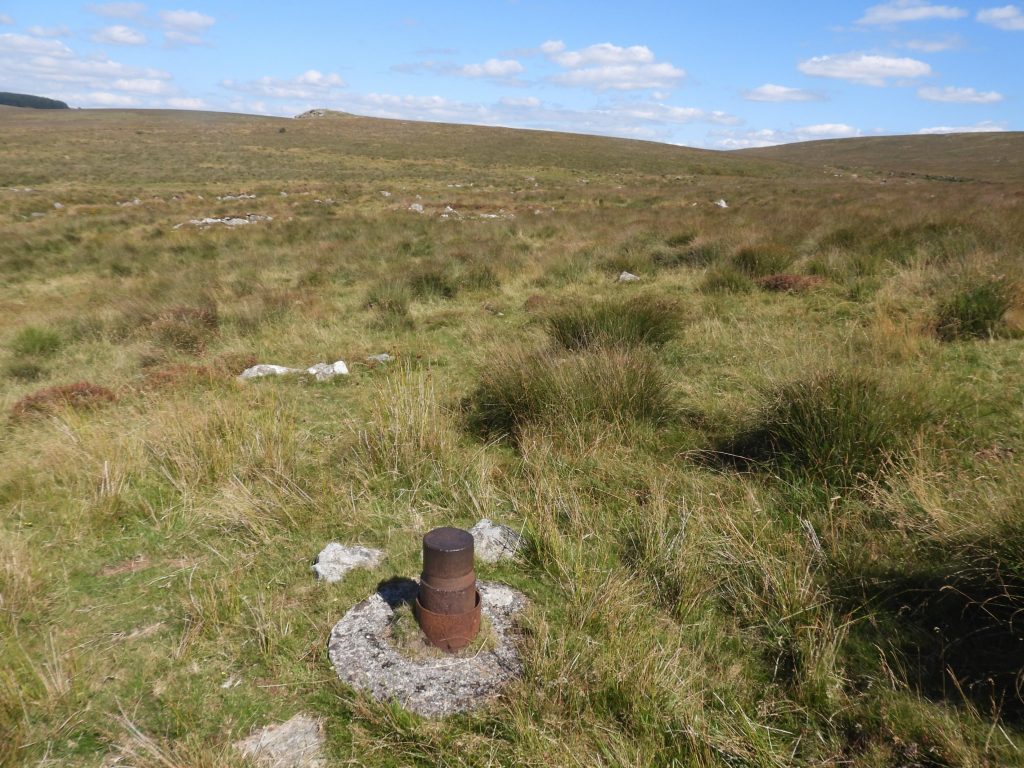
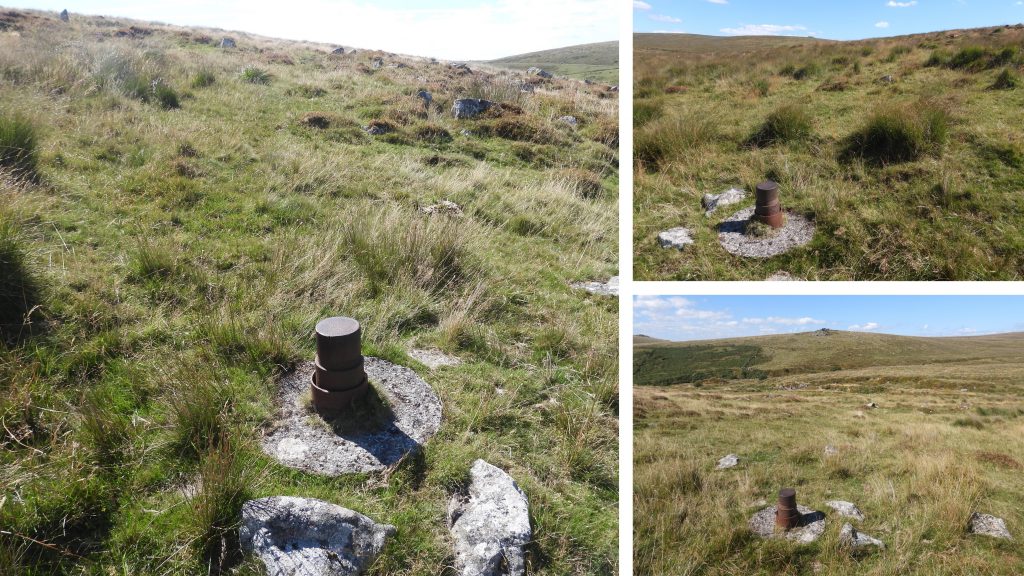
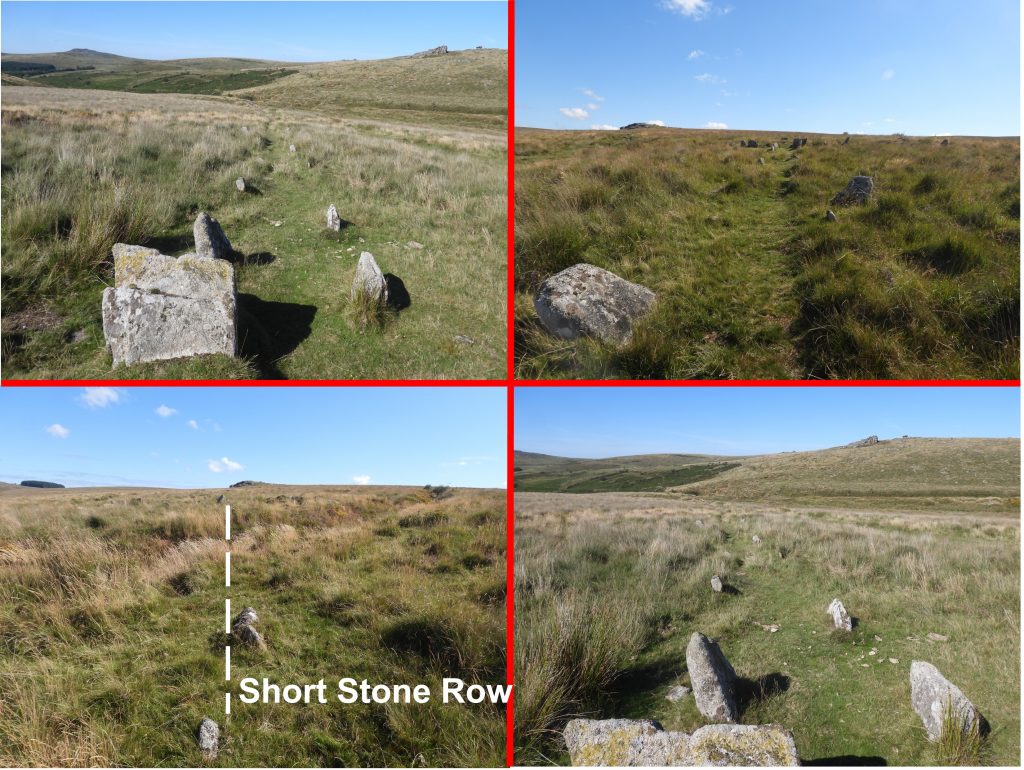
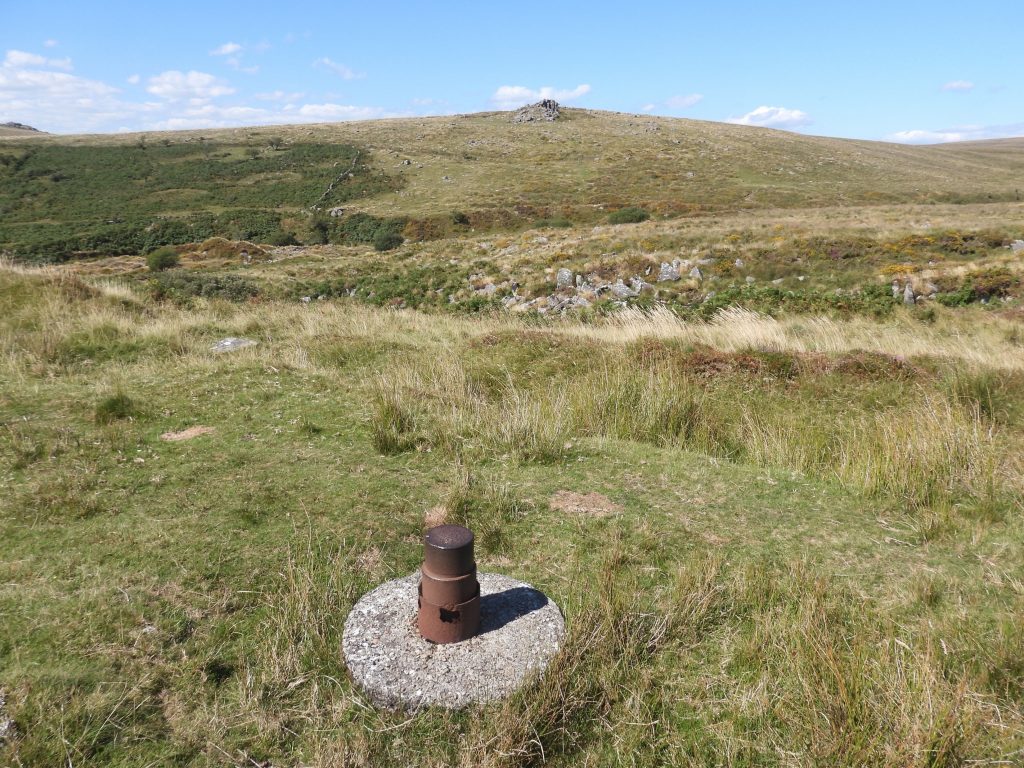
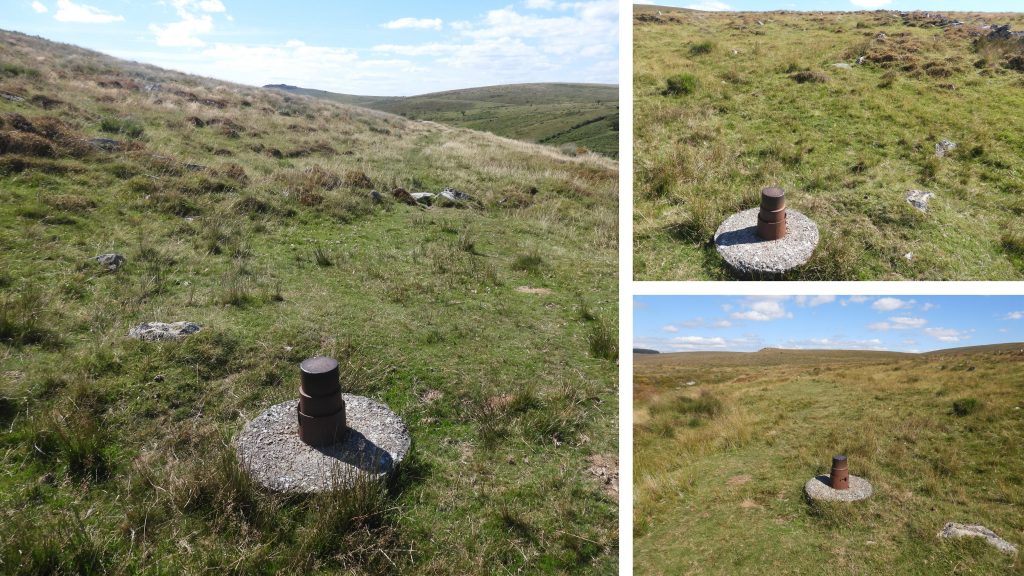
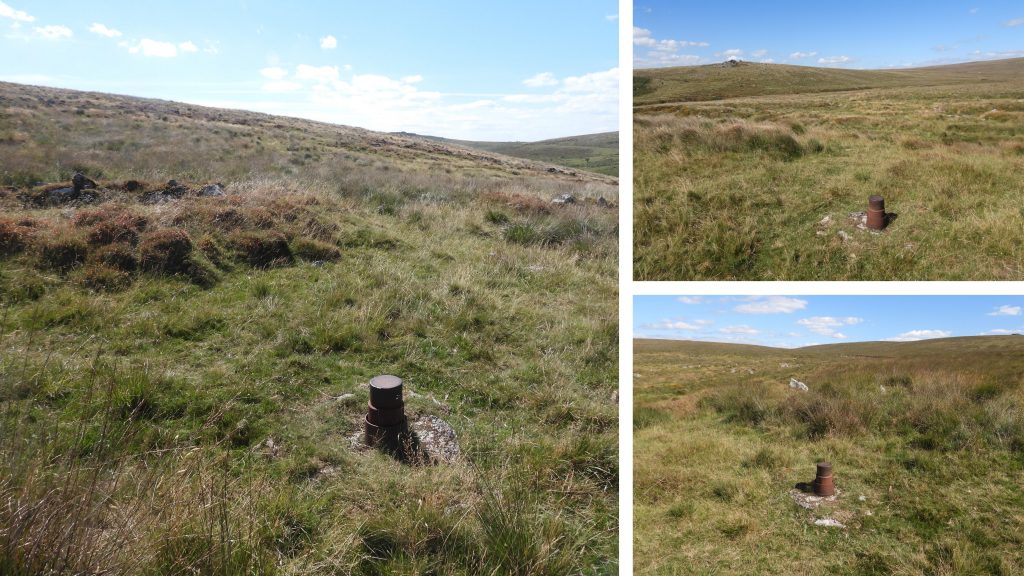
Had the Black Tor / Hart Tor reservoir scheme have gone ahead, the antiquities lost would have included 3 cairns, 2 stone rows and a Bronze Age settlement of 11 huts along as well as a lot of old tinners’ workings. The following pictures show the capped bore holes and the antiquities which were at risk.
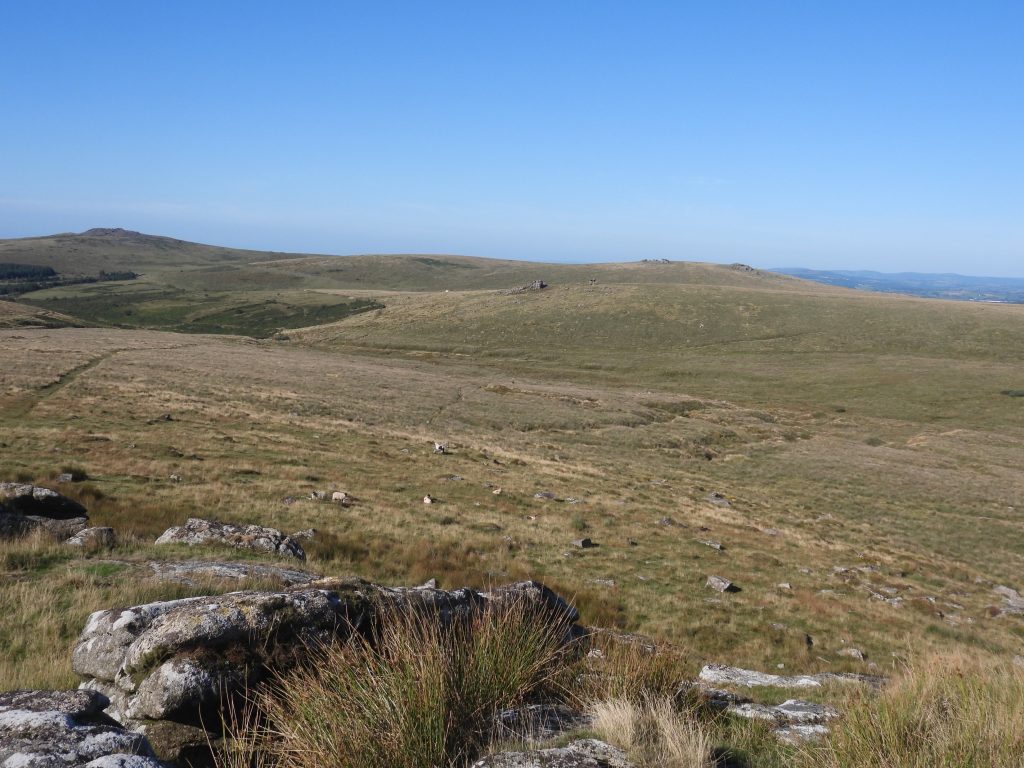
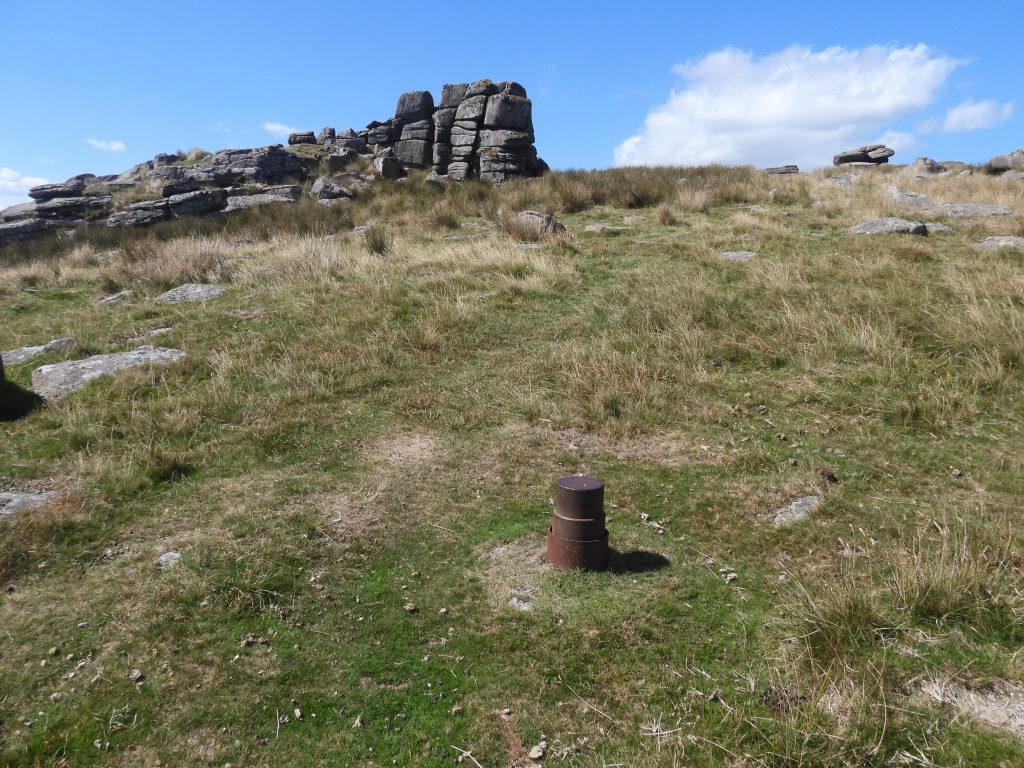
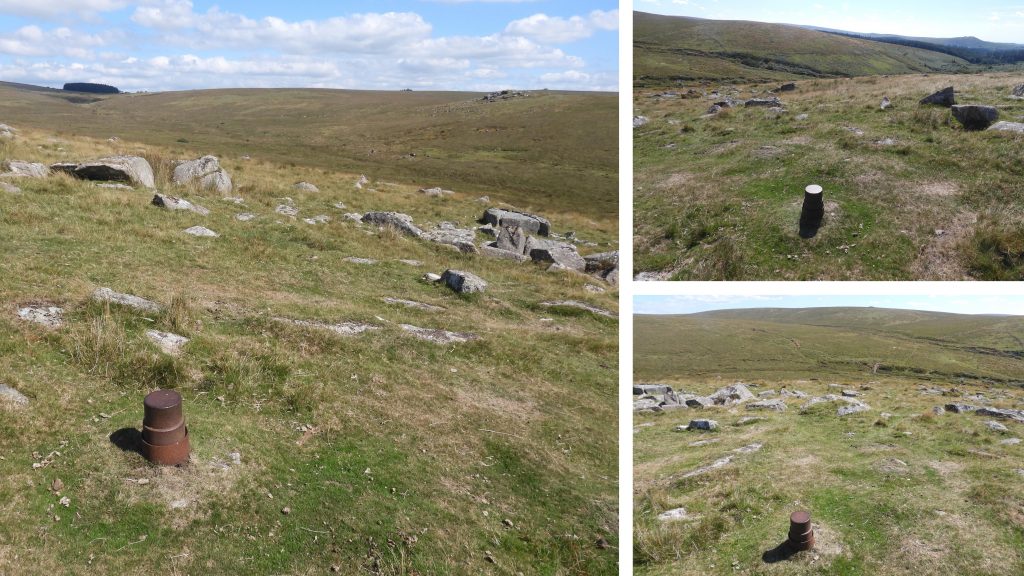
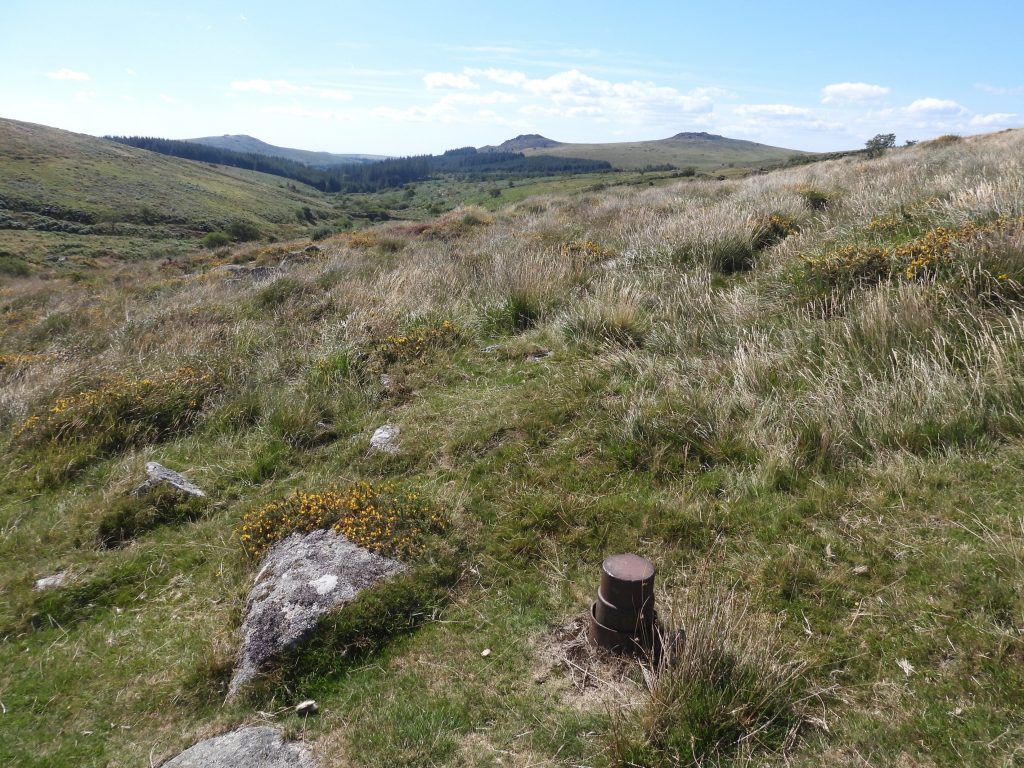
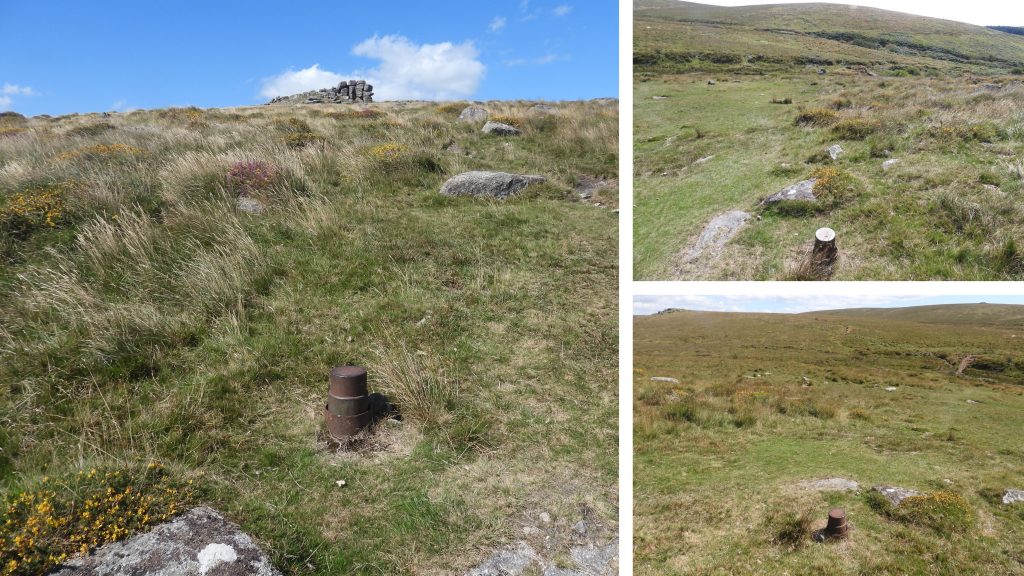
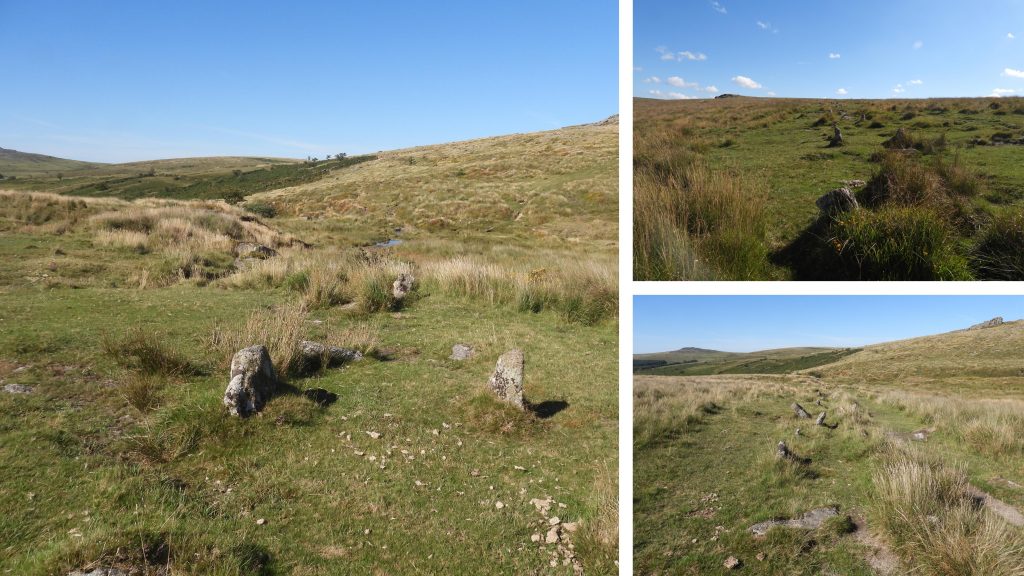
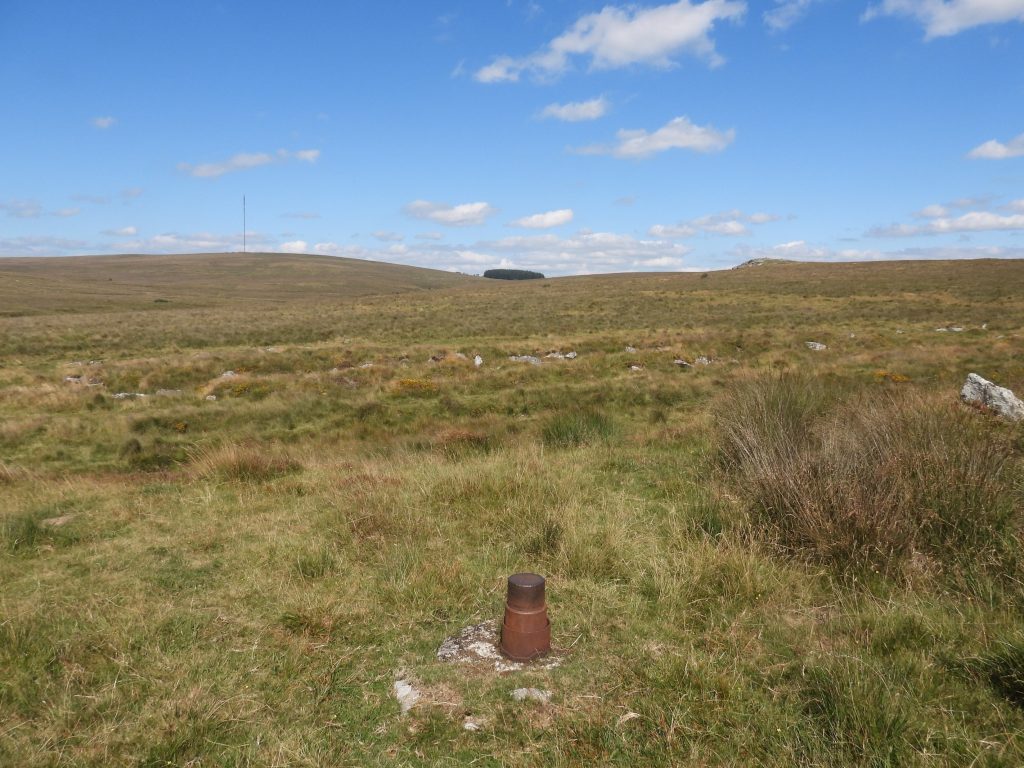
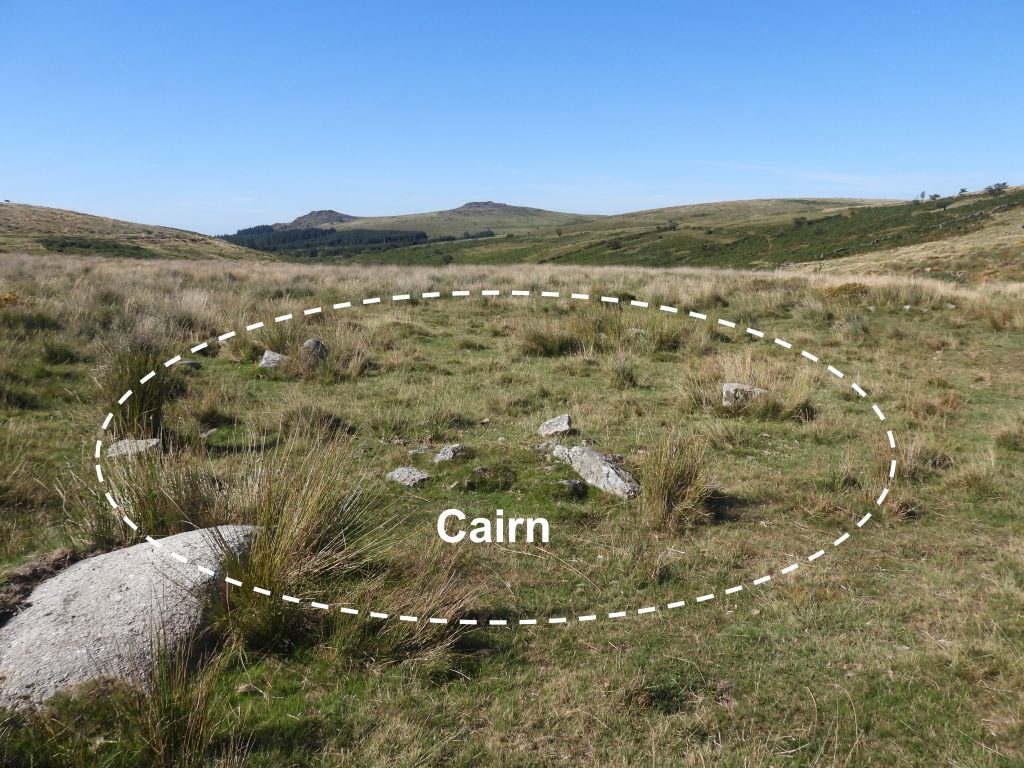
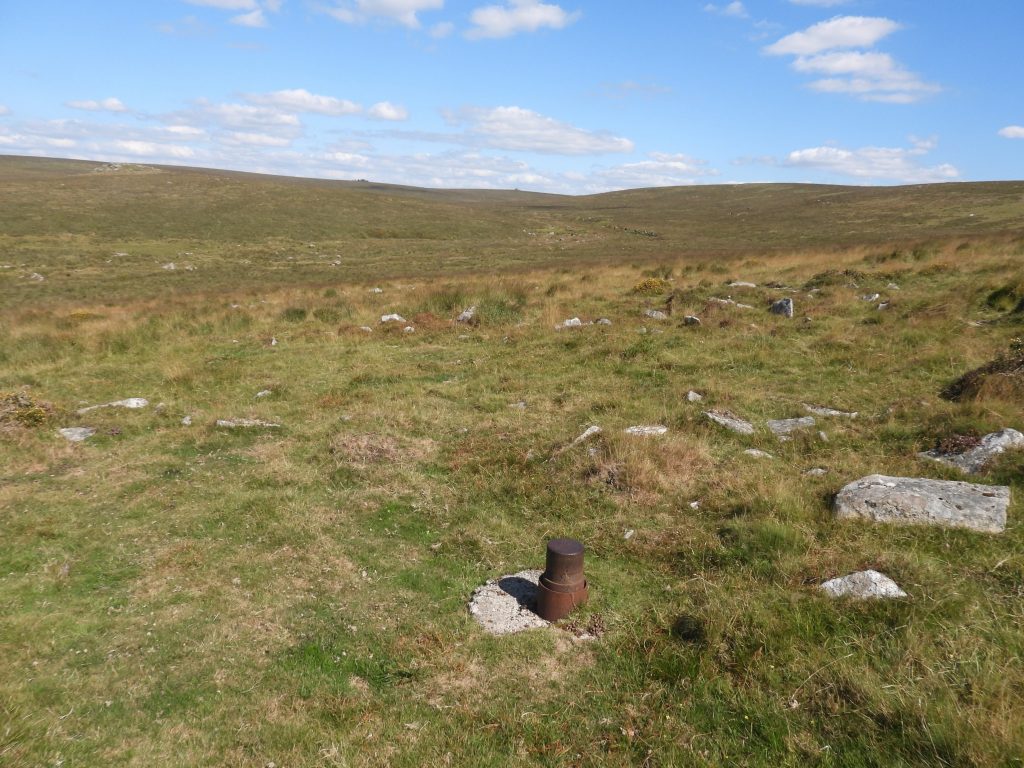
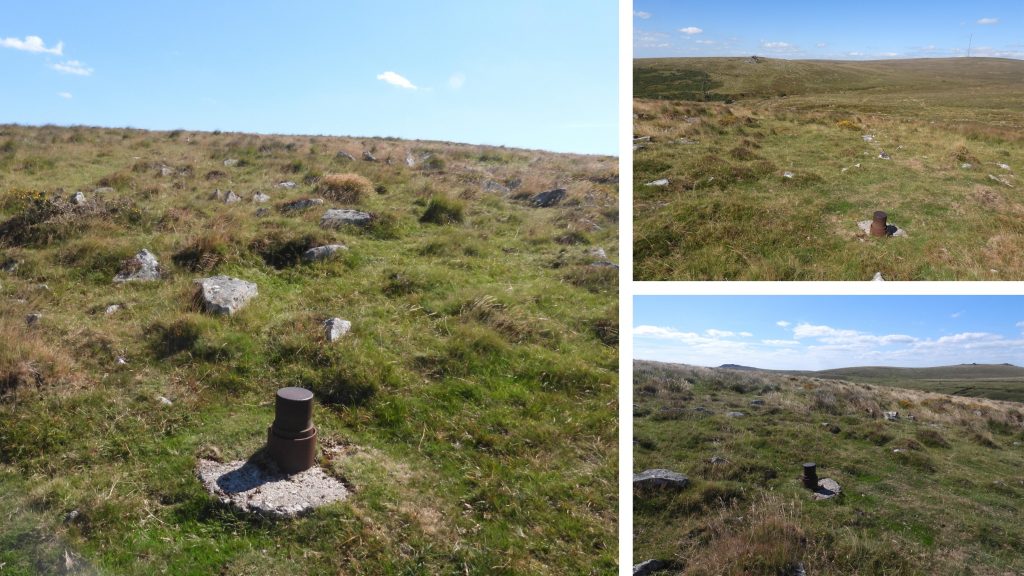
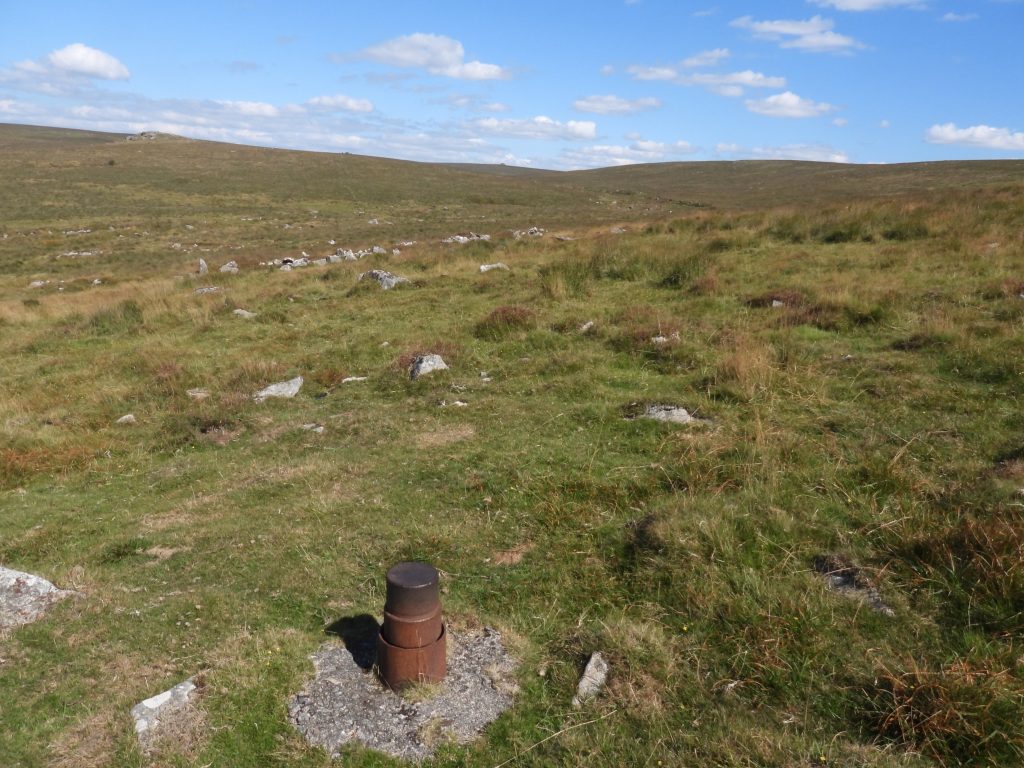
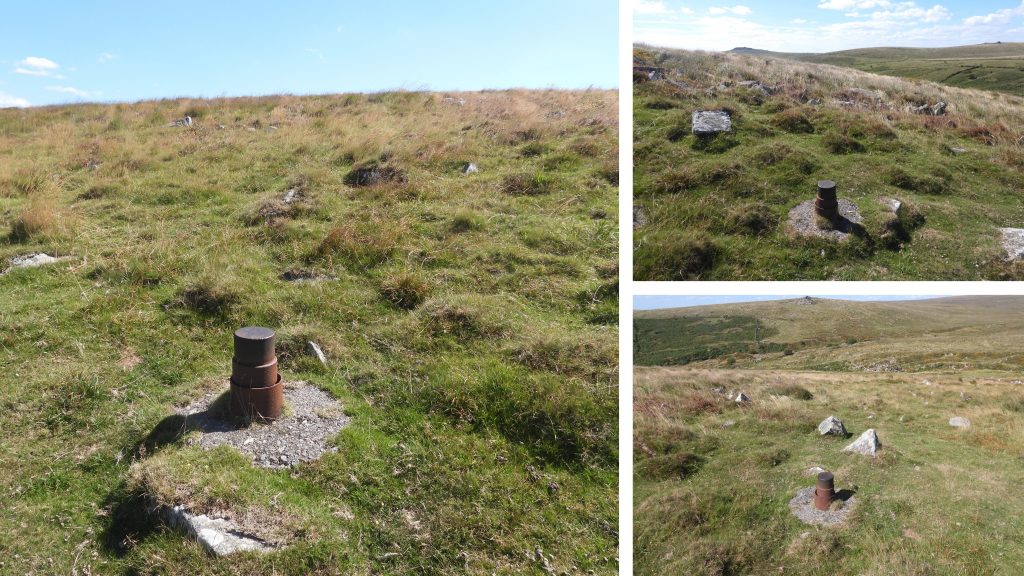
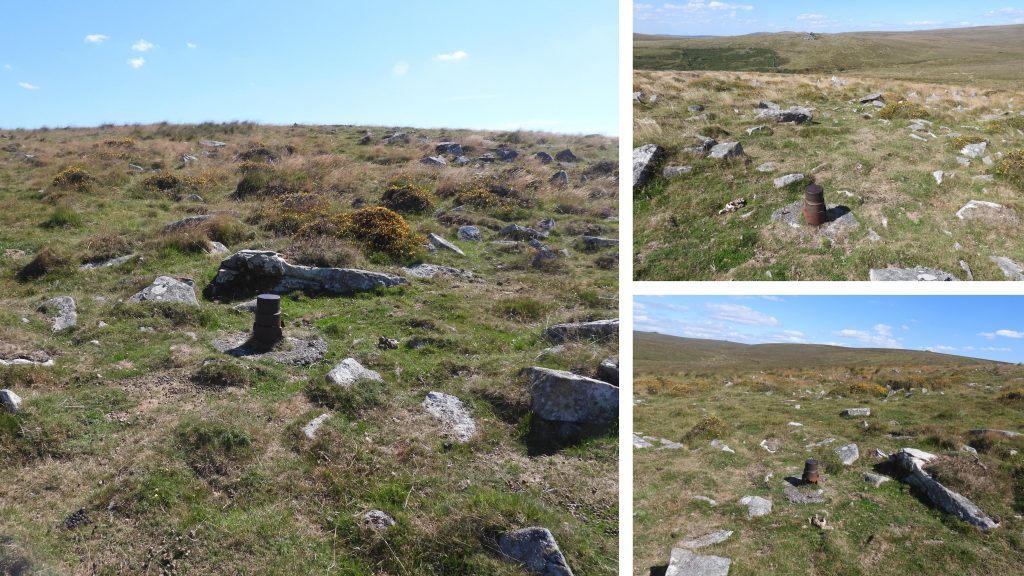
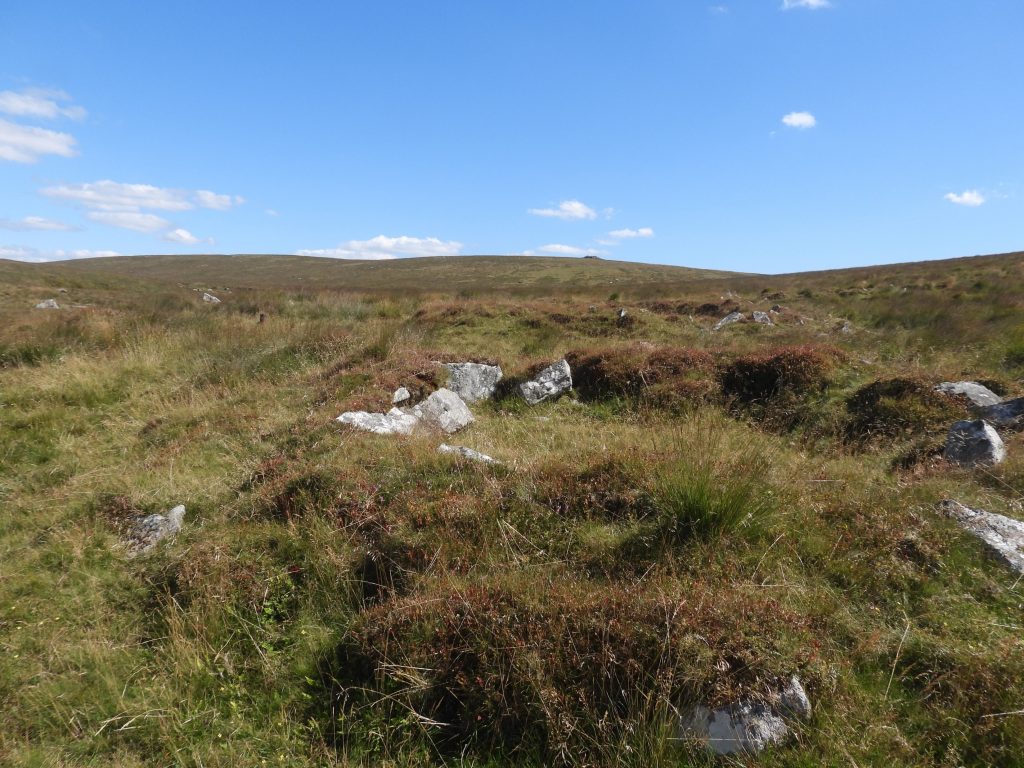
A view of the Upper Meavy Valley from the top of Hart Tor looking west towards Black Tor (mid distance) with Leeden Tor and Sharpitor on the skyline.This is the same view as the previous photograph of the Upper Meavy valley but shows the (very approx.) water level had the dam been built at the 360m contour level. The Capped Borehole (No. 1) nearest to Black Tor. Capped Borehole (No. 1) is located at SX57388 71782There are two stone rows (one short, one long) with associated cairns which can be found between the Meavy and Hart Tor Brook. These antiquities had already been partly destroyed by the tinners but would have been totally lost had the dam and reservoir been constructed.Capped Borehole (No. 2) is downhill from No.1. The phorograph shows views towards Sharpitor Leather Tor and Sheepstor.Capped Borehole (No. 2) is located at SX57475 71720The (short) stone row is a single stone alignment containing at least 16 stones and is just over 50 metres in length. There is a cairn at the east end. The tinners trench which crosses row can be seen in the photograph running left to right.Capped Borehole (No.3) is located next to a ford on the Meavy.Capped Borehole (No.3) is located at SX57525 71678As recorded by Sandy Gerrard (Meavy Valley Archaeology. Interim Report for 1997): The single stone row was: “originally probably much longer. Maximum stone height is 0.86m, minimum is 0.08m and the average is 0.29m. Maximum distance between stone is 13.75m, minimum is 0.5m and average is 3.25m”.The Capped Borehole (No. 4) is located between the Meavy and Hart Tor Brook.Capped Borehole (No. 4) is located at SX57578 71615The cairn in the foreground is associated with the single (short) stone row and is located at SX57716 71699. It is described by Jeremy Butler, (Dartmoor Atlas of Antiquities: Volume Three – The South-West, 58-9, Map 46, Figure 46.5) as being “7.5 metres diameter by 0.9 metres high surrounded by an outer ring of stones and a central pit”.Capped Borehole (No.5) is located on the north bank of Hart Tor BrookCapped Borehole (No. 5) can be found at SX57617 71541The Cairn associated with the long (double) stone row can be found at SX57715 71707. Referring to Jeremy Butler again (Dartmoor Atlas of Antiquities: Volume Three – The South-West, 58-9, 207, Map 46, Figure 46.5) where is is recorded that this cairn is “9.3 metres diameter by 0.8 metres high with a circle of 14 tall slabs surrounding the cairn at the east end of the double stone row. Concentric circles were noticed within the mound in 1859 but are no longer visible”. A lovely example which would have been at least 20m under water had the dam / reservoir been built.Capped Borehole (No.6) can be found in the centre of a Bronze Age hut circle settlement containing 11 huts within a D-shaped enclosure. The iron capped borehole is 0.4m high on a concrete base of 0.4m diameter. Capped Borehole (No. 6) can be found at SX57635 71469Various views of the single (short) and long (double) stone rows.Capped Borehole (No. 6A) is one of four surrounding the Bronze Age settlement and is close to Hart Tor Brook and the former Keaglesborough Leat. Capped Borehole (No. 6A) can be found at SX57584 71492The double (long) stone row extends in the west to near the Meavy. It has been disturbed by the tinners (a leat crosses the row half way down). The row was surveyed and recorded by R.N. Worth (circa 1891) and R.H. Worth (circa 1946). It is recorded as having around 90 stones along it 126 metres length. Another great loss had the dam / reservoir been built.Capped Borehole (No. 6B) is located at the north east edge of the Bronze Age settlement. Capped Borehole (No. 6B) is located at SX57673 71507A less conspicuous cairn in the area is located to the east of Capped Borehole (No. 3). According to Jeremy Butler (Dartmoor Atlas of Antiquities: Volume Three – The South-West, 59, 207, Map 46, Figure 46.5) the cairn has a diameter of SX57567165 “9.0 metres and is 0.8 metres high. A prominent cairn retains a good shape but has not escaped plundering in the centre”. Another potential casualty of the dam / reservoir.Capped Borehole (No.7) is located just to the south of the Bronze Age settlement. It would seem that the geologists may have originally had only 8 boreholes (Nos 1-8) but an additional four were made, surrounding the antiquity. These are labelled 6A, 6B, 7A and 7B on the original survey.Capped Borehole (No. 7) is located at SX57648 71381. View from the southernmost capped borehole looking across the (approx) line of capped boreholes towards Black Tor. The extent of the flooded valley is shown for illustration.Capped Borehole (No. 7A) to the south west of the Bronze Age settlement boundary. Capped Borehole (No. 7A) is located at SX57595 71419Another approximation of the flooded valley. North Hessary mast and Princetown shown in the distance.Capped Borehole (No. 7B) is located at the south east side of the Bronze Age settlement.Capped Borehole (No. 7B) is located at SX57687 71431A view of what the Hart Tor flooded valley would have looked like. Hart Tor would have been on a “peninsula”. South Hessary Tor can be seen in the distance.The twelfth and final Capped Borehole (No. 8) looking across the Hart Tor Brook and Meavy Valleys.Capped Borehole (No. 8) is located at SX57655 71336.Several of the Bronze Age Huts on the north east side of the settlement. Capped borehole (No. 6A) can just be seen in the photograph. All the (11) huts were excavated in 1896 by the Dartmoor Exploration Committee and there was a subsequent report by Rev. Sabine Baring Gould (Third Report of the Dartmoor Exploration Committee – DEC). This would have been after the borehole survey, so the “DEC” would have seen the iron caps. Amongst items found were: charcoal, cooking stones, cooking holes, pottery, a flint scraper, some flint fragments and a muller (a stone used for grinding).
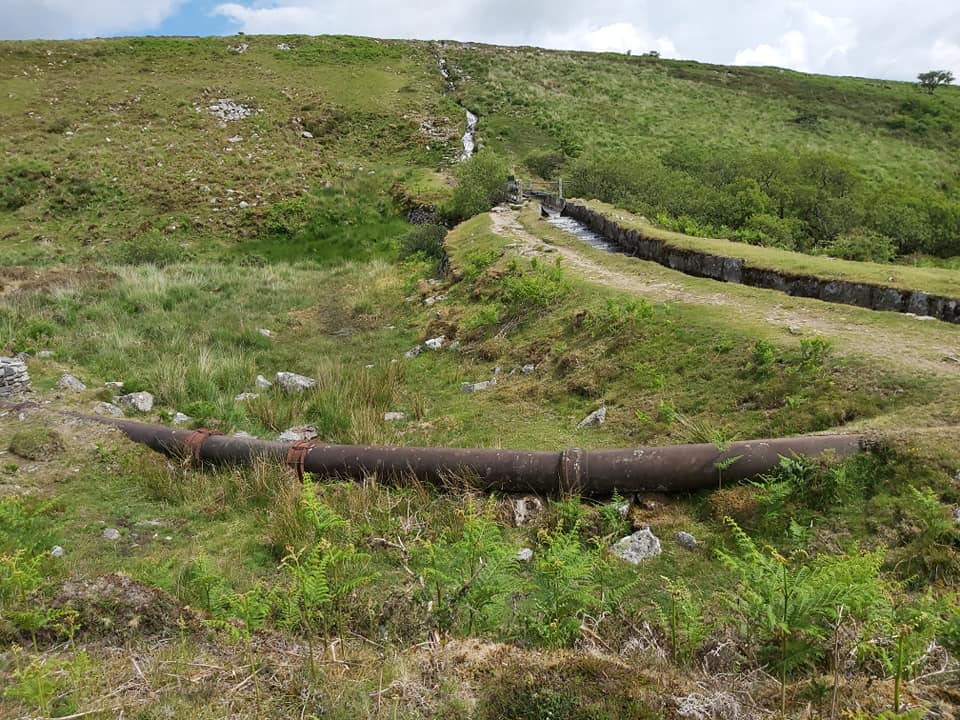
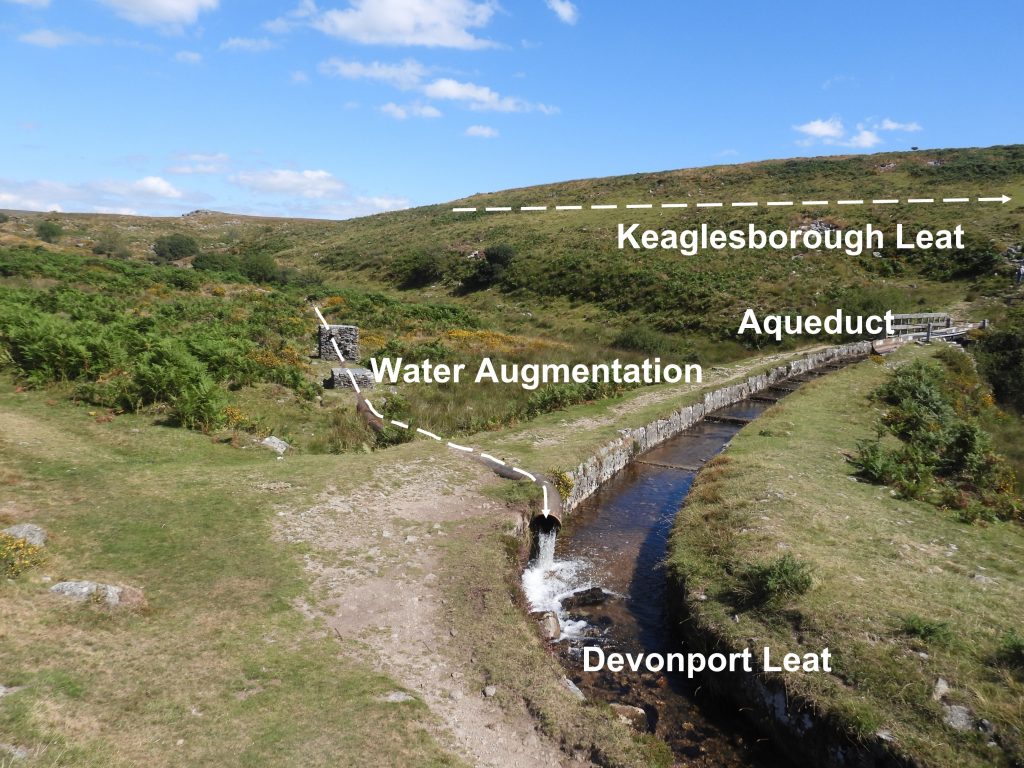
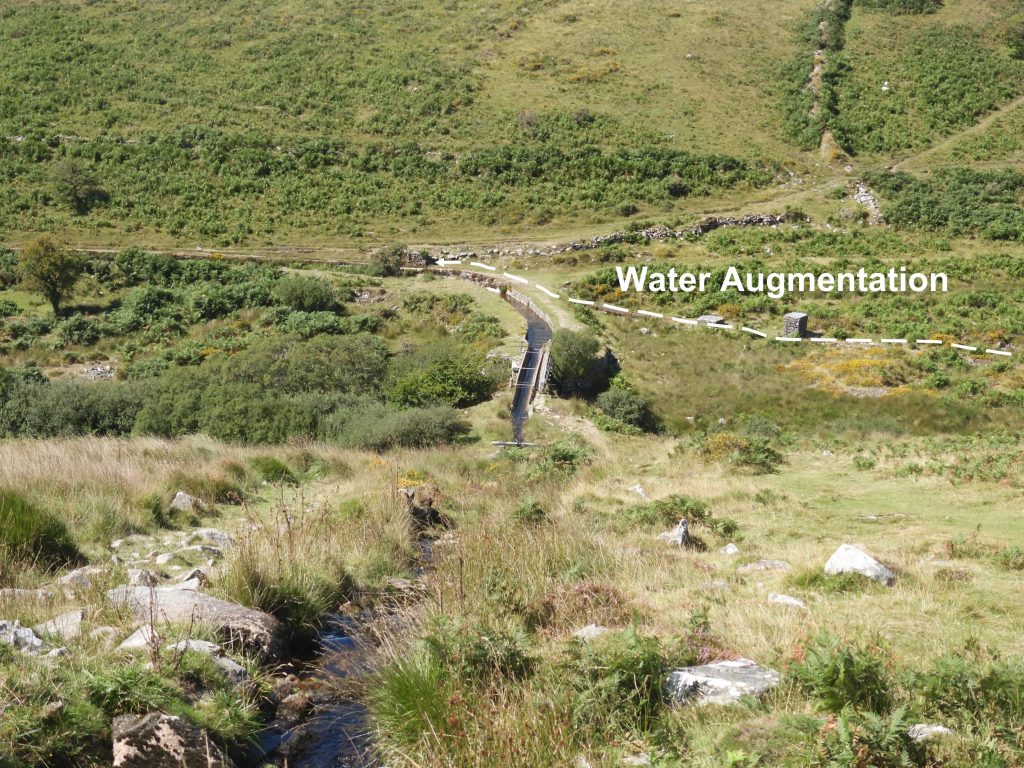
Part 3: Water augmentationof Devonport Leat
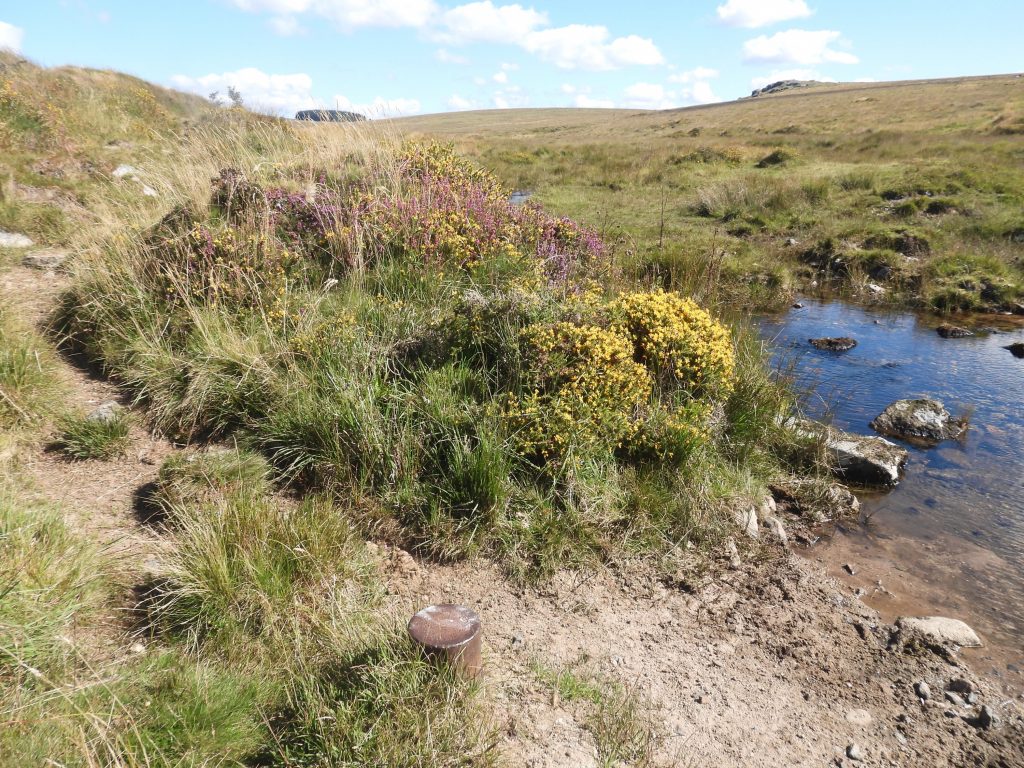
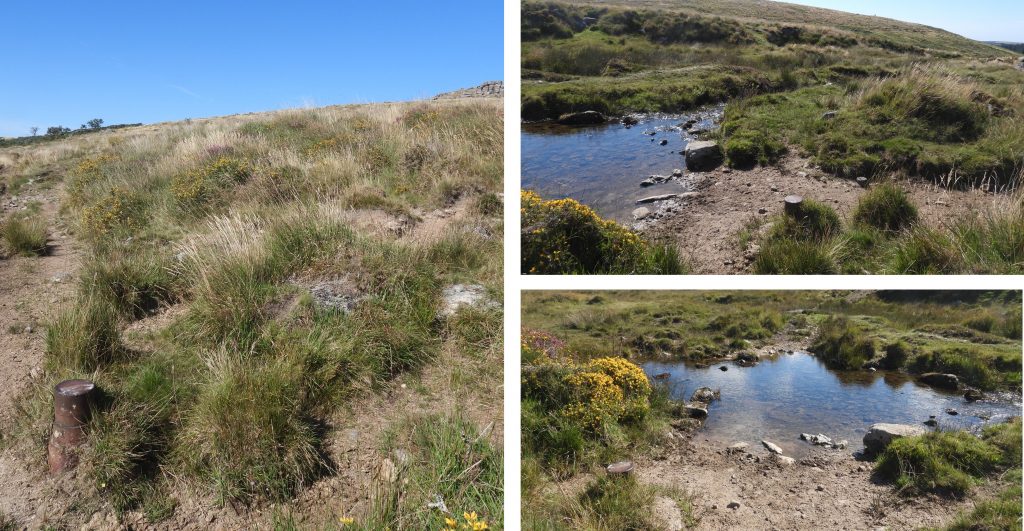
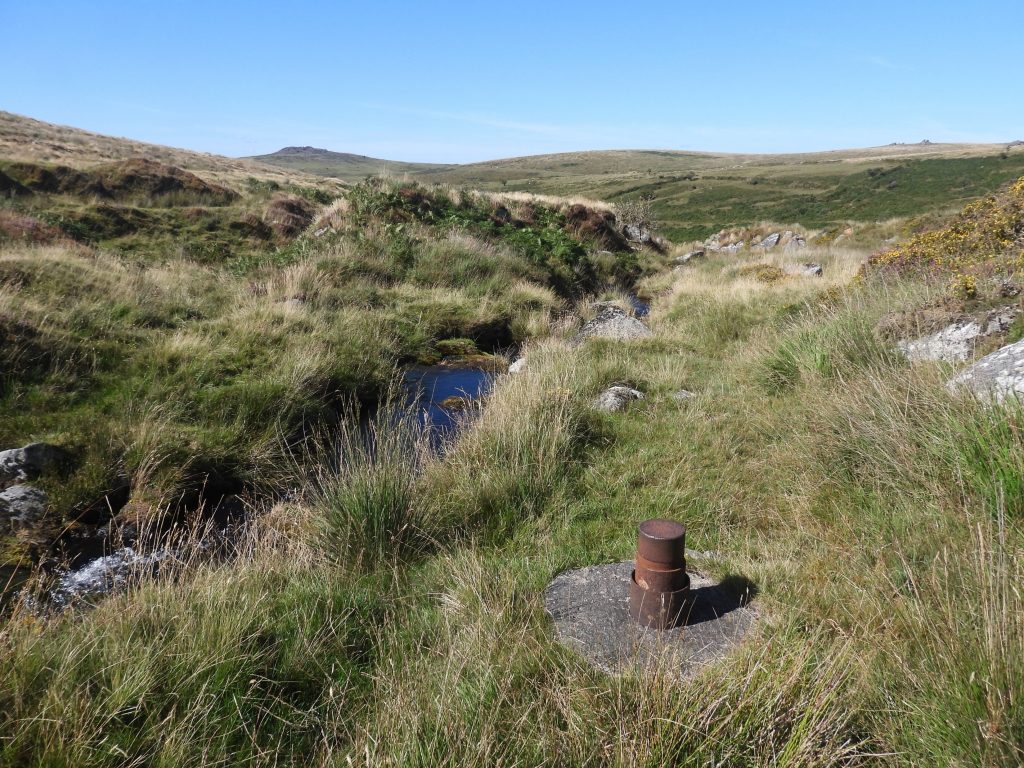
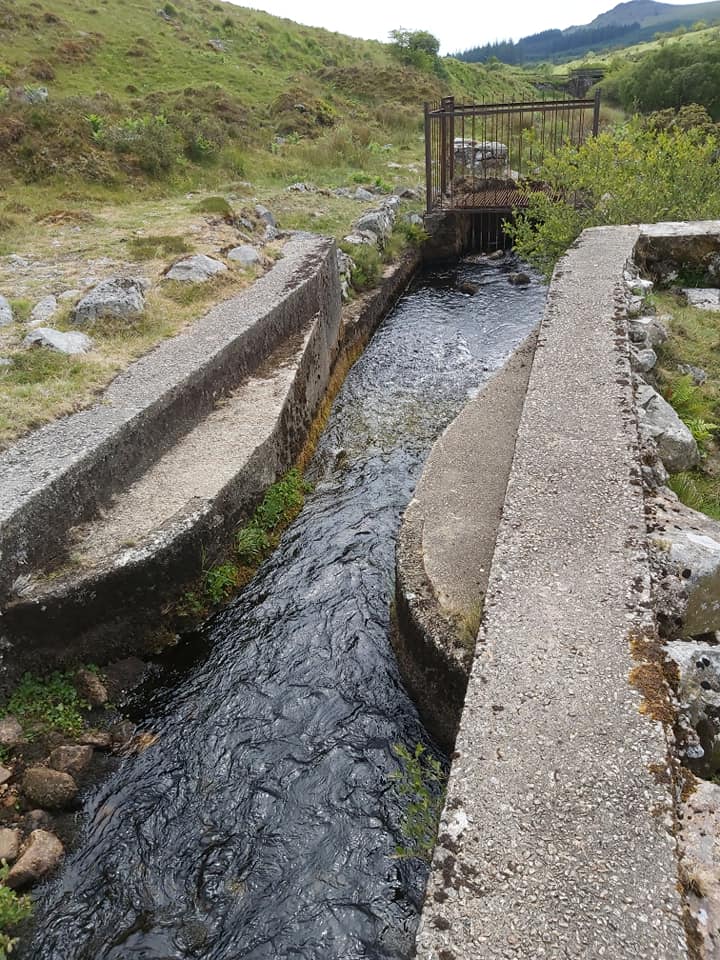
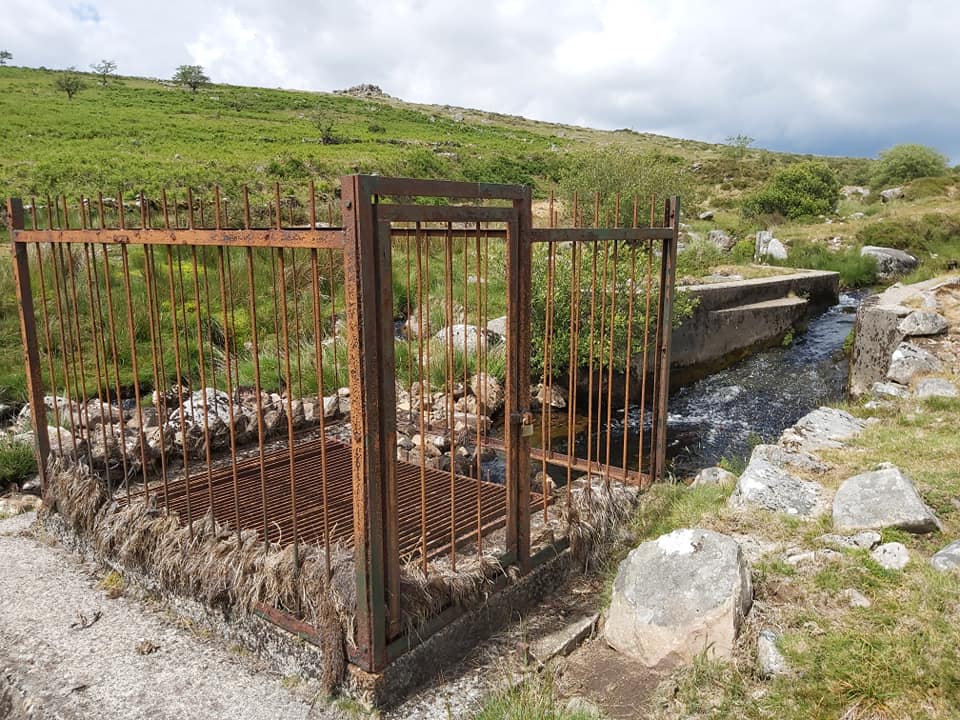
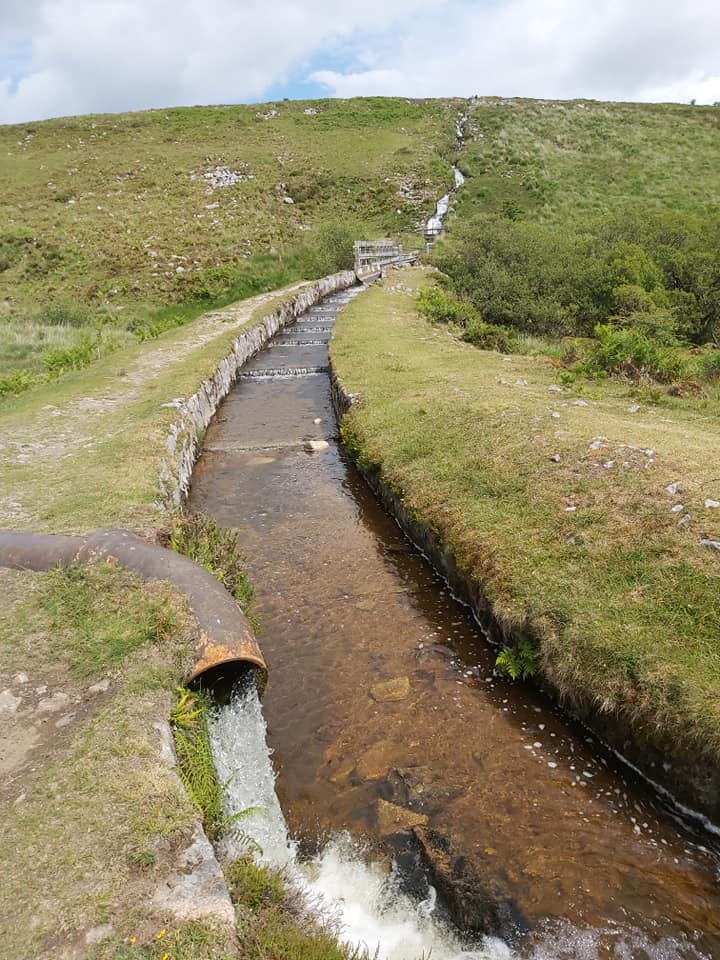
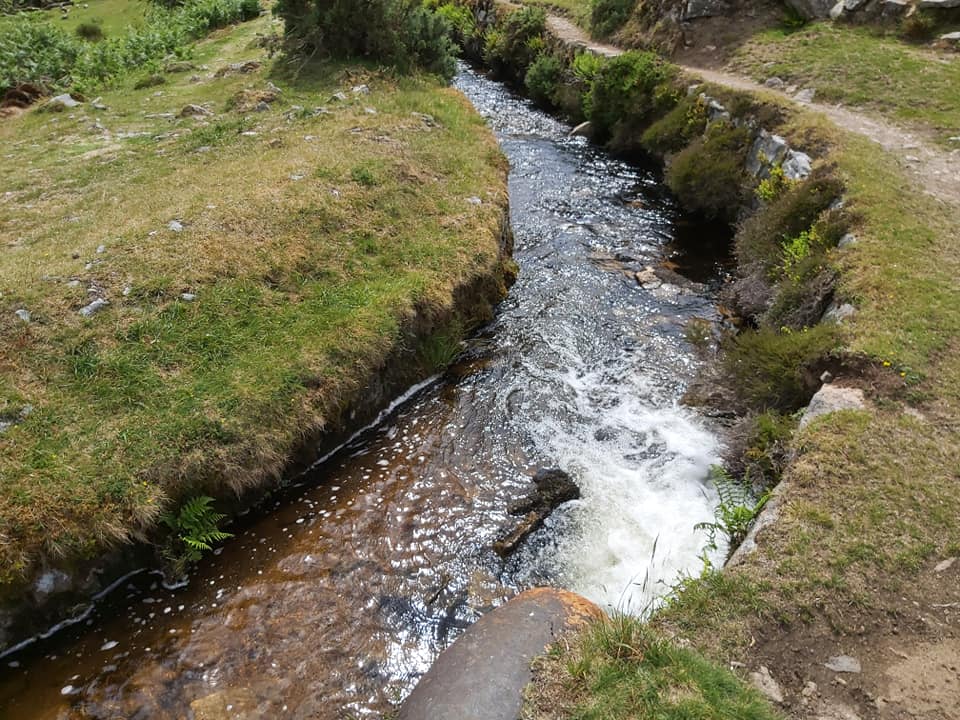
The water in Devonport Leat comes from the West Dart, Cowsic and Blackabrook Rivers. Near to where the leat crosses the Meavy by an aqueduct the leat is supplemented with water via an iron pipe from Hart Tor Brook and River Meavy. Devonport Leat then eventually exits another iron pipe above Burrator Reservoir to supplement it. Thus most of the water from the Meavy, Hart Tor Brook and Devonport Leat sources eventually feed Burrator Reservoir, but not all. Some of is piped (or at least used to be) to a water treatment works at Dousland and before that it fed a hydroelectric turbine at Yelverton. The source of water feeding the Dousland treatment works depends on water quality – if the leat water is of poor quality then good quality water is pumped from Burrator reservoir to the works. Dousland treatment works supplies water down to Crownhill (Plymouth), Tavistock and Princetown. This is the normal arrangement, however, in times of drought or poor quality, South West Water can effect various water movements to maintain good drinking water. The take off to Dousland is just above the Devonport Leat outlet pipe waterfall.
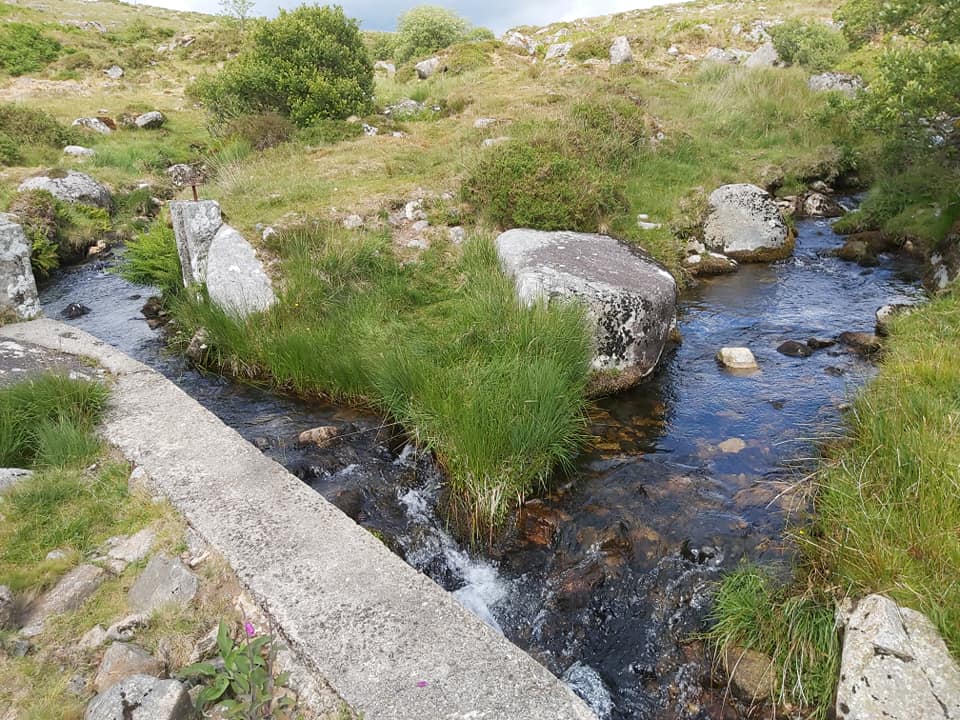
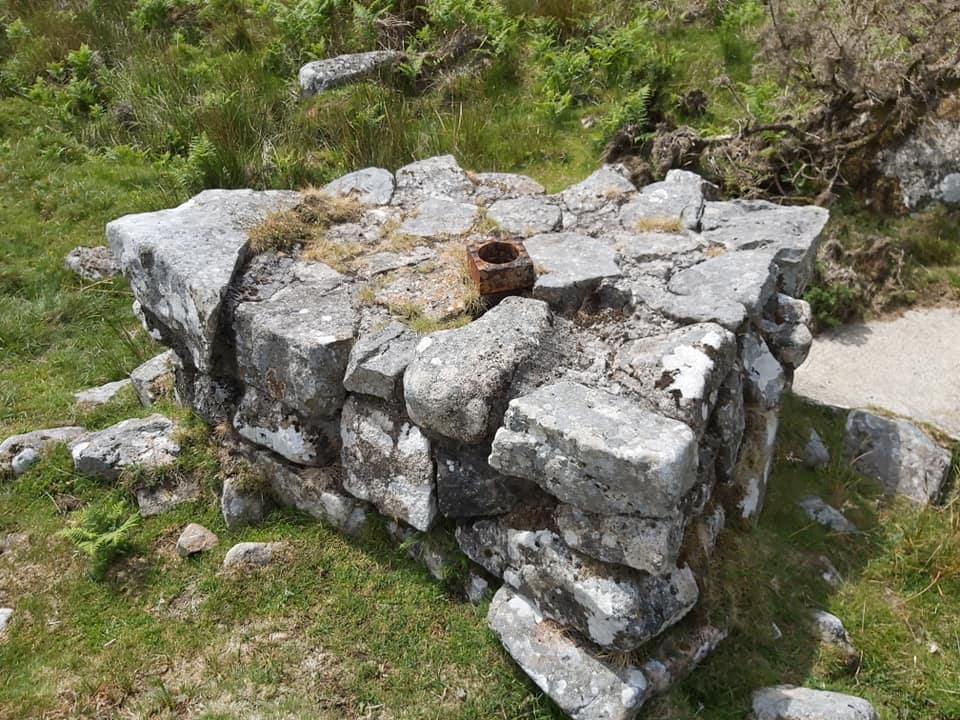
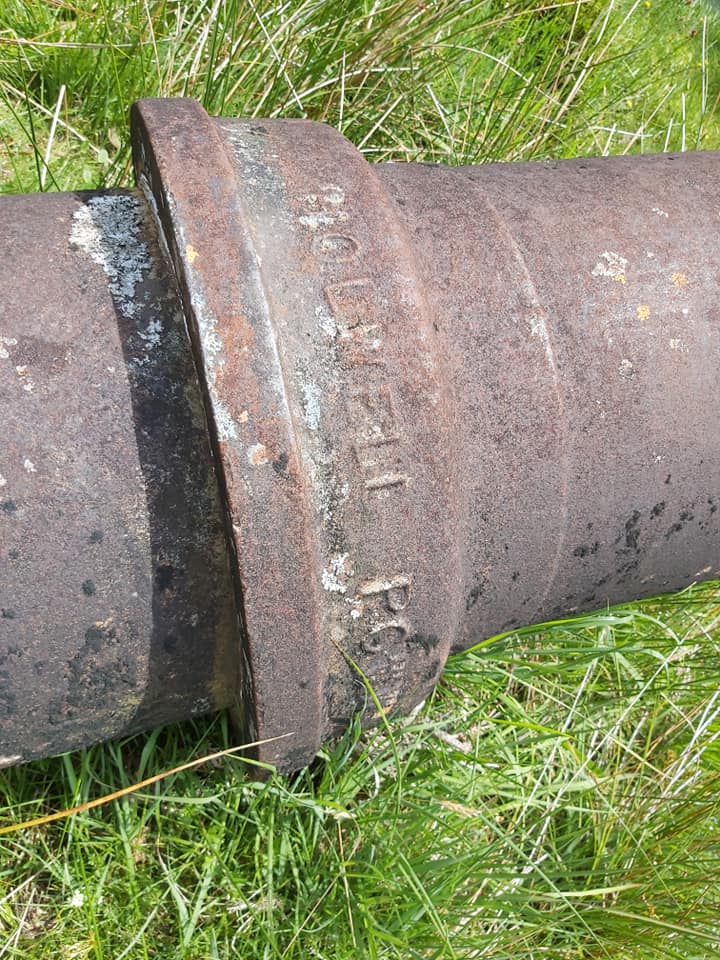
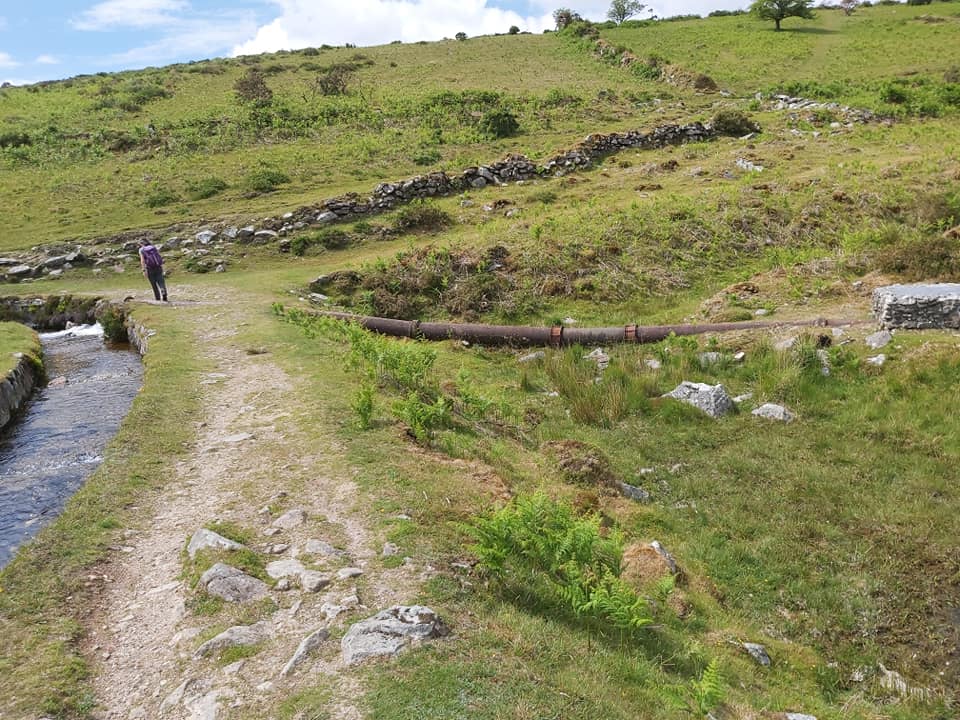
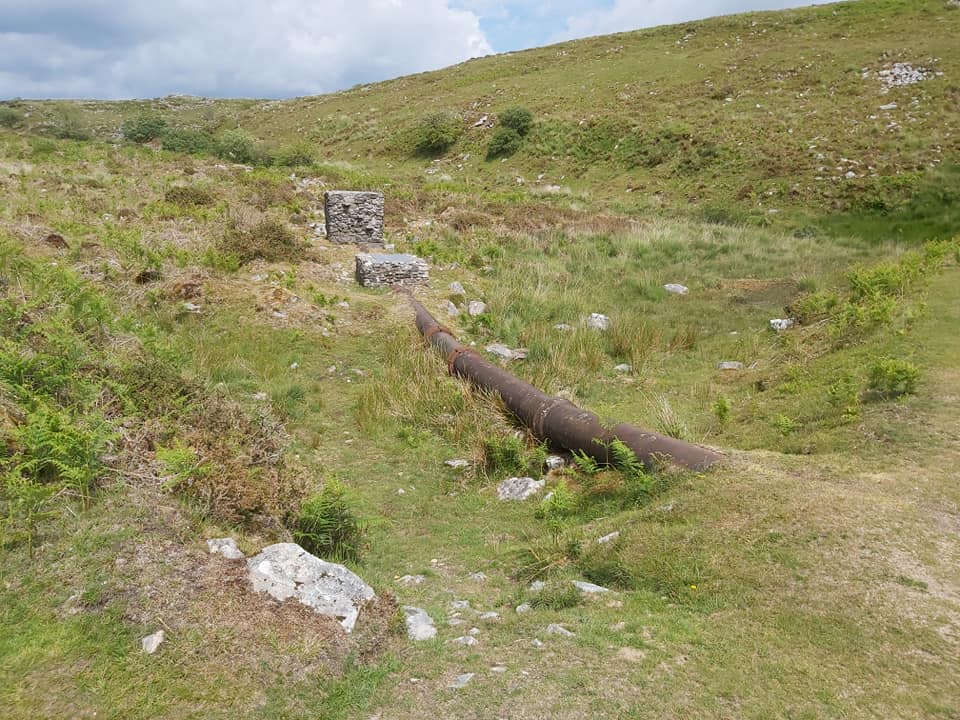
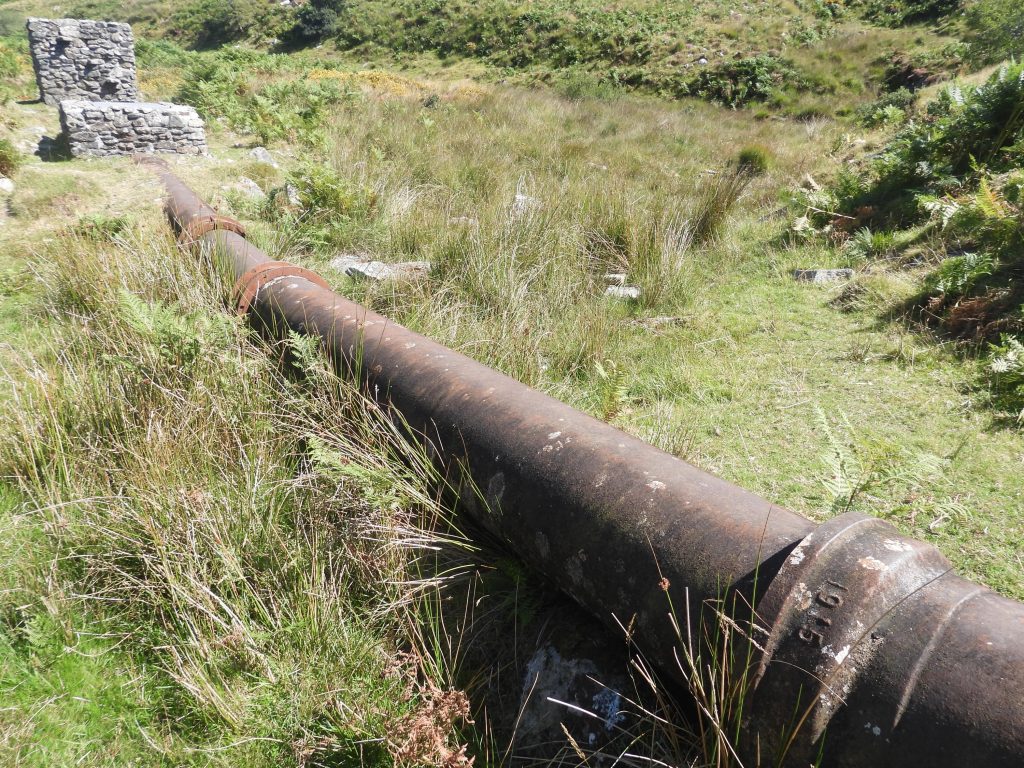
Junction of Hart Tor Brook (right) and man made channel (left) from River Meavy at SX57408 71498Looking down the River Meavy towards Hart Tor Brook junction. The sluice gate allowing the Meavy to continue on the right.Concrete structure taking combined Hart Tor Brook / River Meavy waters. SX57406 71494. The “narrowing” of the channel speeds up the flow rate ahead of entering an iron pipe (flow mechanics*). This was explained to me by Ted Dixon in the 1990s on a WEA night walk (Ted was a fabulous Dartmoor Guide who was also…..). One person has suggested an alternative explanation to this structure insofar as it’s part of a structure to measure flow rate from height difference. (*Note: For the technical : a x v = constant [ a= area of cross section of the pipe and v= velocity of flow], thus the narrower the channel, greater is the speed of flow).Iron pipe water inflow pointConstruction where iron pipe goes undergroundThe Iron Pipe crosses the River Meavy at SX57369 71447Holwell PCWW (Plymouth City Water Works) inscription on the pipe. This pipe dates from circa 1915 and Holwell probably relates to the Holwell Ironworks near to Asfordby Hill just outside Melton Mowbray, Leicestershire. The Holwell Iron Company was constructed in 1878 with the first iron being tapped in 1881.Devonport Leat Aqueduct . The pillars were constructed in 1792. An aqueduct carrying the Devonport Leat across the River Meavy is known as The Iron Bridge and was originally built in 1794The end of the iron pipe, augmenting Devonport Leat. It is believed this pipe is for times of low water in the leat to maintain the flow.The end of the iron pipe, augmenting Devonport Leat.The last few metres of the iron pipe, where the water flows uphill.Looking back up Meavy ValleyWater flowing uphill.Course of the water augmentation and the location of Keaglesborough Leat above the aqueduct“1915” date stamp on the pipeClose up of the “1915” stamp on the pipeView of the aqueduct and end of the water augmentation pipe from Raddick Hill
If my memory serves me correctly, I recall viewing a map, during a visit to the Plymouth & West Devon Records Office, that showed the boreholes. It was a few years ago now and was part of the research into the PCWW boundary stones, for the Plotting Plymouth’s Past project.
Thank you so much for this post. I took a walk out yesterday in glorious weather and visited the 12 Capped Bore Holes using the map in your post. I was surprised how easy they were to locate.


Mark Fenlon September 8, 2022
If my memory serves me correctly, I recall viewing a map, during a visit to the Plymouth & West Devon Records Office, that showed the boreholes. It was a few years ago now and was part of the research into the PCWW boundary stones, for the Plotting Plymouth’s Past project.
Mark Lockett October 4, 2024
Thank you so much for this post. I took a walk out yesterday in glorious weather and visited the 12 Capped Bore Holes using the map in your post. I was surprised how easy they were to locate.
SteveGriggDartmoor October 4, 2024 — Post author
Thanks Mark for your comments. Its a great area to explore